


34
6. IP Setting
To determine how the player obtains its IP address. The available options
are:
Auto (DHCP) - The player automatically obtains its IP address information
using DHCP (Dynamic Host Configuration Protocol). This is the default
setting. In most cases, automatic IP configuration is best and requires no
user intervention.
Manual – Manually enter the numeric IP address information. For more
information on how to manually configure the Internet connection and
what values to use, please consult your broadband router/modem
instruction manuals or call your Internet service provider.
IP Address – The Internet Protocol address of the player. When
"IP
Configuration" is set to "Auto (DHCP)", the value displayed here is
obtained using DHCP and cannot be changed.
Subnet Mask – Each IP address has an associated subnet mask. It is
used by the player to decide whether to route network traffic through the
router or directly to another device on the same network. When "IP
Setting" is set to "Auto (DHCP)", the value displayed here is obtained
using DHCP and cannot be changed.
Gateway – The IP address of the router. It is also called "default
gateway" or "default router". When "IP Setting" is set to "Auto (DHCP)",
the value displayed here is obtained using DHCP and cannot be
changed.
DNS 1 – The IP address of the first (primary) DNS (Domain Name
System) server. DNS is the mechanism to translate human-readable
addresses to numeric IP addresses. When "IP Setting" is set to "Auto
(DHCP)", the value displayed here is obtained using DHCP and cannot
be changed.
DNS 2 – The IP address of the second (secondary) DNS server. When
"IP Setting" is set to "Auto (DHCP)", the value displayed here is obtained
using DHCP and cannot be changed.
7. Proxy Setting
To configure the proxy server settings. A proxy server works as an
intermediary for network communication between clients and other
servers, which can provide benefits like security, anonymity, speedup or
circumventing regional restrictions.
On – To access the Internet via a proxy server.
Proxy Host: To enter the proxy host name using the remote control.
Proxy Port: To enter the proxy host port number using the remote
control.
Off (default) – Do not use a proxy server.
8. Connection Test
To test the Internet connection. It is recommended that you test the
connection when you initially connect the player to the Internet, or
whenever changes to "IP Setting" and other network parameters are
made.
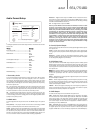
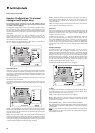
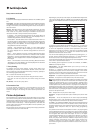
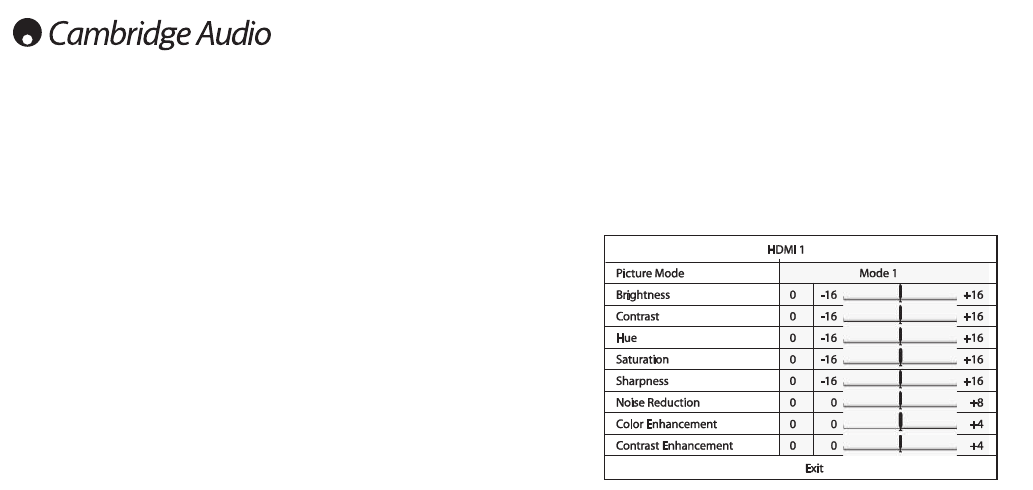
Picture Adjustment
Picture Adjustment is a special section of the Video Setup menu. It allows
you to fine tune many picture control parameters in order to achieve the
optimal picture quality and visual result. To use Picture Adjustment, press
the Setup button on the remote control to enter the player’s Setup Menu,
and then choose "Video Setup" – "Picture Adjustment", then select the
primary video output terminal. The Setup Menu will be replaced by the
Picture Adjustment menu:
For information on how to choose your primary video output, please refer
to Primary Output section of this manual.
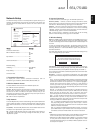
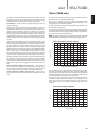
Depending on your primary video output, the detailed Picture Adjustment
menu will be slightly different as HDMI1 uses the Marvell QDEO scaler
which has more sophisticated features and algorithms for adjustment as
below.
To change a picture adjustment parameter, use the / buttons to
highlight the parameter, and use the / buttons to change its value.
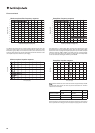
To aid in the adjustment of picture control parameters, the picture
adjustment menu will be reduced to only show the parameter being
adjusted once you press the / buttons. The reduced menu will be
positioned near the bottom of the screen.
You can continue adjusting the current parameter by pressing the /
buttons. To select another parameter, press the / buttons. Press the
Enter button to return to the large Picture Adjustment menu.
To exit the Picture Adjustment menu and return to the Setup Menu, either
select
"Exit" or press the Return button.
The following picture adjustment controls are available, for HDMI1,
HDMI2 and Component video:
Picture Mode – The 651/751BD allows you to save up to three (3)
customized video modes.
Press the / buttons to switch the mode and all parameters will be
automatically adjusted to their stored values. Changes to the current
parameter values will be stored automatically when you exit the Picture
Adjustment screen or, switch to another Picture Mode.
Brightness – To adjust the brightness (black level) of the video output.
Contrast – To adjust the contrast (white level) of the video output.
NNoottee
: Proper brightness and contrast settings are necessary for a quality
video output. If you do not have the correct black and white levels, your
images can appear washed out or can lose detail in shadows when
watching darker scenes. Televisions have brightness (black level) and
contrast (white level) controls; however it may require a combination of
tweaking both the player and your television to get the optimal result.
First adjust the television’s picture controls for the best possible picture.
Once that is done, try changing the player’s settings to further refine the
picture to the optimal result.
Hue – To adjust the hue (tint) of the video output.
Saturation –To adjust the saturation (colour intensity level) of the video
output.
Sharpness – To set the sharpness of the video output (Detail/Edge
Enhancement), this a video processing function that can control the
image sharpness but if overdone may cause unwanted artifacts.
For HDMI 1, the sophisticated QDEO video scaler is used sharpness level
can be set between -16 and +16. The default is level 0, which turns off
sharpness enhancement. The negative levels may be used to reduce or
eliminate overly sharpened video, the picture being progressively
softened.
The positive levels increase the sharpness. At level 1, the player applies
low level Detail Enhancement, during which the video processor isolates
the detailed parts from the original image, processes them separately
and integrates back before the final output. At level 2, the player
increases Detail Enhancement to a higher level. Generally, to make an
image “sharper”, we recommend using level 1 and 2. At level 3 and
above, the player adds Luminance Transition Improvement (LTI) and
Chroma Transition Improvement (CTI), which further sharpen the
luminance transition and chroma transition. However, we do not
recommend using level 3 and above unless the source content is from a
poor source.
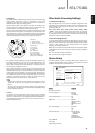
Setup menu continued
Picture Adjustment
Please select your video output
HDMI 1
HDMI 2 & Analog