


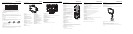


Remote Control
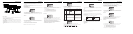
18. Stop button
Press to stop playback, then press the PLAY button to resume normal playback.
19. F.BWD Button
Press to search forward under DVD mode.
20. F.FWD Button
Press to search backward under DVD mode.
21. SLOW /STEP button
Press to activate slow forward or slow rewind or start step frame by frame under DVD mode.
22. MUTE button
Press to turn on/off the speaker output.
23. PREV Button
Press to skip to the previous chapter/track for some discs under DVD mode.
24. NEXT Button
Press to skip to the next chapter/track for some discs under DVD mode.
25. PROG button
Allows the player to play the contents in a programmed sequence under DVD mode.
26. ZOOM button
When a DVD is playing, press this button to activate zoom funciton.
27. GOTO Button
To search specified section of a DVD disc or a CD disc.
28. A-B Button
Repeat certain portion of a performance
29. REPEAT Button
Repeat a title ,chapter or track .
30. DISPLAY Button
Press to show current playback status. To quit display mode, just keep on pressing until all the
infomations disappear from the screen.
31. SOUND Button
Press sound button to adjust sound output mode
32. P/N.SYS Button
Press to select NTSC or PAL system under DVD mode.
NOTE: Refer to playback function for detailed descriptions.
7
Remote Control
8
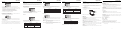
Unit View
Rear Panel
1. Antenna in jack
Connected to external antenna to receive TV program in TV mode.
2. L/R audio input jacks
Connection for external audio input under VIDEO, S-VIDEO or COMPONENT mode.
3. Video input jack
Connection for external video input.
4. PC Audio Input jack
Connection to the audio output jack on a personal computer.
5. Y/Cb/Cr Component Video Input
6. S-Video input jack
Connection for S-Video input.
7. DC 12V power supply cord
8. L/R audio output jacks
9. Video output jack
10. Coaxial digital audio jack
11. VGA Input jack
Connection to the VGA output jack on a personal computer.
5
Disc Information
Discs Formats Supported By This Player
The operating method of some DVD discs is specified by the software maker.
Please refer to the instruction manual of the disc.
The DVD Player will play most recordable (CD-R) or erasable (CD-RW) CDs, but
playback of CD-R or CD-RW discs created on a computer requires proper formatting
and finalization of the disc for audio playback.
Some computers and/or software
programs may not be capable of creating compatible discs.
About Disc Terms
Title
Generally, pictures or music compressed on a DVD are divided into several sections, "title".
Chapter
The smaller section unit of picture or music in a DVD under the title, usually one title is comprised of
one or more chapters and each of them is numbered for easy searching. But some discs may not have
a recording chapter.
Track
A segment of picture or music on a CD. Each track is numbered for searching.
Care of Disc
Video disc contains high-density compressed data that needs proper handling.
1. Hold the disc with fingers by outer edge and/or the center spindle hole. Do not touch the disc surface.
2. Do not bend or press the disc.
3. Do not expose the disc to direct sunlight or heating sources. Store discs in cabinet vertically, and in
dry condition. Prevent exposure to :
Direct sunlight
Heat or exhaust from a heating device
Extreme humidity
Clean the disc surface with a soft, dry cleaning cloth. Wipe the disc surface gently and radically from
center toward the outer edge.Do not apply thinner, alcohol , chemical solvent, or sprays when
cleaning. Such cleaning fluids will permanently damage the disc surface.
3
Disc mark Contents Size Maximum playback time
DVD video
discs
Audio+Video
(moving picture)
CD
Audio
12cm
12cm/8cm
133 min (SS-SL)
242 min (SS-DL)
266 min (DS-SL)
484 min (DS-DL)
74min/20min
MP3
JPEG Still high resolution 600min
Audio
12cm 600min
Remote Control
Remote Control Drawing
1. POWER button
Press to access to or exit the STANDBY mode.
2. Open button
Press to open or close the disc tray.
3. TITLE button
When a DVD disc is playing, press to go to title menu
if the disc contains.
4. ANGLE button
Press to access various camera angles (if the DVD
disc contains multiple camera angles).
5. SUBTITLE button
When a DVD is playing, press to select a subtitle
language (if the DVD disc contains multiple subtitles).
6. AUDIO button
Press to access various audio languages (if the DVD
disc contains multiple audio languages). Press to
select Sound effect from STEREO/MONO under TV
mode (if there is an ASP signal detected, the TV audio
will turn to ASP mode automatically)
7. MENU button
Press to access the disc menu during DVD playback.
8. MODE button
Press to shift modes among DVD, VGA, VIDEO,S-
VIDEO, TV, COMPONENT mode.
9. DVD SETUP button
Press to access the DVD setup menu under DVD
mode.
10. LCD SETUP button
Press to access to LCD functional setup menu.
11. DIRECTION BUTTON
Press to move cursor.
12. OK button
Press to make confirmation
13. NUMERIC KEY PAD
Select numbers by pressing these buttons.
14. -/-- button
Under TV mode press to chose channel. For example if you want to select channel 52, you can
press the button twice repeatedly until OSD display --, and then input number buttons 5, 2.
15. CH+/- BUTTON
Under TV mode, press to choose the channel.
16. VOL+/_ button
Press to increase or decrease the speaker volume level.
17. Play/Pause button
Press to play/pause the disc under DVD mode.
6
OPEN
TITLE
ANGLE
SUBTITLE
RETURN
MODE
DVD SETUP
AUDIO
LCD SETUP
VOL
PLAY/PAUSE STOP
SLOW/STEP MUTE
NEXT
PREV
F.FWD
F.BWD
PROGRAM
GOTO
A-B
REPEAT
ZOOM
SOUND
P/N.SYS
DISPLAY
CH
OK
MENU
POWER
1
2
3
6
5
4
7
8
9
0
-/--
TFT-DVD REMOTE
COBY
1
13
2
3
4
5
6
8
7
11
12
9
14
10
16
18
17
20
19
27
25
26
31
15
21
22
23
24
28
29
30
32
7
OPEN
TITLE
ANGLE
SUBTITLE
RETURN
MODE
DVD SETUP
AUDIO
LCD SETUP
VOL
PLAY/PAUSESTOP
SLOW/STEPMUTE
NEXT
PREV
F.FWD
F.BWD
PROGRAM
GOTO
A-B
REPEAT
ZOOM
SOUND
P/N.SYS
DISPLAY
CH
OK
MENU
POWER
1
2
3
6
5
4
7
8
9
0
-/--
TFT-DVD REMOTE
COBY
Remote Control
Preparation of Remote Control
1. Take the back cover off of the remote control and insert two AAA batteries and put on the cover.
Insert the batteries while observing the correct (+) and (-) polarities.
2. Under normal use, the battery will last for six months.
Using of Remote control
Point the remote control unit from no more than about 7meter from the remote control sensor and
within about 60 degrees of the front of the unit.
The operating distance may vary depending to the brightness around.
Notes:
Do not point bright lights directly at the remote control sensor.
Do not place objects between the remote control unit and the remote control sensor.
Do not use this remote control unit while simultaneously operating the remote control unit of any other
equipment.
2
1
3
5
6
8
9
11 10
7
4
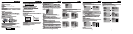
Unit View
4
1. MUTE button
Press to turn on/off the speaker output.
2. ENTER button
3. MENU button
The same function as the LCD SETUP
button on the remote control.
4. CH -/+ button
Press to select channels backward/forward
While in TV mode, the same function as
DOWN/UP direction button when in LCD
menu set up.
5. VOL-/+ button
Press to decrease / increase the volume.
6. MODE button
Press to shift modes among DVD, VGA,
CATV,VIDEO, S-VIDEO,COMPONENT mode.
7. POWER button
Press to access to or exit from the STANDBY
mode.
8. LCD Screen
Present high resolution pictures.
9. Speakers
10. Disc Loading Slot
Used for loading discs.
11. PREV/NEXT Button
Press to skip backward /forward DVD
chapter or CD track
12. PLAY/PAUSE Button
Press it once to start playback.
Press it twice to pause playing.
Press it the third time to resume playback.
13 .STOP Button
Press the Stop button once to have a stop.
It will start playing from where it is stop
once PLAY/PAUSE button is pressed.
Press the Stop button twice to have a stop
It will start playing from the beginning once
PLAY/PAUSE button is pressed.
14. EJECT button
Press to eject /take in the disc.
15. Power On Indicator
In normal playback status, it turns green
16. Remote sensor
16
15
14
11
12
13
123 4 5 67
9
10
8
Front/Top/Side Panel