TV Function
P. Lock: If the P. Lock is selected, input a 4-digit code to enter the P Lock menu. (Enter 1234 if it is the
first use.) If the wrong code is input, the P. LOCK menu will not appear on screen.
2. To exit the Extra setup menu press up/down direcition button to highlight Exit, and press OK to
confirm.
P Lock:
Some movies and TV programs include signals that classify the contents of the program. The P. Lock
control feature in the TV detects the signal and blocks the programs according to your selections.
The default password to enter the system is 1234.
To change the password, please select the New Code item, and enter your desired 4-digit code.
Please keep a copy of it in a safe place. If the password is lost, the defaults setting will not be reverted
to the original password.
There are two Rating systems: TV for broadcasters and MPAA for movies.
There are sub-categories within these ratings. As the rating increases, so does the intensity of the sub-
category.
(I.e.) Under PG, V would be moderate violence. Under MA, V would be graphic violence.
D- Suggestive dialogue
L- Indecent language
S- Sexual situations
V- Violence
13
AV Function
AV Function
The player has AV functions. You can enjoy programs from external input sources such as recorder,
vidicon, satellite receiver or game player etc.
Connect the external AV signal source to S-VIDEO or VIDEO jack, and then turn on the power of the
unit, and press the MODE button to shift to the VIDEO / S-VIDEO /COMPONENT mode.
Picture Parameters setup (S-VIDEO/COMPONENT MODE)
1. Under the S-VIEDO or COMPONENT mode, press the LCD SETUP button once on remote control
to access picture parameters setup menu, the screen will display as below:
2. Press up/down direction button, it appears SYSTEM setup menu and FUNCTION setup menu.
3. To exit the menu, press LCD SETUP button again, or press direction button to highlight the EXIT
and then press OK to confirm
IMAGE Setup
1. Press up/down direction button to highlight the Image setup menu. And press OK to confirm.
2. Press up/down direction button to highlight the desired option and press OK to confirm.
3. Press left/right button to make adjustment. And press OK to confirm.
4. To exit the Image setup menu, highlight Exit and press OK to confirm.
NOTE: When in component mode, the Hue item is unavailable.
SYSTEM Setup
1. Press up/down direction button to highlight the System setup menu. And press OK to confirm.
2. Press up/down direction button to highlight the desired option and press OK to confirm.
Picture: Press up/down direction button to select the item from
Dynamic/Normal/Soft.. Press OK to confirm.
Audio: Press up/down direction button to select the item from
Standard/Classic/Rock/Jazz/Pop. Press OK to confirm
3. To exit system setup menu, highlight EXIT and press OK button.
14
TV Function
SYSTEM Setup
1. Press up/down direction button to highlight the System setup menu. And press OK to confirm.
2. Press up/down direction button to highlight the desired option from Picture/Audio.
Press OK button to confirm.
Picture: Press up/down direction button to select the item from
Dynamic/Normal/Soft.. Press OK to confirm.
Audio: Press up/down direction button to select the item from
Standard/Classic/Rock/Jazz/Pop. Press OK to confirm
3. To exit system setup menu, highlight EXIT and press OK button.
FUNCTION Setup
1. Press direction button to highlight the Function menu. And press OK button to confirm.
2. Press direction button to highlight the desired option from Noise Reduce/input Source,
and press OK to confirm the selection.
Noise Reduction: press direction button to choose from ON/ OFF, and press OK to confirm.
If ON is selected, the image will be shown clearly, but with unclear background.
If OFF is selected, both image and background are displayed normally.
Input Source: a certain input mode has been tickled to indicate current situation
Press direction button to change the desired mode from DVD/VGA/VIDEO/S- VIDEO/TV/
COMPONENT and press OK to confirm.
3. To exit function setup, highlight EXIT and press OK button.
11
PICTURE
AUDIO
EXIT
SYSTEM
EXIT
FUNCTION
EXIT
TV Function
CHANNEL Setup
1. Press direction button to highlight the Channel setup menu. And press OK button to confirm .
2. Press direction button to highlight the desired option and press OK to confirm the selection.
Refer to table 1 for detailed description.
NOTE: The program will be skipped when the signal is weak.
EXTRA Setup
1. Press direction button highlight the Extra setup menu and press OK to confirm.
Closed Caption: if the Closed Caption is selected, press direction button to select an option :
CC1 CC2 CC3 CC4 T1 T2 T3 T4 OFF
If OFF is selected, the caption will be hided.
NOTE:
The Closed Caption operation is not allowed on some movies and TV programs.
12
AUTO SEARCH
ANTENNA
TUNING
SKIP
EXIT
CHANNEL
EXIT
Item Selection Instruction
Auto
Search
Tuning
Skip
Search the channels from low to high,
and reserve the channels auto-
matically. The reserved channel will
be displayed on screen. Press OK
to stop searching.
Press right direction button to increase fine tune.
Press left direction button to decrease fine tune.
In order to improve the picture
and sound, you can use the function to
adjust the received program, and then
press OK to reserve it.
Press up/down direction button to select ON or OFF. Set "ON" to skip the present program.
It will not be displayed .
To restore to normal , set it to "OFF"
Search:
PRG:
17
1
Press up/down direction to select Air or Cable.
Press up/down direction button to highlight Search
Press OK to start autosearch
You can select an outer antenna or the
cable TV
Antenna
(Table 1)
EXIT
Closed Caption
P, Lock
Exit
EXTRA
P. Lock
EXIT
TV Rating
MPAA Rating
New Code
Exit
TV Rating
TV-MA:Mature audience only
TV-14: Not intended for ages under 14
TV-PG:Parental guidance suggested
TV-G:General audience
TV-Y7:For children age 7 and above.
TV-Y:All children
MPAA Rating
NR: Unrestricted
X: For adults only
NC17:Not intended for ages under 17
R: Restricted
PG-13:Not intended for ages under 13
PG:Parental guidance suggested
G:General audience
IMAGE
EXIT
IMAGE
EXIT
PICTURE
AUDIO
EXIT
SYSTEM
EXIT
NOISE REDUCTION
INPUT SOURCE
EXIT
TV Function
TV Function
Preparations
1. Connect the antenna to the antenna jack on the unit side panel.
2. Connect the power supply cord. If the player is in standby mode, press the POWER button to turn
on the power.
3. Press the MODE button to select the TV mode.
4. Press CH buttons on the remote control, or use the number buttons directly, to select the channel
that you wish to view.
Picture Parameters setup
1. Press the LCD SETUP button once on remote control to access picture parameters setup menu, the
screen will display as below:
2. Press up/down direction button, it appears in succession SYSTEM setup menu, FUNCTION setup
menu, CHANNEL setup as well as EXTRA setup menu. Press OK button to confirm .
3. To exit the menu, press LCD SETUP button again, or press direction button to highlight the EXIT
and then press OK to confirm
IMAGE Setup
1. Press up/down direction button to highlight the Image setup menu. And press OK to confirm .
2. Press up/down direction button to highlight the desired option from Contrast/Brightness/Saturation/
Sharpness/Hue. Press OK to confirm.
3. Press left/right button to make adjustment. And press OK to confirm.
4. To exit the Image setup menu, highlight Exit and press OK to confirm.
NOTE: When in component mode, the Hue item is unavailable.
10
CONTRAST
BRIGHTNESS
SATURATION
SHARPNESS
HUE
EXIT
IMAGE
EXIT
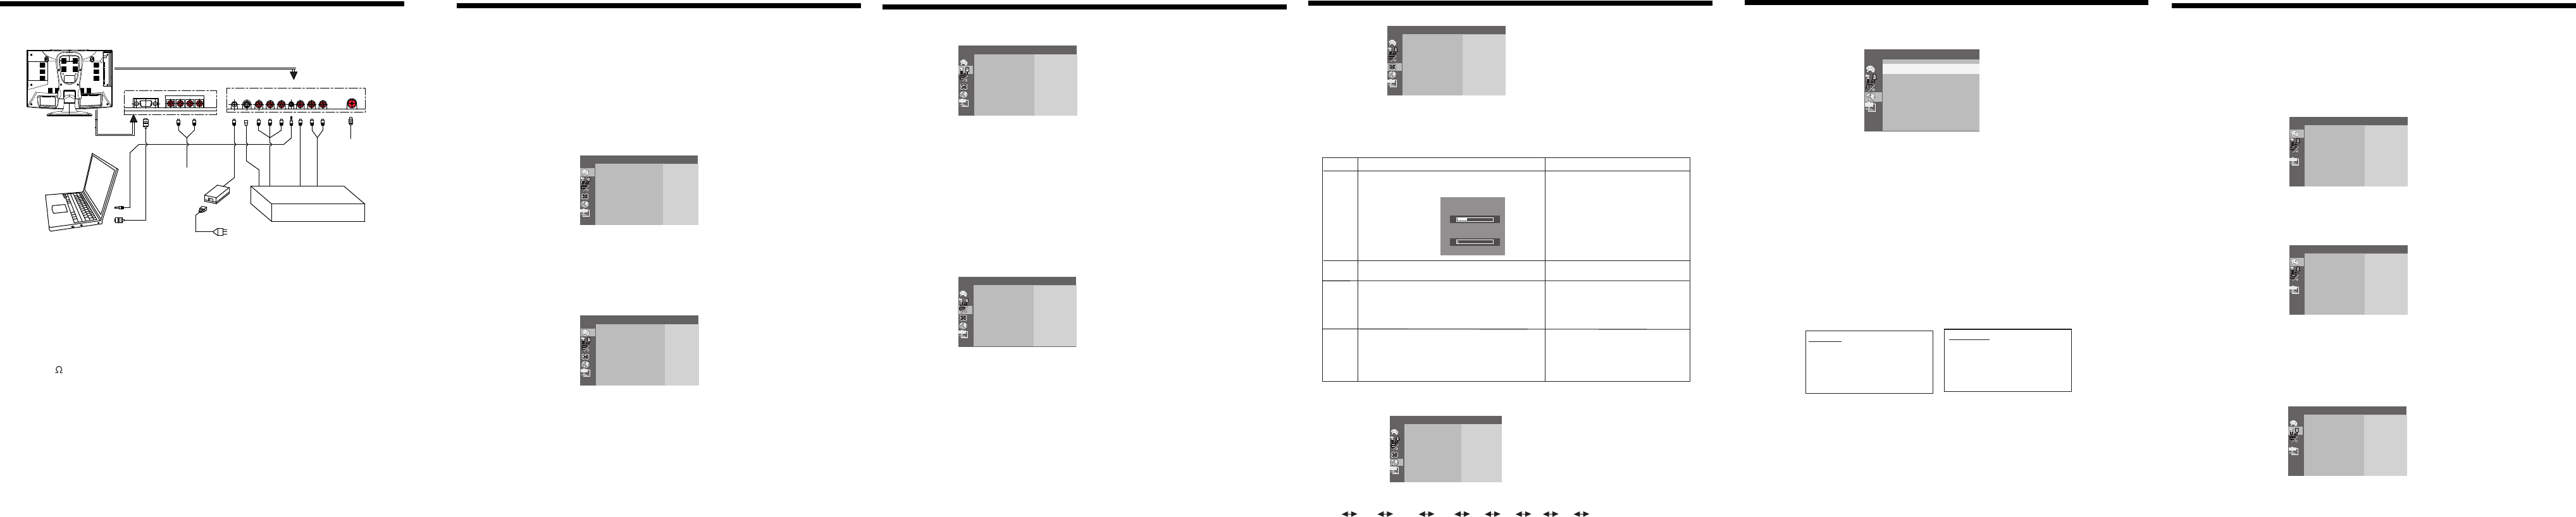
Cable Connections
9
For your reference:
1. Connect TV RF sources to antenna port. TV RF signals include: receiving antenna/CATV net. You
can use 75 coaxial cable to connect outdoor antenna.
2. Connect the earpiece to the "phone" port.
3. Connect audio sources (including DVD/VCR/CAMCORDER/PC) to the proper audio input ports "L"
and "R" by RCA cable.
4. Connect video sources (DVD/VCR/CAMCORDER) to the "VIDEO" or "S-VIDEO" port by RCA cable
or S-VIDEO cable.
5. When used as computer screen, the PC port should be connected to computer display output by 15-
pin D-SUB signal cable.
6. Insert the AC power to the DC adapter, then connect 12v input port of the Display to its' DC output
port.
DVD OR VCR
DC
12V
S-VIDEO
VIDEO
OUT
COAXIALT
Y Cb Cr
AUDIO
PC
V
E
D
I
O
L R
AUDIO IN
TV ANT
IN
VGA
P-SCAN
ADAPTER
AC INPUT
Figure. Cable connections
R L
AUDIO OUT
CONTRAST
BRIGHTNESS
SATURATION
SHARPNESS
HUE
EXIT
IMAGE
EXIT
CONTRAST
BRIGHTNESS
SATURATION
SHARPNESS
HUE
EXIT
CONTRAST
BRIGHTNESS
SATURATION
SHARPNESS
HUE
EXIT


