


Error! Use the Home
tab to apply
1 to the text that you want to
appear here. Error! Use the Home
tab to apply 1 to the text that
you want to appear here.
57
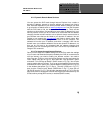
8.2.3 Dynamic Domain Name Services
You can access the DVR card through Internet Explorer from a static or
dynamic IP address; however a dynamic address can change from time to
time. How often depends on your service provider. When it changes you need
to go to back to a website such as www.myipaddress.com from the computer
with the DVR card to find out what the new IP address is. There are two
solutions to this problem. One would be to get a static IP address from your
service provider so that you do not have to be concerned with the address
changing. Another solution would to use a dynamic domain name service to
get a domain name that can be linked to your dynamic IP address. You can
register on our support site: myq-see.com and create a domain name, then
download the client software program and install it on the computer. This
software will monitor your IP address, and when it changes it will link the
domain name you created to whatever the current dynamic IP address is, so
that you do not have to be concerned with the address changing and
preventing you from accessing the DVR card. This service is provided free of
charge to our customers.
8.2.4 To Access through Internet Explorer
Once you have setup the network settings on the DVR to match the settings
of your router and forwarded the ports needed by the DVR (for remote access
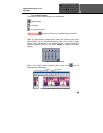
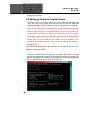
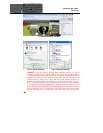
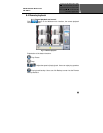
over the internet), you need to modify your browser controls. You need to
allow Pop-ups. To do so go to the Internet Explorer tool bar and select the
"tools" option (RED box in Fig 7.6), then select the "Pop up Blocker" option
and select "Turn Off Pop-up Blocker” (BLUE arrows in Fig 7.6). You will also
need to enable Active X controls. To do so go to the Internet Explorer tool bar
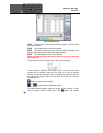
and select the "tools" option, then "Internet Options"(GREEN arrow in Fig 7.6),
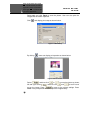
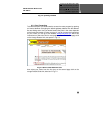
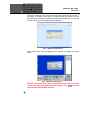
In the windows that opens (Fig 7.7) Go to "Security" (RED box in Fig 7.7),
then click the "Custom Level" button (GREEN box in Fig 7.7), then click on
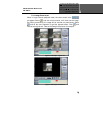
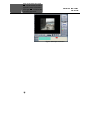
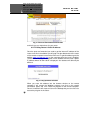
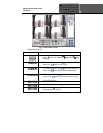
OK (BLUE arrow in Fig 7.7). This will open the page shown in Fig 7.8. On this
page scroll down to the ActiveX Controls and Plug Ins and make sure they are
all set to either prompt (RED arrows) or enabled (BLUE arrows).