Fixed Local Network Address
STEP 3 Static Internal IP (Network) Address
Most routers assign connected devices a random IP address that is not
currently in use by another device on your internal network. With the
exception of 2Wire brand routers, when a router or networked device
reboots due to a power loss or other issue, the addresses will change and
the port forwarding configuration will no longer work. For that reason, we
recommend changing your DVR’s network setting to a fixed, or “static” IP
address which will not change.
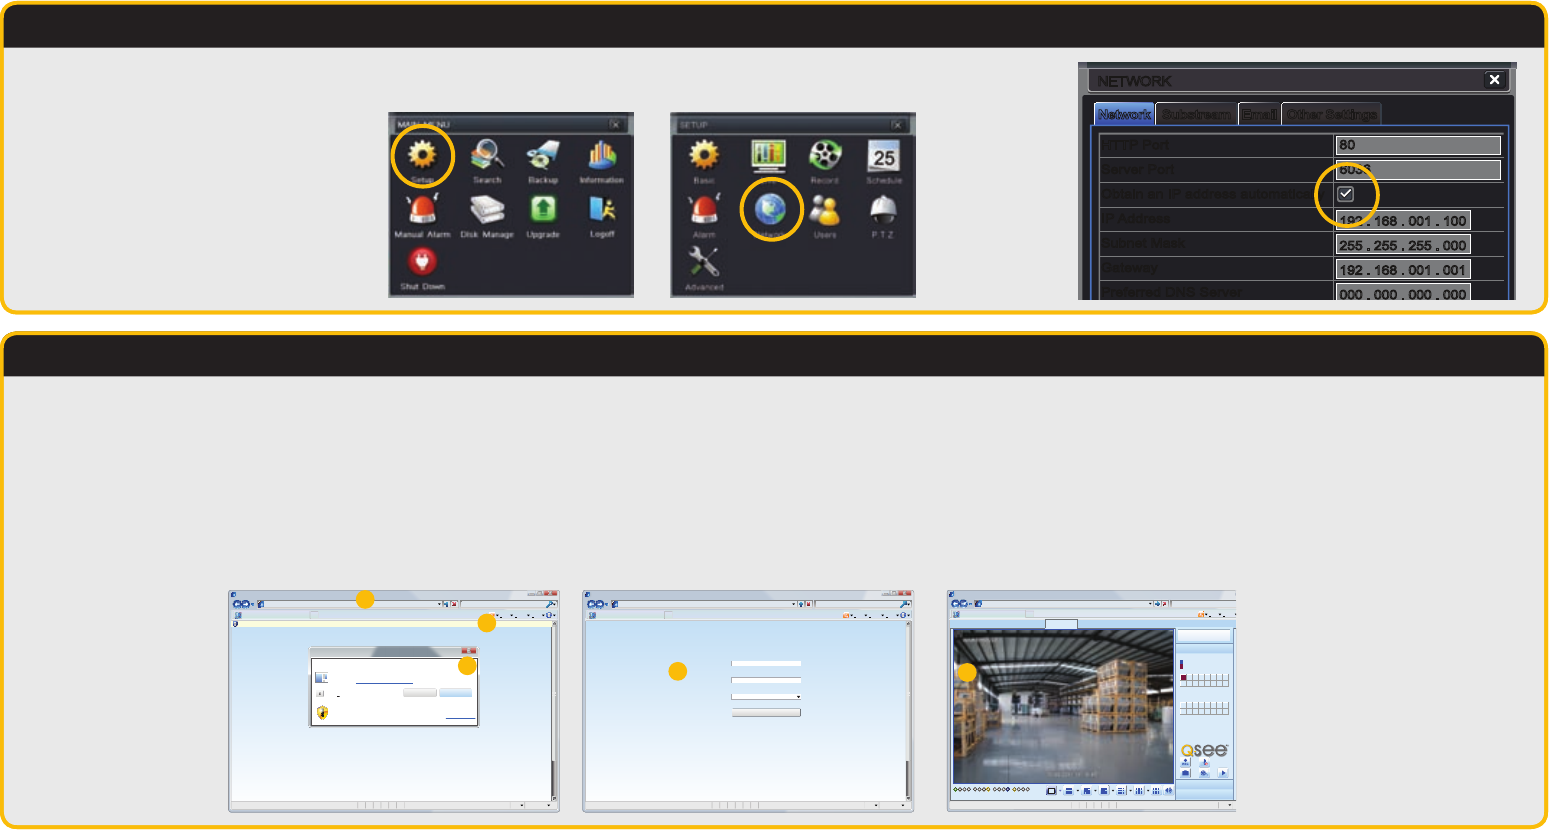
A. Click on the Setup icon in the Main Menu.
C. Uncheck the box
labeled “Obtain IP Address
Automatically”.
D. Click Apply and then Exit.
NetworkNetwork SubstreamSubstream Other SettingsOther SettingsEmailEmail
NETWORKNETWORK
DefaultDefault
ApplyApply ExitExit
TestTest
HTTP Port
Server Port
Obtain an IP address automatically
IP Address
Subnet Mask
Gateway
Preferred DNS Server
Alternate DNS Server
PPPoE
User Name
Password
HTTP Port
Server Port
Obtain an IP address automatically
IP Address
Subnet Mask
Gateway
Preferred DNS Server
Alternate DNS Server
PPPoE
User Name
Password
80
6036
192 . 168 . 001 . 100
255 . 255 . 255 . 000
192 . 168 . 001 . 001
000 . 000 . 000 . 000
000 . 000 . 000 . 000
80
6036
192 . 168 . 001 . 100
255 . 255 . 255 . 000
192 . 168 . 001 . 001
000 . 000 . 000 . 000
000 . 000 . 000 . 000
B. Click on the Network icon in the Setup Menu.
Accessing Your DVR Remotely
STEP 4 Using the Web Client Software
Now that your ports have been successfully forwarded, you are now able to access your DVR from
your computer using Internet Explorer. Macintosh users, or PC users who prefer to use Safari,
should refer to the Macintosh Remote Access Guide on the CD that came with your DVR, or which
is available from www.Q-See.com/Support.
Whether you are monitoring your DVR from a computer on the same local network (LAN), or on
one at a remote location (WAN/Internet), the procedure is the same. The only difference is that for
LAN access you will be entering your DVR’s IP address, which you obtained in Part 1 Obtain an IP
Address, while for Internet access you will use the Public IP Address which was shown at the end
of Part 2 when you visited www.canyouseeme.org
A. Enter the appropriate address in the address bar of a Windows Explorer browser window in the
same manner as you’d enter any web address using either the DVR’s IP address or Public IP ad-
dress as described above.
B. When the web page loads, you may receive a warning message along the top of the page indicat-
ing that an ActiveX control was blocked. You will need to click on the warning message bar to
unblock it.
C. You will be asked to install the file “WebClient.cab”. Click Allow to begin the download.
D. When the Web Client plug-in is fully downloaded, it will launch in the web page and present you
with a login screen. Enter the same user name and password that you use when accessing the
DVR. You may also choose your preferred language.
E. Once you have logged in, the webpage will show the view from Camera 1 along with on-screen
controls to allow you to monitor and direct your DVR. Please consult the Remote Monitoring Guide
included on the CD that came with your DVR or available on our website, for instructions on how
to use the software.
NOTE: Depending upon your security settings, your computer may ask you multiple times to confirm the installation and running of this application. This
Explorer plug-in is being downloaded from your DVR itself and should list Digital Peripheral Systems, Inc. as the publisher. Confirm the download and
launch of the software as needed. This authorization process should only occur during the first time you access the DVR from that particular computer.
Browser - Windows Internet Explorer
Fine 100%
Web Client
Page Safety Tools
hp://10.6.196.6
Protected Mode: On
LOGIN
LOGIN
User Name
Password
Language
admin
English
Browser - Windows Internet Explorer
Fine 100%
Web Client
Page Safety Tools
hp://10.6.196.6
Protected Mode: On
This website wants to install the following add-on: “WebClient.cab” from Digital Peripheral Solutions Ltd.” If you trust the website and the add-on and want to install it, click here...
Do you want to install this soware?
Name:
Publisher:
More opons
While files from the Internet can be useful, this file type can potenally harm
your computer. Only install soware from publishers you trust. What’s the risk?
WebClient.cab
Digital Peripheral Soluons Ltd.
Don’t Install
Don’t Install
Install
Install
Internet Explorer - Security Warning
Browser - Windows Internet Explorer
Fine
Web Client
Page Safety
hp://10.6.196.6
Protected Mode: On
LIV E SEA RCH BAC KUP TOO LS INFOCON FIG
2011-10-06 18:16:49
Status
P.T.Z
Color
Master Stream
Sub-Stream
Local Recording Status
1 2 3 4 5 6 7 8
9 10 11 12 13 14 15 16
1 2 3 4 5 6 7 8
9 10 11 12 13 14 15 16
A
D
E
B
C


