E-Mail Alerts
STEP 6 Sending E-mail
Your DVR can send e-mail notifications to up to three recipients. Depending on your DVR’s settings, the system can
generate heavy e-mail traffic. For that reason, we recommend creating a dedicated e-mail address specifically for
the system to send alert notices. If you do not have your own e-mail system (such as corporate mail server) you
should consider using a free e-mail provider. However, because many free e-mail services allow only a limited
amount of e-mail traffic we specifically recommend using Google’s Gmail service with its higher limit. Similarly, you
will want the alert e-mails to go to a different account than the one sending them. This will ease your management
of these alerts.
STEP 7 Setting E-mail Triggers
Now that you have your DVR configured to send e-mail
notificatioins, you will need to set up which events will
trigger a message. Most users prefer to receive alerts
when a camera detects motion. These alerts can also
include a still image of the event.
Instructions for additional settings are available in your
manual.
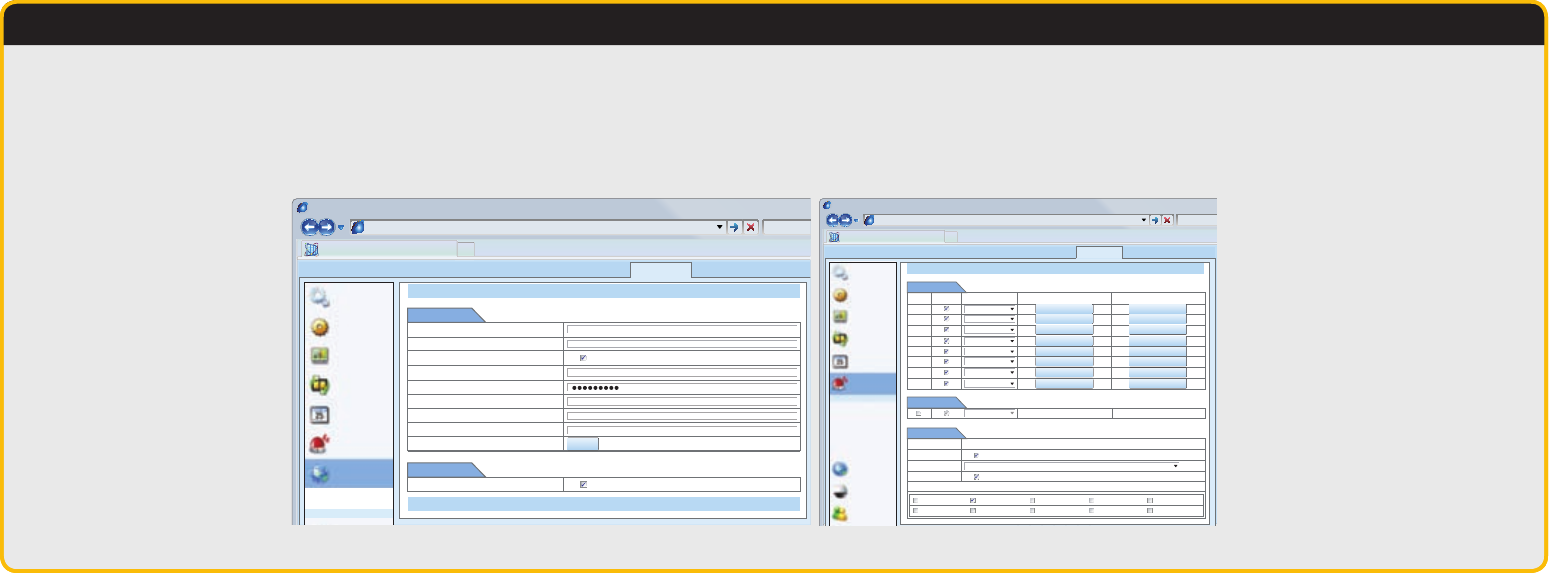
A. Select the Alarm icon from the menu on the left side of
the screen in the Config tab.
B. Click the box under Enable for each camera that you want
to send an alert when it detects motion.
C. For each camera selected, you will need to click on the
Setting button in the Trigger column.
D. Click on the box next to E-mail.
E. Under Snap, you can indicate which cameras will take
snapshots for the e-mail.
F. Repeat for each camera
G. Click on Apply to save your settings.
Browser - Windows Internet Explorer
Web Client
hp://10.6.196.6
LIVE SEARCH BACKUP TOOLS INFOCONFIG
Apply Default
Apply Default
Mail
SMTP Port
Port
SSL Check
Send Addr
Password
Receive Addr1
Receive Addr2
Receive Addr3
Advanced
Aaching Image
smtp.gmail.com
465
YourDVR@gmail.com
receive1@gmail.com
Test
Test
Local config
Basic
Live
Record
Schedule
Alarm
Network
Network
Sub-stream
Email
Browser - Windows Internet Explorer
Web Client
hp://10.6.196.6
LIVE SEARCH BACKUP TOOLS INFOCONFIG
Apply Default
Local config
Basic
Live
Record
Schedule
Alarm
Network
motion
Motion Schedule
Sensor
Sensor Schedule
Video Loss
Other Alarm
Alarm out
Alarm out Schedule
P.T.Z
Users
Moon
CH
1
2
3
4
5
6
7
8
Enable Holding Time[s] Trigger Area
10
Setting
Setting
Setting
Setting
10
Setting
Setting
Setting
Setting
10
Setting
Setting
Setting
Setting
10
Setting
Setting
Setting
Setting
10
Setting
Setting
Setting
Setting
10
Setting
Setting
Setting
Setting
10
Setting
Setting
Setting
Setting
10
Setting
Setting
Setting
Setting
All
10
Trigger
Channel 1
Buzzer
Show Full Screen
E-mail
Snap
1
5
2
6
3
7
4
8
None
A. Keeping the Web Client window open, open another
browser window and Create an e-mail account for your
DVR to use in sending out the alerts.
B. Back in the Web Client window, click on the Email link
below the Network icon to open the Email window.
C. Fill out the required information. Gmail settings are
shown:
SMTP Server – smtp.gmail.com
Port – 465
SSL Check – Gmail requires this to be selected.
Send Addresses – the Gmail address you created
Password – the e-mail password you entered when
creating your e-mail address
Receive Addresses – you may send notifications to up
to three addresses.
D. Press the Test button. A pop-up window will appear
indicating that the settings are being tested. It will be
replaced by a window indicating success.
E. Check this box if you wish to attach an image recorded
by the camera when it detects motion.
F. Click on Apply at the bottom to save your settings.
While these settings can be made in the Network window on the DVR, for the purposes of this demonstration, we
will continue to use the Web Client window and use settings for Gmail – other services will have different values and
these can be found in that provider’s Options settings.


