


8
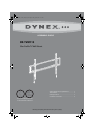
Installation instructionsDX-TVM113
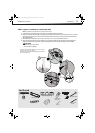
STEP 4 - Select screws, washers, and spacers
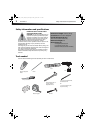
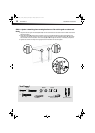
1 Select the hardware for your TV (screws, washers, and spacers). A limited number of TVs come with mounting
hardware included. (If there are screws that came with the TV, they are almost always in the holes on the back
of the TV.) If you don't know the correct length of the mounting screws your TV requires, test various sizes by
hand threading the screws.
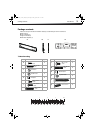
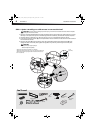
Select one of the following types of screws:
Select from the following washers:
For an irregular or obstructed TV back, use the following spacers:
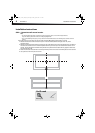
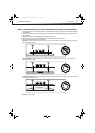
CAUTION: To avoid potential personal injuries and
property damage, make sure that there are adequate threads
to secure the brackets to your TV. If you encounter resistance,
stop immediately and contact customer service. Use the
shortest screw and spacer combination to accommodate your
TV. Using hardware that is too long may damage your TV.
However, using a screw that is too short may cause your TV to
fall from the mount.
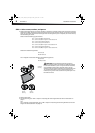
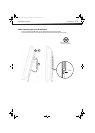
2 Remove the screws.
3 For a flat back TV, go to “STEP 5 - Option 1: Attaching the mounting hardware to TVs with a flat back“ on
page 9.
-OR-
For an irregular or obstructed back, go to “STEP 5 - Option 2: Attaching the mounting hardware to TVs with
irregular or obstructed backs” on page 10.
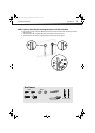
M4 × 12 mm screws (D) for flat backed TVs
M4 × 30 mm screws (E) for irregular or obstructed back TVs
M6 × 12 mm screws (I) for flat backed TVs
M6 × 20 mm screws (J) for flat backed TVs
M6 × 35 mm screws (K) for irregular or obstructed back TVs
M8 × 16 mm screws (L) for flat backed TVs
M8 × 40 mm screws (M) for irregular or obstructed back TVs
M4 washer (F)
M6/M8 washer (G)
M4 spacer (H)
M6/M8 spacer (N)
Screw is
too long
Screw fits
correctly
Screw is
too short
DX-TVM113_13-0321_MAN_V2_EN.fm Page 8 Friday, April 26, 2013 11:11 AM