


General Instruction
2
Warnings
Cautions
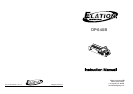
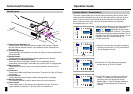
This is a 6 channel portable dimmer/pack. Each channel can individually
be set to dim or switch as well as accept separate DMX Addresses. For
your convenience, each channel can manually be controlled via our
simple to use, digital display and function buttons. The Panic function
allows you to select desired channels to switch ON constantly via the six
dip switch settings. The unit is also supplied with 3 & 5 pin XLR
connectors. The aluminum case makes the DP-640B one the lightest
portable dimmers of its kind.
Be sure that this unit is properly grounded.
Do not allow for any flammable liquids to come in close contact with this
unit.
Do not operate this unit if the internal components are exposed.
Handle this unit carefully, any strong shocks or vibration may result in
damage.
When unpacking, please check the unit for the damages. Should you find
something wrong with the unit, please contact the dealer that you
purchased it from immediately.
All rights reserved. No part of this manual may be reproduced, in any form
or by any means, without permission in writing from Elation Professional.
Specifications and improvements in the design of this product and this
manual are subject to change without written prior notice.
Notice:
To optimize performance of this product, please read these instructions
carefully to familiarize yourself with the basic operations.
Keep this unit dry, do not expose it to water or high levels of humidity.
Operation Guide
9
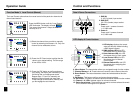
PANIC dip-switches 1~6:
Flip the dip switches of the desired channels to the "ON" position.
The selected channels will output 100%. Note: When operating
with DMX control, corresponding channels, with dip switches set
to "ON", will output 100% while channels with dip switches set to
the "OFF" position can be controlled from the DMX console.
PANIC
ON
MDON
654321
The Panic feature allows you to select desired channels, via dip switches 1-6, to
be constantly on.
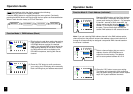
The DP-640B was designed to be mounted or free standing. It is recommended
that you use a suitable mounting clamp and safety cable when mounting clamp
and rigging to a truss structure. There are two sets of threads on the DP-640B.
They are in place for the mounting bracket. Use the bracket knobs and washers to
secure the mounting bracket to either side of the pack. For cooling purposes,
it is necessary to mount the pack so that air is free to circulate around the dimmer.
There should be at least 12 inches of clearance between the pack and anything
surrounding it.
The DP-640B is supplied with dual 20 Amp Edison plugs attached to 12 gauge
line cords. These cords should be connected to a service capable of suppling
20 amps per line cord and be protected by a properly sized main circuit breaker.
Lamp loads should be plugged into the dual 20 Amp Edison sockets which are
supplied on the face of the pack. 3 & 5 pin XLR's are supplied for the DMX input
and output of the data link. Connect out of the DMX controller orprevious fixture
in line and into the input of the DP-640B. Connect out of the DP-640B and into
the input of next pack or fixture in line. It is recommended that the last pack or
fixture in line include a DMX terminator into the output. A DMX terminator
consists of a 120 ohm, 1/4 watt resistor soldered across pins 2 & 3 of a standard
3 or 5 pin XLR connector.
Installation / Mounting
Connections
Only use an AC source that complies with the local building and electrical
codes.