


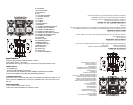
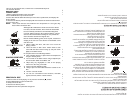

6. PROGRAM
7.CD PLAY/PAUSE
8.LCD DISPLAY
9.CFD
10. V OLUME CONTROL
11.CD STOP SWITCH
12.CD SKIP-
13. TUNING
14. CD SKIP+
15. B AND SWITCH
16 SPEAKER
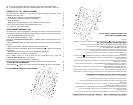
17. CASSETTE RECORD SWITCH
18. CASSETTE PLA Y SWITCH
19. CASSETTE REW SWITCH
20. CASSETTE FWD SWITCH
21 CASSETTE STOP/EJECT SWITCH
22. CASSETTE PAUSE SWITCH
23. CASSETTE HOLDER
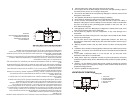
24 .A NTENNA
25. B ACK COVER
26. S PEAKER OUTPUT
TERMINAL(RIGHT).
27 SPEAKER OUTPUT
TERMINAL(LEFT)
28. A C SOC KET
29. A UDIO OUT
30. V IDEO OUT
31. JOYSTICK T ERMINAL
specifications
Frequency Range FM:88-108MHz,AM:530-1700KHz
Power Requirements 120V,60Hz
Specifications are subject to change for performance improvem ent without notice.
POWER SUPPLY
AC OPERATION
- THE AC POWER COR D IS LOCATED
- PLUG THE AC LINE CORD INTO ANY NORMAL HOUSEHOLD AC MAINS
OUTLET IN CORRECT VOLT AGE AND THE MAINS SOCKET.
STANDBY INDICATOR
When the power is connected to AC outlet, the STAND BY LED indicator will light up. You
have to press the POWER button on the unit or POWER button on the remote to turn on
the unit.
RADIO OPERATION
1. Connect the unit to the power source.
2. Slide the FUNCT ION SWITCH to "RADIO" position.
3. Se lect desired wav e band with the BAND S WITCH.
4. Tune to desi red station by rotating the TUNING KNOB.
5. Gently rotate this control back & forth unti l you get the strongest, clearest sound.
6. The built-in MW(AM) or LW antenna and the SW antenna rod are directional. When
receiving SW broadcast, extend the SW ELESCOPIC ANTENNA in full length.
The stronges t re ception can be ach ieved by rotating the set for MW(AM) or LW or
Telescopic Antenna for FM or SW.
7. Ad just the VOLU ME KNOB to your listening preference.
8. To turn off the radio, slide the FUNCTION SWITCH to "TAPE" position.
CASSETTE OPERATION
PLAYBACK OF CASSETTE
Be sure to tighten any slack tape in th e cassette before use, using either a pencil or a
ball-point pen, simply in sert the pen or pencil into the centre of spool and ro tate to remove
slackess.
Depress the S TOP/EJECT button to open the cassette door.
Insert the cassette into the compartment with the open end facing upward and the full reel
on the left hand side, push the cassette well down and clos e the door, be sure not to touch
the tape surface. Set the Function switch to "TAPE " position and press the cassette play
button. To stop playback, press the STOP/EJECT b utton again.
AUTO STOP
When the tape reaches the end during play back or recording, the built-in auto stop system
will release the depress ed play, record keys. The auto stop system operates while
recording from the built-in radio or CD player, only the cas sette function is brought
automatically to stop mode and the radio or CD Player will continue to play.
TAPE RECORDING
A. Install a cassette tape.
B. Set FUNCT ION SWITCH to "RADIO" position. After selecting the desired band and
tune the T UNING KNOB to desired broadcast s tation. Then push down RECORD
BUTTON and PLAY BUTTON simultaneou sly.
C. After recording the desired broadc ast, depress the STO P/EJECT BUTTON lightly, and
then set FUNCTION SWITCH to "TAPE" position in order to listen to the recorded
broadcast.
D. If you desire to play reco rded broadcast, please follow the instructions explained in
playback sec tion.
Note: Tape recording is also available for VCD/CD/MP3 playback (set FUNCTION
SWITCH to "VCD/CD/MP3" position). Similar as radio recording.
External MIC recording: S et FUNCTION SWITCH to "TAPE" position, pre ss the RECORD
BUTTON and PLAY BUTTON simultaneou sly and speak through external MIC.
TYPES OF CASSETTE
Use only good quality cassettes (IEC TYPE 1) for making recordings. Ma y be used to
replay other ty pes of cassette but is unable to make proper recordings on these more
specialized tapes.
The us e of C120 cassettes is NOT recommended in this ma chine.
PROTECTING RECO RDING
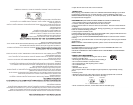
24
27
26
25 28
29
30
31
8
10
3
11
5
6
13
12
4
97
2
14
17
18
19
20
21
22 23
15
16 16
5.Suavemente gire el control de sintonización hacia adelante y hacia atrás hasta obtener un
sonido bueno y claro.
6.El cable incorporado de la antena MW (AM) o LW y la antena SW son direccionales. Si se
recibe señal SW, extienda la antena telescópica SW totalmente. La mejor recepción se puede
lograr agotando el aparato en el caso de MW (AM) o la antena telescópica en el caso de FM o
SW.
7.Regule el control de VOLUMEN al nivel deseado.
8.Para apagar la radio, deslice el selector de FUNCIONES a la posición de TAPE (casete).
FUNCIONAMIENTO DE LA CASETERA
REPRODUCCIÓN DE UN CASETE
Asegúrese de ajustar la cinta que se encuentre suelta dentro del casete antes de usarlo utili-
zando ya sea un lápiz o lapicero simplemente insertando el lápiz o lapicero dentro del centro
de carrete y girando para ajustar la cinta.
Presione el botón STOP / EJECT para abrir la puerta del casete.
Inserte el casete dentro del compartimiento con la parte que se encuentra abierta hacia arriba
y con el carrete lleno en el lado izquierdo. Empuje del casete hacia abajo y cierre la puerta.
Asegúrese de no tocar la supercie de la cinta. Coloque el selector de funciones en la posición
“TAPE” y presione el botón reproducir del casete. Para detener la reproducción, presione el
botón STOP / EJECT de nuevo.
DETENCIÓN AUTOMÁTICA
Cuando la cinta alcance el nal durante la reproducción o grabación, el sistema incorporado de
extensión automática hará que los botones de reproducción y de grabación salten. El sistema
de detención automática funciona mientras se esté grabando de la radio incorporada o del
reproductor de discos. Sólo la función de casete se detiene automáticamente ya que la radio o
el reproductor de discos continuarán funcionando.
GRABACIÓN DE CINTAS
A.Instale una cinta de casete
B.Coloque el selector de funciones en la posición “RADIO”. Después de seleccionar la banda
deseada sintonizara con el botón de sintonización la emisora deseada, presione el botón de
grabación (RECORD) y el botón de reproducción (PLAY) simultáneamente.
C.Después de grabar el programa deseado, presione el botón STOP / EJECT y coloque el
selector de funciones en la posición “TAPE” para escuchar lo que se ha grabado.
D.Si se desea reproducir un programa grabado, siguen las instrucciones que se explican en la
sección de reproducción.
Nota: También se puede grabar cintas de la reproducción de CVD/CD/MP3 (coloque el selector
de funciones en la posición “CVD/CD/MP3”. El procedimiento es similar a la grabación de la
radio.
Grabación de un micrófono externo: Coloque el botón de funciones en la posición “TAPE” y
luego presione los botones de reproducción y grabación simultáneamente y proceda a hablar a
través de micrófono externo.
TIPOS DE CASETE
Utilice solamente casetes de buena calidad (IEC TIPO 1) para efectuar grabaciones. Se puede
reproducir otros tipos de casetes pero las grabaciones no pueden ser las más apropiadas con
este tipo de casetes especializados.
NO se recomienda el uso de casetes C120 con este equipo.
CÓMO PROTEGER LA GRABACIÓN