


1750
Operators Manual
12
Installing the Recorder
1. Position the Recorder within 2 m (6 ft) of the monitoring location.
2. The Recorder can be set on the floor or a table, or attached and secured to a pole or other
mounting surface. The Recorder can be oriented vertically or horizontally.
3. Connect the Recorder to a 100 to 240 V ac power source, 50 or 60 Hz.
4. Plug the power cord into a properly-grounded wall outlet.
WCaution
To avoid damage to the Recorder:
• Ground the chassis as appropriate according to your power
connection before you do anything else.
• Connect the power cord to the Recorder using the appropriate
supplied adapter.
• Connect the power cord to a properly grounded wall outlet.
• Be sure to plug the power cord into the Recorder panel BEFORE
connecting it to an outlet.
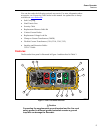
After a minute, or two, all LEDs should flash ON, then OFF, and then each should turn
ON and OFF in sequence. The LEDs will then remain on if you make secure test lead
connections and there is sufficient voltage and current.
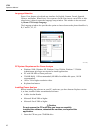
5. Turn on the PDA and tap the Power View icon
to launch Power View.
If a Recorder is within range and is not password protected, it should appear in the drop
down menu just below the main title bar on the PDA. You may need to select Browse for
recorder when first connecting. Select the recorder you want to browse to with the PDA
stylus. Upon selection, the Home screen for live data appears.
If more than one Recorder is within range, these will appear in the drop down menu list.
6. If you have previously established password protection for the Recorder, you must type
the correct password in the Password text box and click OK. (Password protection is
established for a specific Recorder using either the Setup Password menu in Power View
or the Power Analyze software).
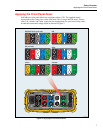
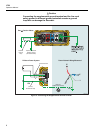
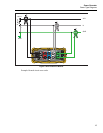
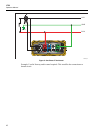
Connecting the Recorder to the Wiring
After you have set up the Recorder you are ready to connect the voltage leads and current
probe or flexi-probes to the power network being tested. Refer to the Power Type
diagrams provided on the PDA or in this manual.
XWWarning
To prevent possible electrical shock, Flexi-probes should not
be applied or removed from hazardous live conductors.
In most cases, you should install the current probes first. Because they are clamped
around wires, current probes are usually more secure than voltage probes. Examine the
conductors you are about to connect to and determine if you should attach the current
probes to the phase wires or busbars before you connect the voltage probes.
1. Select and attach the appropriate current probes to the Recorder.
2. Select and attach the appropriate voltage test leads and probes to the Recorder.