


9
Model D2424LV Quick Operation Guide
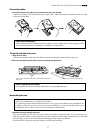
Formatting a hard disk drive
After installing a hard disk drive into the recorder, you must format the disk; otherwise you cannot
record or playback any data. Note that the following explanation assumes that the disk is
unformatted. If you want to know how to reformat a formatted disk, see the Reference manual.
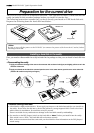
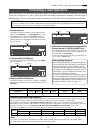
1. Turn the power on.
The display will show the ROM version and time/date,
followed by “Initializing...” -> “Current IDE Drv” -> [(hard
disk model name)]. Then after “Unformat!” appears
momentarily, the recorder automatically accesses the
Disk Format menu in the SETUP mode and the following
screen appears.
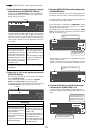
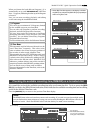
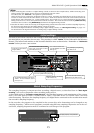
3. Press the [EXECUTE/YES] key.
The display changes the screen for setting the sampling
frequency and quantization (default indication is “44.1
kHz 24bit?”).
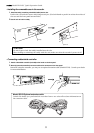
<CAUTION>
Be sure to connect the recorder to the power supply specified in the specification section of the Refer-
ence manual. Do not use an AC outlet of any other voltage.
Flashing
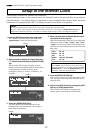
4. Select desired sampling frequency/quantization
with the Jog dial (or [PREV] key/[NEXT] key).
For sampling frequency/quantization, other settings
given in chart below can be selected in addition to the
presently shown "44.1kHz 24bit."
At selecting the sampling frequency/quantization, be
sure to refer to <Note> below.
44.1kHz
96kHz
16 bits
24 bits 24 bitsQuantization
Sampling frequency
24 real tracks + 32 additional tracks
Number of available tracks
<Available recording time after formatting>
A greater sampling frequency will reduce the available recording time/space after formatting. Under the same sam-
pling frequency setting, the greater quantization (bit number) reduces the available recording time.
The following table shows the "approximate available recording time" under each sampling frequency/quantization.
Depending on your medium, the available recording time may differ slightly. It will be a good idea to check the
available recording time. See “Checking the available recording time (REMAIN) on a formatted disk” on page “11.”
Note that the available time values in the following table are based on a mono track recording.
10.0GB
Approx. 1258min.
Approx. 1735min.
Approx. 1156min.
Approx. 628min.
Approx. 1888min.
44.1kHz
48kHz 88.2kHz
16 bits 24 bits
16 bits 24 bits
24 bits
Capacity
<Note>
You cannot save audio data recorded in a 88.2kHz/24bit or 96kHz/24bit program using an adat digital signal.
See the Reference manual for details about the save/load operations.
48kHz
16 bits
24 bits
88.2kHz
24 bits
8 real tracks + 48 additional tracks
Approx. 577min.
96kHz
24 bits
∞
42
OL
0
30
24
18
12
9
6
3
kHz
24
FS
BIT
SETUP
∞
42
OL
0
30
24
18
12
9
6
3
2322
21
20
19
18
17
1615141312
11
10
98765
4
3
2
1
CLOCK
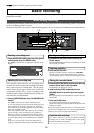
2. Press the [EXECUTE/YES] key.
The E-IDE hard disk name will be displayed and, “SURE?”
and “?” will flash.
∞
42
OL
0
30
24
18
12
9
6
3
kHz
24
FS
BIT
SETUP
∞
42
OL
0
30
24
18
12
9
6
3
SURE?
2322
21
20
19
18
17
1615141312
11
10
98765
4
3
2
1
CLOCK
Flashing
Flashing
Flashing
∞
42
OL
0
30
24
18
12
9
6
3
kHz
24
FS
BIT
SETUP
∞
42
OL
0
30
24
18
12
9
6
3
SURE?
2322
21
20
19
18
17
1615141312
11
10
98765
4
3
2
1
CLOCK
Flashing
The sampling frequency:
The sampling frequency and quantizing of the
current drive (E-IDE hard disk) are setup dur-
ing the formatting or reformatting process.
Consequently, all programs in the current drive
will adhere to the sampling frequency used at
formatting. You can change the format, how-
ever, after compiling a program.
In other words, a variety of programs with dif-
ferent sampling frequencies can be installed on
the current drive. But alterable frequencies will
be limited, depending on quantization at for-
matting. For details, refer to page “23”.