


2-Button Interlock
312374J 7
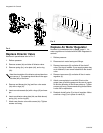
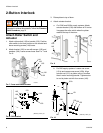
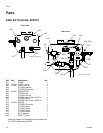
5. Tighten actuator bracket to rod using 4 screws (140)
and bracket clamps (139).
6. Adjust the roller switch (133) out so it contacts actu-
ator bracket (138), then tighten screws (144).
7. Tighten bracket (132) to ram with screws (105) and
washers (106).
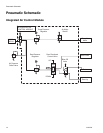
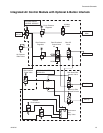
8. Connect main air (S1) to port (S1) on roller switch
(133) with 15 in. of tubing (146).
9. Connect switch signal air (S2) to port (S2) on roller
switch (133) with 15 in. of tubing (146).
10. For D60 supply systems: Install two fittings (150)
into (S1) and (S2).
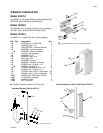
Attach 2-Button Interlock
Assembly
See F
IG
. 12.
1. Relieve pressure.
2. Remove shrouds. See F
IG
. 1.
3. Disconnect air lines.
4. Remove integrated air controls from bracket. See
Disassembly, page 3.
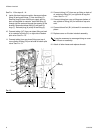
5. Remove back cover from 2-button interlock assem-
bly (130).
6. Position 2-button interlock assembly between air
control bracket and air controls. The screws that
attach the integrated air controls to the supply sys-
tem also attach the 2-button interlock assembly.
7. Reattach integrated air controls. See Reassembly,
page 5.
8. Insert cap screw (145) through integrated air con-
trols into 2-button interlock module. See F
IG
. 12.
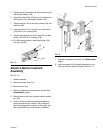
F
IG
. 11:
S1
S2
133
ti10844a2
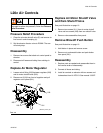
F
IG
. 12
130
145
ti10843a