


59
ENGLISH
SPECIAL SETTINGS
----------------------------------------------------------------------------------------------------------
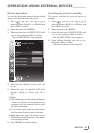
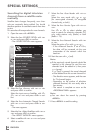
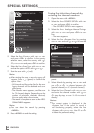
Searching for digital television
channels from a satellite auto-
matically
If you know the parameters of a new television
channel, you can also search for it manually.
Current transponder data can be found in the
teletext, in satellite TV magazines or on the
Internet.
1 Open the menu with »MENU«.
2 Select the line »SOURCE SETUP« with »
V
«
or »
Λ
« and press »OK« to confirm.
– The »SOURCE SETUP« menu appears.
3 Select »Digital Manual Tuning « with »
V
« or
»
Λ
« and press »OK« to confirm.
– The menu appears.
4 Select the line required for the parameters
with »
V
« or »
Λ
«.
– »Frequency (MHz)«: Enter the five-digit
frequency with »1 ... 0« .
– »Symbol Rate (kS/s)«: Enter the five-digit
symbol rate with »1 ... 0« .
– »Polarization«: Use »
<
« or »
>
« to set the
polarisation to »Horizontal« or »Vertical«.
– »Network Search«: use »
<
« or »
>
« to se-
lect the option »On« or »Off«.
– »Scan Mode«: Use »
<
« or »
>
« to select
whether you want to search for unencrypt-
ed (Unencrypted) channels only, encrypt-
ed (Encrypted) channels only, or for both
(Unencrypted + Encrypted).
– »Service Type«: Use »
<
« or »
>
« to select
whether you want to search for television
channels only (TV), radio stations only
(Radio), or both (Radio + TV).
5 Start the scan with »
« (red).
– The »Results« menu appears, and the scan
for TV channels begins.
Note:
7
You can abort the search by pressing
»MENU«.
6 Press »MENU« to end the setting.
LNB settings
1 Open the menu with »MENU«.
2 Select the line »SOURCE SETUP« with »
V
«
or »
Λ
« and press »OK« to confirm.
– The »SOURCE SETUP« menu appears.
3 Select »Antenna Settings« with »
V
« or »
Λ
«
and press »OK« to confirm.
– The »ANTENNA SETTINGS« menu ap-
pears.
4 Select the line required for the parameters
with »
V
« or »
Λ
«.
– »Satellite«: »Press OK«, select a satellite
with »
<
«, »
>
«, »
V
« or »
Λ
« and press
»OK« to confirm.
– »Transponder«: »Press OK«, select a tran-
sponder with »
<
«, »
>
«, »
V
« or »
Λ
« and
press »OK« to confirm. Use »
« (red) to
add a transponder, use »
« (green) to
delete it, or use »
« (yellow) to change
transponder data.
– »LNB Power«: Set the LNB power supply
(depending on the type of LNB) to »Off«
»13/18 V« or »14/19 V« with »
<
« or »
>
«.
– »LNB Type«: Select a type of LNB with »
<
«
or »
>
«. Use »
« (green) to save the set-
ting, or use »
« (red) to abort.
– »22 KHz«: Depending on the LNB type,
22 kHz audio is selected. For a universal
LNB, this option is set to »Auto« and cannot
be changed.
– »DISEqC mode« and »LNB selection«:
depending on the type of antenna used,
use »
<
« or »
>
« select the option »Off«,
»DiSEqC 1.0« or »DiSEqC 1.1«.
»Off«: for a satellite system with only
one antenna.
» DiSEqC 1.0«: allows up to four satel-
lites to be received simultaneously.
Under »LNB selection«, use »
<
« or
»
>
« to select the option »1/4«, »2/4«,
»3/4« or »4/4«.
» DiSEqC 1.1«: allows up to 16 satel-
lites to be received simultaneously.
Under »LNB selection«, use »
<
« or
»
>
« to select the option »1/16« to
»16/16«.
5 Press »MENU« to end the setting.