


ENGLISH
60
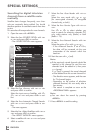
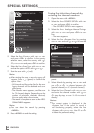
Settings for motorised antennas
(DiSEqC 1.2)
Your television set supports motorised satellite
systems in compliance with DiSEqC 1.2. This
function allows the satellite antenna to be oper-
ated via the television set.
1 Open the menu with »MENU«.
2 Select the line »SOURCE SETUP« with »
V
«
or »
Λ
« and press »OK« to confirm.
– The »SOURCE SETUP« menu appears.
3 Select the line »DiSEqC 1.2« with »
V
«
or »
Λ
«. Select the option »On« with »
<
«
or »
>
«
– The line »User Mode« is active.
Note:
7
Additional operations are explained in the
following sections.
SPECIAL SETTINGS
----------------------------------------------------------------------------------------------------------
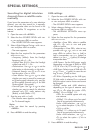
User mode
You can adjust the alignment of the satellite an-
tenna to each individual satellite. These settings
will be saved so that the antenna can later be
easily guided to each saved alignment.
1 Select the line »User mode« with »
V
«
or »
Λ
« and press »OK« to confirm.
– The »USER MODE« menu appears.
2 Select the preferred option with »
V
«
or »
Λ
«.
– »Satellite«: »Press OK«, select a satellite
with »
<
«, »
>
«, »
V
« or »
Λ
« and press
»OK« to confirm.
– »Transponder«: »Press OK«, select the
transponder from which the signal is being
received with »
<
«, »
>
«, »
V
« or »
Λ
« and
press »OK« to confirm.
– »Moving Mode«: Use »
<
« or »
>
« to select
the option »Discrete« or »Continuous«.
– »Discrete«: Moves the antenna in defined
steps to the west and the east.
– »Continuous«: Moves the antenna to the
west or east continuously.
– »Step Size«: Use »
<
« or »
>
« to select the
number of steps with which the antenna
should turn. »Step Size« is only active
when the »Transport Mode« was set to
»Discrete«.
– »Move Motor«: Aligns the antenna with
the selected satellite. Use »
<
« to align it to
»West«, use »
>
« to align it to »East«.
– »Go To Stored Position«: Aligns the antenna
to a saved satellite position. Up to 50 posi-
tions can be saved. »Press OK« and then
select the saved position with »
<
« or »
>
«.
Press »
« (green) to confirm – the anten-
na will be aligned with the saved position.
– »Store Stored Position«: The current anten-
na alignment is saved.
3 Press »MENU« to end the setting.