VCR Functions
–
15
–
EN
English
• Press VCR on the remote control before you set Timer Recording. Make sure the remote control is in the VCR
mode, then press SUBTITLE/TIMER.
• If a tape is not in the unit or does not have the record tab, TIMER indicator on the front panel and the light flash and
Timer Recording cannot be performed. Please insert a recordable tape.
• When Timer Recordings are set, TIMER indicator on the front panel and the light will appear. To use the VCR as usual
until the time for the recording, press
SUBTITLE/TIMER so that TIMER indicator on the front panel and the light
disappear. Press VCR/TV to choose the VCR position. Select either VCR or DVD mode, then continue with the other
features as described in this manual.The light will not appear in the DVD mode. However, the Timer Recordings will
remain as programmed.
After an OTR and a Timer Recording has been set, this unit operates as follows:
• If a tape runs out before an OTR or a Timer Recording is finished, the unit ejects the tape and switches to the DVD mode
automatically. Press SUBTITLE/TIMER on the remote control or STOP/EJECT
CC
/
AA
on the unit, then press VCR to activate
the VCR function again.
• Once the unit turns to the timer standby mode, no VCR functions are available until
SUBTITLE/TIMER is pressed.
(OUTPUT on the front panel and VCR on the remote control will not function.)
• To cancel the timer standby mode, press SUBTITLE/TIMER on the remote control or STOP/EJECT
CC
/
AA
on the unit, then
press VCR to activate the VCR function again.
• The mode of the unit and the remote control may differ (VCR mode or DVD mode) when you set Timer Recording or after
you cancelled Timer Recording. Press VCR or DVD on the remote control to select your desired mode before you operate.
When an OTR or a Timer Recording is completed...
• If there are Timer Recordings on standby, the unit switches to the DVD mode automatically, and the TIMER indicator on the
front panel lights up to indicate the unit is in the timer standby mode. In some occasions, however, the VCR/DVD may be
automatically turned off, instead of changing to the DVD mode after pressing REC/OTR.
• The TIMER indicator on the front panel flashes if there are no more Timer Recordings on standby.
• Once the unit switches to the DVD mode, all VCR functions will be unavailable. “”will not appear as long as the DVD is in
use. All DVD functions are available during OTR, timer standby mode and Timer Recording.
If you want to use the VCR/DVD during a timer recording or while the light is on or flashing.
• Press
yy
/I to turn on the VCR/DVD. Press DVD on the remote control to choose DVD mode, then continue with the other
DVD features as described in this manual.You don’t need to set the TIMER off to use the VCR/DVD.
Note (for Timer Recording) :
• If there is a power failure or the unit is unplugged for more than 30 seconds, clock and all timer settings will be lost.
Hints for OTR and Timer Recording
Warning: Unauthorized recordings of copyrighted video tapes may be an infringement of copyright laws.
VCR
DVD/VCR
AUDIO OUTAUDIO IN
VIDEO OUT
L
/
/
R
L
R
VIDEO IN
0VM204468
AUDIO OUT
VIDEO OUT
L
R
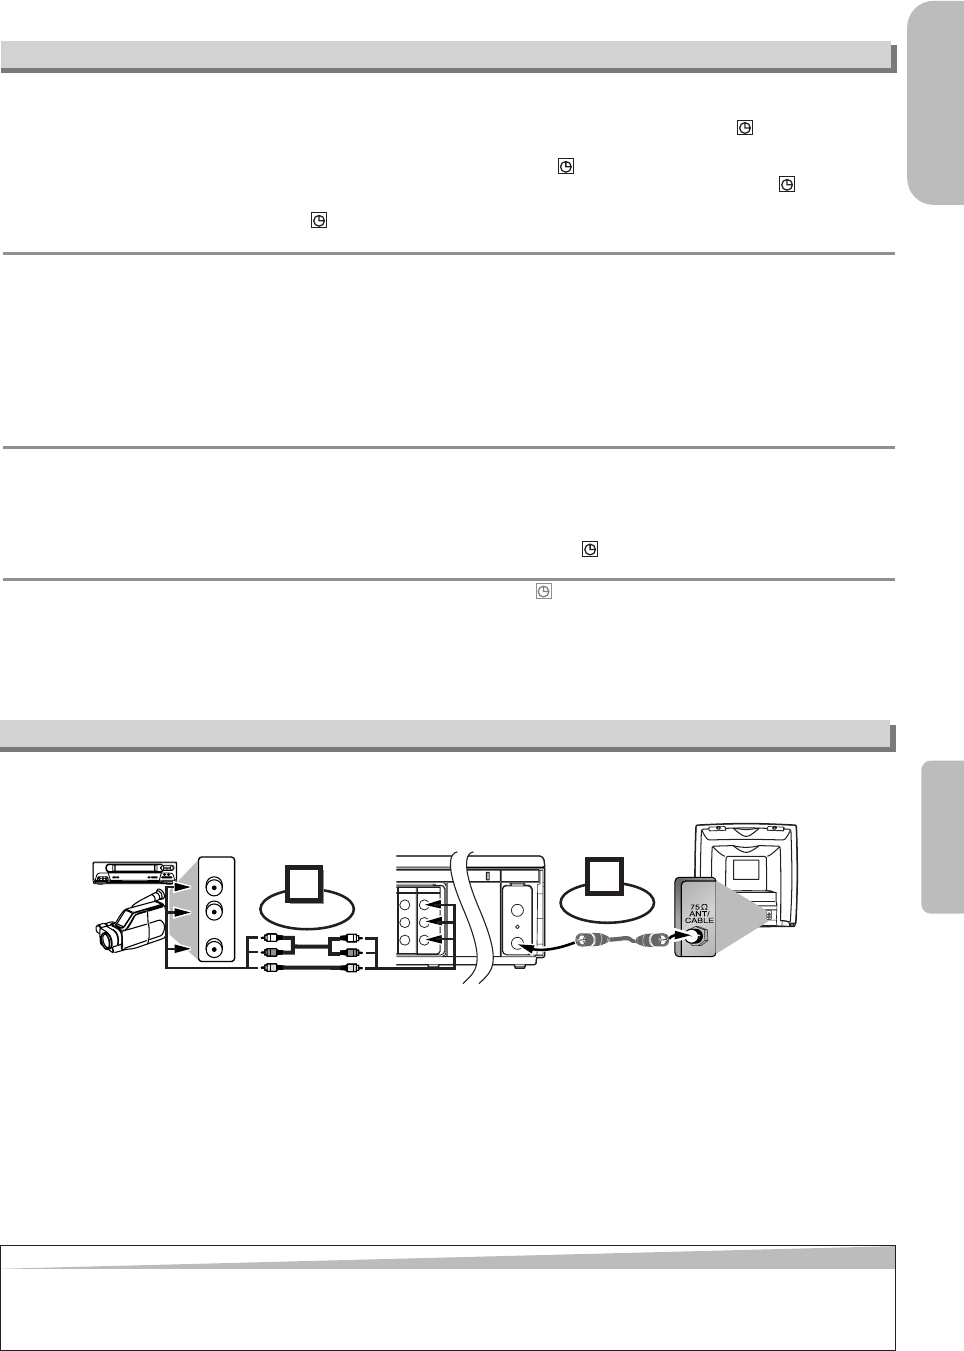
Connect
1
Audio/Video cables
(supplied)
RF cable
(supplied)
(Back of TV)
(Back of Recording VCR/DVD*)
(Back of another source)
or
2
Connect
*Front input jacks are also available.
1) Insert a pre-recorded tape into the playing VCR.
2) Insert a tape with its record tab into the recording VCR/DVD.
3) Press SURROUND/SPEED on the remote control of the recording VCR/DVD to select the desired recording speed
(SP/SLP).
4) Select the “L1” or “L2” position on the recording VCR/DVD.
• To use the input jacks on the back of this unit, select “L1” position by pressing [0], [0], [1] or SKIP/CH (i/K or j/L)
on the remote control or CHANNEL (
KK
/
LL
) on the front panel.
• To use the input jacks on the front of this unit, select “L2” position by pressing [0], [0], [2] or SKIP/CH (i/K or j/L)
on the remote control or CHANNEL (
KK
/
LL
) on the front panel.
5) Press REC/OTR on the recording VCR/DVD.
6) Begin playback of the tape in another source.
7) To stop recording, press
STOP/EJECT
CC
/
AA
on the recording VCR/DVD, then stop playback of the tape in another source.
Hint
Hint
• For best results during dubbing, use the front panel controls whenever possible.The remote control might affect another source’s operation.
• Always use video-quality shielded cables with RCA-type connectors. Standard audio cables are not recommended.
• You can use a video disc player, satellite receiver, or other audio/video component with A/V outputs.
• “L1” or “L2” is found before the lowest memorized channel. (Example: CH02)
• “L2” input jacks are on the front of this VCR/DVD.
Copying a Video Tape
H9850UD_EN/SP.qx3 05.4.8 11:42 AM Page 15


