


24
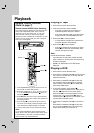
Playing a T
Playing a T
ape
ape
1. Press VCR to control the VCR deck.
2. Insert a pre-recorded video cassette.
• If the unit is powered off, it will power on
automatically when the tape is loaded.
• If the Timer indicator lights on the front panel
display window, press STANDBY/ON once.
3. Press PLAY (N) to start playback.
• If a tape without a safety tab is inserted the
unit starts playback automatically.
4. Press STOP (x) to stop playback.
• If the tape reaches the end before you press
STOP (x) the Recorder automatically stops,
rewinds and ejects the tape.
Note:
S-VHS Quasi Playback (SQPB)
•This Recorder can play back S-VHS recorded
tapes, however, it cannot make recordings using
S-VHS format tapes.
• SQPB is an abbreviation for S-VHS Quasi
Playback.
Playing a DVD
Playing a DVD
1. Press DVD to control the DVD deck.
2. Press EJECT, OPEN/CLOSE (Z) to open the disc
tray. Load your chosen disc in the tray, with the
playback side down.
3. Press EJECT, OPEN/CLOSE (Z) to close the
tray. Playback starts automatically. If playback
does not start, press PLAY (N)orStarts play-
back using HOME menu.
4. To stop the playback, press STOP (x).
The unit records the stopped point, depending on
the disc. “
X
x” appears on the screen briefly.
Press PLAY (N) to resume playback (from the
scene point). If you press STOP (x) again or
unload the disc (“x” appears on the screen.), the
unit will clear the stopped point.
5. Press EJECT, OPEN/CLOSE (Z) to remove the
disc.
Press EJECT, OPEN/CLOSE (Z) to close disc
tray or press
STANDBY/ON (1/&)
, the disc tray
closes automatically and unit turns off.
Playback
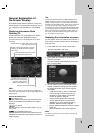
Remote Control Function
(Refer to page 7)
Remote Control A/B/C/D Code Switching
The remote control is capable of controlling four JVC
video units independently. Each of the units can
respond to one of four codes (A, B, C or D). The
remote control is preset to send C code signals
because your unit is initially set to respond to C code
signals. You can easily modify your unit to respond
to A, B or D code signals.
1. Press STANDBY/ON (1/&) on the unit to turn off
the unit with no video tape inserted.
2. Press the number key “1” for A, “2” for B, “3” for C
or “4” for D while
pressing ENTER (
) down on
the remote control.
3. Press N/`` on the unit for over 5 seconds while
the unit is turned off. The current code appears on
the display window.
4. Press STOP (x) on the remote control, the cur-
rent code on the display window changes to new
code and blinks for approximately 10 seconds.
5. The new code setup on unit and remote is done.
Note:
If you change the batteries of the Remote Control
with A, B or D code, the remote control code is set to
C automatically. In this case, you should reset the
remote control code described above.
STANDBY/ON (1/&)
Number 1-4
STOP (
x)
ENTER (
)
B/``