


EN 13
Tuner
Set Receivable Channels
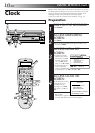
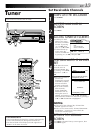
TURN ON THE RECORDER
1
Press POWER.
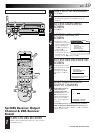
ACCESS MAIN MENU
SCREEN
2
Press MENU.
ACCESS TUNER SET SCREEN
3
1) At the top of Main
Menu screen, move
the arrow to “INITIAL
SET UP” by pressing
@# (or 23), then
press fi (or ∞) or OK.
2) At the Initial Set Up
screen, move the
arrow to “TUNER SET”
by pressing @# (or 23), then press OK.
PERFORM AUTO CHANNEL
SET
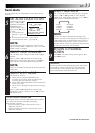
4
At the Tuner Set screen,
move the arrow to
“AUTO CHANNEL SET”
by pressing %fi (or 5∞),
then press # (or 3) or
OK.
● Receivable channels in
your area are
automatically assigned
to the CH +/– buttons,
and non-receivable
channels are skipped.
● If you want to set the
CATV channels,
change the BAND
mode into CATV by
moving the arrow to
“BAND” and pressing # (or 3) or OK. The BAND
mode alternates between TV and CATV by pressing #
(or 3) or OK when BAND is highlighted.
NOTES:
●
At the end of Auto Channel Set, “SCAN COM-
PLETED” appears on screen.
●
If the scan was unsuccessful, “SCAN COMPLETED –
NO SIGNAL –” appears on screen. Check the
connections and start again.
RETURN TO NORMAL
SCREEN
5
Press MENU. The Initial Set Up screen appears, then
press MENU again.
INFORMATION
The recorder detects the band (TV or CATV) and selects the
correct band automatically during Auto Channel Set.
The selected band will be displayed on the right side of
“BAND” on the Tuner Set screen.
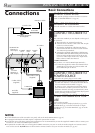
Turn on the TV and select the AV mode.
HDD/VHS SET UP INITIAL SET UPFUNCTION SET UP
SELECT OK END
SELECT WITH [∞523]
THEN PRESS [OK]
TUNER SET INITIAL SET
INDEX MENU
TUNER SET
BAND
AUTO CHANNEL SET
MANUAL CHANNEL SET
TUNER SET
BAND CATV
AUTO CHANNEL SET
MANUAL CHANNEL SET
SELECT WITH[5,∞] THEN[OK]
PRESS[MENU] TO END
=
AUTO CHANNEL SET
SCANNING...
PRESS[MENU] TO END
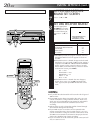
123
4 56
789
0
2
1
4
3
>
<
1
2
–
+
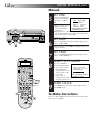
POWER
MENU
OK
OK
DIGITPURE TECHNOLOGY
HM-HDS1
POWER
S-VHS ET
S-VHS
HDD
OK
MENU
REC LINK
CH
NAVI
STOP PLAY PAUSE REC
REW FEW
A. DUB
EJECT
VIDEO
PAUSE
S-VIDEO
(M) L – AUDIO – R
F - 1
MENU
POWER
OK
CH+/–