


June 10, 2003 4:09 pm Page 16
—16—
Master Page: Right
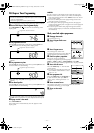
Ⅵ AUTO SP]LP TIMER —ON / OFF
When this function is set to “ON”, the recorder automatically
switches to LP mode to allow complete recording if there is not
enough tape to record the entire programme while timer-
recording in SP mode.
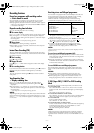
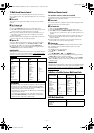
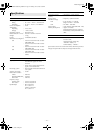
For example, recording a programme of 210 minutes in length
onto a 180 minute tape.
NOTES:
● If you have programmed the recorder to timer-record 2 or more
programmes, do not use this function, but change the tape
speed manually during timer programming.
● There may be some noise and sound disturbance where the tape
speed switches from SP to LP mode on the tape.
● This function is not available during ITR (Instant Timer
Recording), and will not work properly with any tapes longer
than E-180 or with some tapes of shorter lengths.
● If you perform timer recording with both this function and VPS/
PDC activated, and the programme goes beyond its originally
scheduled length, sometimes the programme cannot be
recorded in its entirety.
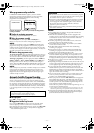
Ⅵ VIDEO STABILIZER —ON / OFF
When this function is set to “ON”, you can automatically correct
vertical vibrations in the picture when playing back unstable
recordings made on another recorder.
NOTE:
To watch recordings with close-caption or when you finish
viewing a tape, set this function to “OFF”.
Ⅵ S-VHS — 0N / OFF
You can determine which recording mode — either S-VHS mode
or VHS mode — is used for recording on S-VHS tapes.
● When this function is set to “ON”, you can record on S-VHS
tapes with S-VHS picture quality.
● When this function is set to “OFF”, you can record on S-VHS
tapes with VHS picture quality.
NOTES:
● S-VHS mode allows you to make high quality video recordings
with horizontal resolution of 400 lines, comparing with the 230
lines of resolution of conventional VHS recordings. To achieve
the highest quality picture we recommended to record in S-VHS
mode. (But remember that a conventional VHS recorder without
SQPB cannot play back S-VHS tapes recorded in S-VHS mode.)
● S-VHS setting does not affect recording on VHS tapes.
Recording on VHS tapes is always performed in VHS mode
except when using S-VHS ET mode (
੬
16).
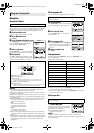
Ⅵ S-VHS ET — ON / OFF
When this function is set to “ON”, you can record on VHS
cassettes with S-VHS picture quality. Tapes recorded using this
function can be played back on most S-VHS recorders or VHS
recorders equipped with the S-VHS ET function or VHS recorder
equipped with the SQPB (S-VHS QUASI PLAYBACK) function.
When this function is set to “ON”, the S-VHS indicator lights up
on the display panel.
NOTES:
● Before recording, set “B.E.S.T.” to “ON” (
੬
see below).
● You cannot activate the S-VHS ET function while recording
(
੬
8), timer-recording (
੬
10) or Instant Timer Recording
(
੬
9) or the “B.E.S.T.” function (
੬
see below) is in progress.
● The S-VHS ET function does not work with S-VHS cassettes.
● To keep the highest quality recording and playback pictures
over a long period of time, S-VHS recording on S-VHS cassettes
is recommended.
● Use of high grade tapes is recommended for S-VHS ET
recordings. On some tapes, picture quality will not improve
even if the S-VHS ET function is used. Check the recording
quality before you start important recordings.
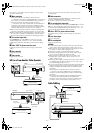
Remote Control Functions
Remote A/B Code Switching
The remote control is capable of controlling two JVC video
recorders independently; one set to respond to the remote
control's A code control signals and another set to respond to B
code control signals. The remote control is preset to send A code
signals because your video recorder is initially set to respond to A
code signals. You can easily modify your video recorder to
respond to B code signals.
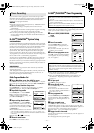
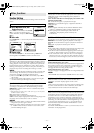
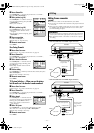
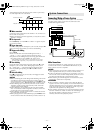
A
Set remote control code for remote control
A Press and hold VCR.
B Press the number key “2”.
C Press OK, and release VCR.
● The remote control now can transmit B code control signals.
B
Check remote control code for decorder
Press and hold 4 on the recorder for more than 5 seconds while
the recorder is turned off. The code currently set appears on the
display panel.
C
Change code for recorder
Press any key on the remote control. The recorder now responds
to B code control signals.
To control two recorders with the same remote control
You can control two JVC recorders by switching the remote
control code for the remote control between A and B (
੬
step 1),
keeping two recorders to different control codes.
● To change only the remote control code for the remote control,
DO NOT perform steps 2 and 3.
NOTE:
To set the recorder back to respond to A code signals, repeat the
same procedure as shown above except pressing number key "1"
instead of "2" in step 2 of 1.
Approximately 150 minutes Approximately 60 minutes
SP mode LP mode
Total 210 minutes
Special Features
Control Your TV Using Additional Buttons
Use the number keys, and the p button, & button or #
button to select the TV's channel.
● With televisions under Code 01, 02, 07, 08, 10, 11, 14, 20,
22, 23, 24, 25, 27, 33, 35, 38, 40 or 42, the p button
corresponds to the 1-digit/2-digit entry switching button
(often labelled – /– –) of your TV's remote control.
● With televisions under Code 01, 16, 28, 29, 34 or 39, the &
button corresponds to the 10 + button, and the # button
corresponds to the 20 + button of your TV's remote control.
NOTE:
The way these buttons are used is determined by your TV. Use
these buttons as instructed for your TV's remote control.
HR-S5980AH.5980AJ_EN001B.fm Page 16 Tuesday,June 10, 2003 4:10PM