


Filename [SR-MV30U_10Subsidiary.fm]
Masterpage:Left+
76 EN
Page 76 March 30, 2004 5:46 pm
SUBSIDIARY SETTINGS
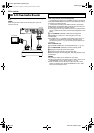
8 SUPERIMPOSE — AUTO / OFF
When this function is set to “AUTO”, various operational indicators
appear on the TV screen.
NOTES:
● Even when “SUPERIMPOSE” is set to “OFF”, you can display the
various operational indicators by pressing ON SCREEN. To clear the
operational indicators, press ON SCREEN again.
● When you use this unit as the source player for editing, be sure to set
“SUPERIMPOSE” to “OFF” before starting.
● During playback, the operation mode indicators may be disturbed
depending on the type of tape being used.
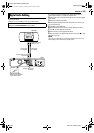
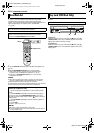
8 AUTO SP]EP TIMER — ON / OFF
When this function is set to “ON”, the unit automatically switches to
EP mode to allow complete recording if there is not enough tape to
record the entire program while timer-recording in SP mode.
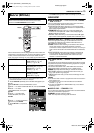
For Example:
Recording a program of 140 minutes in length onto a 120-minute
tape
Make sure you set this function to “ON”, before the timer-recording
starts.
NOTES:
● If you have programed the unit to timer-record 2 or more programs,
the second program and those thereafter may not fit on the tape if
you set “AUTO SP]EP TIMER” to “ON”. In this case, make sure the
mode is not engaged, then set the tape speed manually during timer
programing.
● In order to ensure that the recording fits on the tape, this feature may
leave a slight non-recorded section at the end of the tape.
● There may be some noise and sound disturbance at the point on the
tape where the unit switches from SP to EP mode.
● The Auto SP]EP Timer feature is not available during ITR (Instant
Timer Recording), and the feature will not work properly on the
following tapes: T(ST)-30, T(ST)-60, T(ST)-90, and T(ST)-120
8 DIGITAL R3 — ON / OFF
When this function is set to “ON”, the Digital 3R picture system
applies edge correction to the luminance signal to enhance detail.
NOTES:
● Normally it is recommended to keep “DIGITAL 3R” set to “ON”.
● Depending on the type of tape being used, picture quality may be
better with “DIGITAL 3R” set to “OFF”.
● If you use the unit as the source player for editing, be sure to set
“DIGITAL 3R” to“OFF” before starting.
8 DIGITAL TBC/NR — ON / OFF
The unit is equipped with the Digital TBC (Time Base Corrector)
that removes jitter from fluctuating video signals to deliver a stable
picture even with old tapes and rental cassettes.
The on/off of Digital 3-DNR (Noise Reduction) which cuts noise
and enables clear picture reproduction is also linked to this
function.
We recommend that you set “DIGITAL TBC/NR” to “ON” when...
— playing back a tape recorded on a camcorder.
— playing back a tape repeatedly used.
— using this unit as the source player for editing.
NOTES:
● If you play back a tape recorded under poor TV reception condition,
the picture may become more stable with “DIGITAL TBC/NR” set to
“OFF”.
● When “DIGITAL TBC/NR” is set to “ON” if you play back a tape where
certain types of signals are recorded (using a PC or some character
generators), the playback picture may be distorted. If this is the case,
set “DIGITAL TBC/NR” to “OFF”.
● While the dubbing mode is established, “DIGITAL TBC/NR” is set to
“OFF” on the VHS deck.
8 VIDEO STABILIZER — ON / OFF
When this function is set to “ON”, you can automatically correct
vertical vibration in the picture when playing back unstable
recordings made on another recorder.
NOTES:
● When you finish viewing a tape, be sure to set this function to “OFF”.
● Regardless of the setting, this function has no effect during recording
and during special effects playback.
● The on-screen display may jitter vertically when this function is set to
“ON”.
● To watch recordings with close-caption, set this function to “OFF”.
8 BLUE BACK — ON / OFF
When this function is set to “ON”, the TV screen becomes all blue
when receiving a channel not in use.
NOTE:
When you want to receive an unstable channel with poor signals, set
this function to “OFF”.
8 2ND AUDIO RECORD — ON / OFF
When this function is set to “ON”;
If a SAP program is received, the SAP audio is recorded on L/R
tracks. The main audio is not recorded.
If a non-SAP program is received, the main audio is recorded on L/
R tracks.
When this function is set to “OFF”, the SAP audio cannot be
recorded.
NOTE:
When the channel is changed on the unit;
● The “STEREO” indicator appears on the screen for about 5 seconds
if the program is a stereo broadcast.
● Both “STEREO” and “SAP” indicators appear when a stereo program
is accompanied by SAP sound.
8 S-VHS MODE — ON / OFF
Your unit can record in S-VHS (Super VHS), S-VHS ET or VHS.
To record in S-VHS:
Set “S-VHS MODE” to “ON”. Then, insert a cassette marked
“S-VHS”. The S-VHS indicator lights up on the front display panel.
The S-VHS recording mode is selected.
To record in S-VHS ET on a VHS cassette:
Set “S-VHS ET” to “ON”. (੬ pg. 75) Then, insert a cassette
marked “VHS”. The S-VHS indicator lights up on the front display
panel.
To record in VHS:
Insert a cassette marked “VHS”.
Set “S-VHS ET” to “OFF”. (੬ pg. 75)
The VHS recording mode is automatically selected regardless of
the “S-VHS MODE” setting.
To record in VHS on an S-VHS cassette:
Insert a cassette marked “S-VHS”. The S-VHS indicator lights up
on the front display panel. Then, set “S-VHS MODE” to “OFF”. The
S-VHS indicator goes off.
The VHS recording mode is selected.
NOTE:
When playing back a tape that has been recorded in S-VHS or
S-VHS ET, the S-VHS indicator lights up on the front display panel
regardless of the “S-VHS MODE” setting.
Total 140 minutes
Approximately 110 minutes Approximately 30 minutes
SP mode EP mode
SR-MV30U_00.book Page 76 Tuesday, March 30, 2004 5:46 PM