


57
Auto SP
→
LP Timer
(VHS Deck Only)
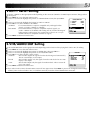
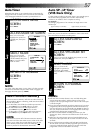
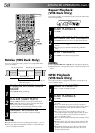
If, when timer-recording in SP mode, there is not enough tape to
record the entire programme, the recorder automatically
switches to LP mode to allow complete recording.
For Example . . .
Recording a programme of 210 minutes in length onto a 180-
minute tape
NOTES:
●
The Auto SP
→
LP Timer feature is not available during ITR
(Instant Timer Recording), and the feature will not work
properly with any tapes longer than E-180 or with some tapes
of shorter lengths.
●
If you have programmed the recorder to timer-record 2 or more
programmes, the second programme and those thereafter may
not fit on the tape if you set "AUTO SP
→
LP TIMER" to "ON". In
this case, make sure the mode is not engaged, then set the tape
speed manually during timer programming.
●
In order to ensure that the recording fits on the tape, this
feature may leave a short non-recorded section at the end of
the tape.
●
There may be some picture noise and sound disturbance at
the point on the tape where the recorder switches from SP to
LP mode.
●
If you perform timer recording with both PDC and the Auto
SP
→
LP Timer activated, and the programme goes beyond its
originally scheduled length, there may be times when the
programme cannot be recorded in its entirety.
Total 210 minutes
Approximately 150 minutes Approximately 60 minutes
SP mode LP mode
Make sure you set "AUTO SP→LP TIMER" to "ON" at the Mode
Set screen before the timer-recording starts.
ACCESS MAIN MENU
SCREEN
1
Press MENU.
ACCESS VHS MODE SET
SCREEN
2
Press %fi to move the highlight bar (pointer) to "VHS
MODE SET", then press OK or
#
.
SELECT MODE
3
Press %fi to move the
highlight bar (pointer) to
"AUTO SP→ LP TIMER",
then press OK or
#
to select
"ON".
RETURN TO NORMAL
SCREEN
4
Press MENU.
VHS MODE SET
B. E. S. T. ON
PICTURE CONTROL AUTO
AUTO SP=LP TIMER ON
DIGITAL 3R ON
S-VHS ON
DIGITAL TBC/NR ON
VIDEO STABILIZER OFF
[5∞] =
[MENU] : EXIT
Auto Timer
When the Auto Timer is set to ON the timer is automatically
engaged when the recorder power is turned off and automati-
cally disengaged when the recorder is powered back on.
ACCESS MAIN MENU
SCREEN
1
Press MENU.
ACCESS MODE SET SCREEN
2
Press %fi to move the
highlight bar (pointer) to
"MODE SET", then press
OK or
#
.
SELECT MODE
3
Press %fi to move the
highlight bar (pointer) to
"AUTO TIMER", then press
OK or
#
to select either
"ON" or "OFF".
RETURN TO NORMAL
SCREEN
4
Press MENU.
NOTE:
For safety, when Auto timer is set to "OFF", all other recorder
functions are disabled while the Timer mode is engaged. To
disengage the timer, press
‰
(TIMER).
Next Function Memory
The Next Function Memory "tells" the recorder what to do
after rewinding. Before continuing, make sure the recorder
is in the Stop mode.
a– For Automatic Start Of Playback After Tape Rewind . . .
. . . press REW, then press PLAY within 2 seconds.
b– For Automatic Power Off After Tape Rewind . . .
. . . press REW, then press within 2 seconds.
c– For Automatic Cassette Ejection After Tape Rewind . . .
. . . press REW, then press EJECT within 2 seconds.
NOTE:
The Automatic Power Off of the Next Function Memory
does not work if the Auto Timer is set to "ON". If the Auto
Timer is set to "ON", the recorder directly goes into the
Timer-Standby mode at the same time when the
button is pressed for the Automatic Power Off.
MAIN MENU
MODE SET
VHS MODE SET
DV MODE SET
AUTO CH SET
MANUAL CH SET
OUTPUT/INPUT SET
INITIAL SET
[
5
∞
] =
[MENU] : EXIT
MODE SET
S-VHS/AUDIO OUT AUTO
O. S. D. ON
AUTO TIMER ON
DIRECT REC ON
POWER SAVE OFF
[5∞] =
[MENU] : EXIT