


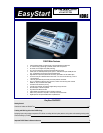

D16XD EasyStart
2. Press the [CH VIEW] key
Ä select different channels by pressings the [CH SELECT] keys (yellow) above the faders, or
press the “CH” in the upper left corner of the display and use the DIAL to change channels.
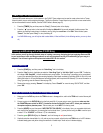
3. Press the “Ch Routing” tab. Here you can view the signal flow for the selected channel.
[TRACK] & [SCRUB] Virtual tracks and Track editing
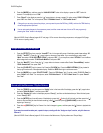
1. Press the [TRACK] key. This screen displays the currently selected virtual track for each channel. You can name your
tracks by pressing the “Rename” button in the display. There is also a handy time saving preset name list available!
Press the “Rename” button, then press the ” ▼” popup next to the name. Here you can scroll through the list and select
one of the preset names
Ä press “Cancel”.
2. Press the “MasterTrk” tab. There are eight virtual stereo master tracks available to mix (bounce) down to. These are
used to bounce tracks and mixdown finished songs for CD burning.
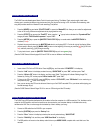
3. Press the “EditTrk” tab, then press the “” popup button in the upper left corner of the display next to “CopyTrk”, to
view the list of editing functions. Leave “CopyTrk” selected and press “OK”.
Perform and edit on a vocal track:
Now you’ll locate and move the “laugh” on the vocal track (at the end of the song) to the beginning of the song…
1. Press and hold [STOP] and then press the [MARK JUMP] [>] key to move to the end of the song.
2. Press the [SCRUB] key. Select track eight (the vocal track) by pressing the “” popup button in the upper left corner of
the display and select “Trk 8”
Ä Press “OK”.
3. Use the DIAL to scrub over the vocal track. Scrub counterclockwise to the beginning of the laugh (at approximately
00:01:00.234) Ä press [STORE] then press [LOC 1/IN]. This stores the in point. Scrub to the end of the laugh (at
approxiamtely 00:01:01:300)
Ä press [STORE] then [LOC 2/OUT] to store the out point. Now we have a region of audio
for editing.
4. Press the [TRACK] key Ä press the [<] [MARK JUMP] key to return to the beginning of the song Ä press [STORE] and
then press [LOC 3/TO]. This stores the location of where you will paste the region of audio selected.
5. Leave the edit type set to “CopyTrk”. Select track “8” for the “Source” and select track “8” for “Destination” ”
Ä press
“Exec” then press “Yes” and then “OK”.
6. Now cut the laugh from the end of the song. Press the “” popup button in the upper left corner of the display and
select “EraseTrk” from the list, and then press “OK” Ä for “Destination” select track “8” Ä press “Exec” then “Yes”
and then “OK”.
7. Press the [] key to playback the song and hear the result.
! You can undo edits or recording (Up to 16 levels) by pressing the [UNDO] key, and then select the level and press
“Undo”.
[SCENE] Scene Automation
With the scene automation a song can contain 100 “snapshots” of the mixer settings. Fader, Pan, EQ and effects settings are
stored with a scene and can be recalled automatically during playback.
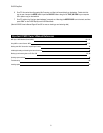
1. Press the [MIXER] key
Ä press the “FADER/PAN AUTOMATION” button in the display then press the “Mixer View”
tab.
2. Press the [<] [MARK JUMP] key to return to the beginning of the song. Push faders 1-8 and the MASTER fader all the
way up then all the way back down. When the song is played back you will see the on screen faders return to their
settings stored in the scene. Press the [] key and watch the display.
3