


3
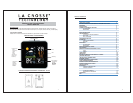
FEATURES:
• 12/24 hour time with snooze alarm and alarm icon
• Calendar display: month, day, date
• Heat index and dew point
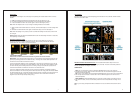
• Color forecast: sunny, partly sunny, cloudy, rainy and stormy
• 12 hour forecast based on changing barometric pressure
• IN / OUT temperature (°F / °C)
• IN / OUT humidity (%RH)
• MIN / MAX records (24-hour readings)
• Light up the Forecast Station with a press of a button using battery power OR continuous light using
the AC adapter with ON / OFF option
• LCD light dimmer for nighttime use
• Low battery icon for Forecast Station and sensor
• Sits on desktop or tabletop
• 3 "AA" Alkaline batteries (not included) OR optional 5.0V AC adapter (included)
INITIAL SET UP:
1. Insert A/C adapter into the wall outlet then into the Forecast Station or insert 3 AA batteries (not
included) into the Forecast Station (see Power the Forecast Station). The Forecast Station will light
up and show, indoor temperature, humidity and channel 1.
2. Insert 2 fresh AA batteries into the transmitter, observing the correct polarity (see Install Batteries in
the Outdoor Transmitter).
Note: The CH switch is set to Channel 1 by default. Confirm channel 1 is selected.
3. Keep the transmitter 5-10 feet from the Forecast Station for 15 minutes to establish a good
connection.
4. Within 3 minutes the station will beep and the outdoor temperature should be displayed on the
Forecast Station. If the outdoor temperature is not displayed after 3 minutes remove power from the
transmitter and the Forecast Station for 60 seconds and start again from step 1.
5. For optimum 433 MHz transmission, the outdoor transmitter should be placed a distance of no more
than 200 feet (60 meters, open air) from the Forecast Station.
Do Not Mix Old and New Batteries
Do Not Mix Alkaline, Standard, Lithium or Rechargeable Batteries
4
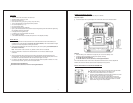
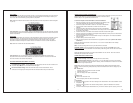
POWER THE FORECAST STATION:
The clock can be powered by the 5-volt a/c adapter or batteries.
A/C power adapter:
Insert enclosed 5-volt a/c power adapter into a wall outlet, then into the Forecast Station.
Batteries:
1. Remove battery cover: Slide tab to the right and pull out to remove battery cover.
2. Install three fresh AA batteries according to the polarity markings.
Do Not Mix Old and New Batteries
Do Not Mix Alkaline, Lithium, Standard, or Rechargeable Batteries
If the Forecast Station does not show indoor temperature after 60 seconds, remove adapter and
batteries, and wait for at least 60 seconds before repeating the setup process.
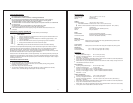
INSTALL BATTERIES IN THE OUTDOOR TRANSMITTER:
1. Slide the battery cover down, then lift off the back of the transmitter.
Note: Be careful not to break the tabs on the battery cover.
2. Confirm the channel selector switch is on channel 1.
3. Insert two fresh AA batteries into the transmitter. Observe the correct
polarity (see marking inside battery compartment).
4. Keep transmitter 5-10 ft. from the Forecast Station during setup.
5. After 15 minutes, if the outdoor temperature shows on the Forecast
Station, you can move the outdoor transmitter outside to a shaded
location within range of the Forecast Station.
Battery
Compartment
5-Volt a/c adapter