


5
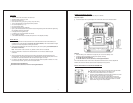
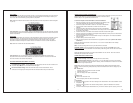
FUNCTION BUTTONS:
Button Press and Release Functions Hold 3-5 seconds
SET
Move through program menu Confirm
setting.
Enter program menu, set time,
date, etc.
ALARM
View Alarm
Activate/Deactivate Alarm
Alarm set
+
1 step forward (setup)
Fast advance (setu
p)
-/
°C/°F
Select temperature in
°C/°
F
1 step backward (setup)
Fast backward (set)
MIN/MAX
1-time MAX values
2-times MIN values
Resets all MIN / MAX values
HEAT/DEW
1-time Heat Index
2-times Dew Point
CH
Switch channels
(when using
multiple transmitters)
Search for remote transmitter
LIGHT HI/LO
HOLD ON/OFF
Dim backlight
for night time.
Turn continuous backlight
ON or OFF
(a/c adapter)
LIGHT/SNOOZE (top)
Activates backlight when using only
batteries.
Trigger snooze alarm
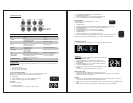
PROGRAM MENU:
The SET button will moves through the items in the program menu. The + or -/°C/°F button will change
these values.
12/24 hour time format
Manual time set (Hour, Minutes)
Calendar set (Year, Month, Date)
12 OR 24 HOUR TIME FORMAT:
The Time may be displayed in 12-hour or 24-hour format. Default is 12-hour time.
Note: When in 12-hour format AM or PM will show in front of the hour.
1. 12H will flash.
2. Press and release the + or -/°C/°F button to select 24-hour time.
3. Confirm with the SET button and move to Set Time.
SET TIME:
To set the time manually:
1. The hour digit will flash.
2. Press and release the + or -/°C/°F button to select the hour.
12H
6
3. Press and release the SET button to set the minutes.
4. The minute’s digit will flash.
5. Press and release the + or -/°C/°F button to select the minutes.
6. Confirm with the SET button and move to Set Calendar.
SET CALENDAR:
The date default of the Forecast Station is 1. 1. 2010.
To set the calendar:
1. The year will flash.
2. Press and release the + or -/°C/°F button to set the year (between year 2010-2039).
3. Press the SET button again to confirm and to enter the month setting.
4. The month will flash.
5. Press and release the + or -/°C/°F button to set the month.
6. Press the SET button again to confirm and enter date setting.
7. The date will flash.
8. Press and release the + or -/°C/°F button to set the date.
9. Confirm all calendar settings with the SET button to confirm and exit the program menu.
Note: The day of the week will set automatically once the year, month and date are set.
FAHRENHEIT/CELSIUS:
1. Press and release the -/°C/°F button once to switch from Fahrenheit to Celsius.
ALARM SET:
Hold the ALARM button for 5 seconds to enter the alarm time set mode.
1. The alarm hour digit will flash.
2. Press and release the + or -/°C/°F button to select the hour.
3. Press and release the SET button to set the minutes. The minute
digits will flash.
4. Press and release the + or -/°C/°F button to select the minutes.
5. Confirm with the SET button and exit.
6. The alarm icon
will show above the minutes indicating the alarm
is active.
7. The alarm icon
will flash when the alarm is sounding.
DEACTIVATE ALARM:
1. Press and release the ALARM button once to show Alarm Time.
2. Press and release the ALARM button to deactivate the Alarm. The
alarm icon will disappear
indicating the alarm is no longer active.
SNOOZE:
1. When the alarm sounds, press the SNOOZE/LIGHT button to trigger snooze alarm for 10 minutes.
The snooze icon Zz will flash when the snooze feature is active.
2. To stop alarm for one day, press ALARM button, while in snooze mode. The alarm icon
will remain
solid.
Note: When the alarm sounds, it continues for 2 minutes and then shuts off completely.
2010
1M.1D