


PAGE 32
206-4118
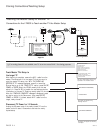
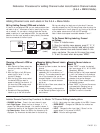
IMPORTANT INSTALLER SETUP INFORMATION! PLEASE READ THE FOLLOWING...
To set up a master TV you will need to know how to
enter the TV Installer menu and make changes to
the default values as required. If necessary, famil-
iarize yourself with the TV Installer menu and how
to make and save changes in the menu, bef
ore attempting to
clone the TV Master TV setup.
You will also need an LG Installer remote control similar to
the one shown in the front of this manual. The installer remote
must have a “Source” button or its equivalent. The remote
shown in this manual has a “INPUT” button -- this button
serves the purpose of a Source button.
Finally, the TV’s clonable features need to be set up. This is a
critical step. If the Master TV display panel’s clonable features
like adding channel icons or channel labels, digital font options
etc., are not correctly added, then the cloned TVs will all have
problems.
As the cloning procedure is being performed, specific steps
need to be done at the indicated times to achieve the desired
result. Be sure to do each task as indicated. If a procedure or
step is left out or not performed completely, cloning may not
work. At each step, pay attention to assure the TV screen shows
the proper message when cloning. If the message indicated
does not appear, there is a problem with that step and cloning
may not be successful. Cloning is only possible when the signal
source is an An
alog channel, not a digital channel.
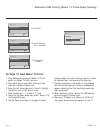
Reference: Detailed Instructions For Making A Master TV
Making a Master TV
Detailed Instructions
The following describes the procedure for preparing a Master TV
for cloning and the procedure for adding Channel Icons and/or
Labels.
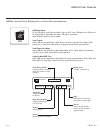
Note 1: Disconnect all Aux inputs. Under certain conditions,
Auto Tuning Channel Search is disabled if there is an Aux input
active.
Note 2: Under certain conditions, changes to the input mode of
the RGB inputs will not take effect until the power is cycled (TV
is turned Off and On). To avoid confusion, disconnect all RGB
inputs before entering the Installer menu.
1. Enter the TV installer menu.
a. Reset the internal controller to factory default by access-
ing installer menu item 117 FACT DEFAULT, set it to 1 and
press “ENTER”. The value will change back to 0 after the TV’s
internal controller has been restored to factory default con-
dition. This step will ensure that the TV channel memory will
be the active channel list. Check the Status LED. If it is
blinking rapidly then the TV channel map is in use.
b. Within the Installer menu, set the Installer menu items to
the configuration required of your institution.
c. It is important to set the tuning band at this time, see
Installer menu item 03 BAND/AFC.
d. Set Installer menu item 28 – CH OVERIDE to 001 to allow
access to the Auto Tuning and Ch. Edit features in the
Channel Menu. Exit the Installer menu.
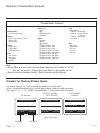
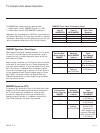
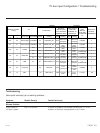
2. Access the Master TV menus and set the clonable options on
the menus to the desired configuration. Refer to the
Clonable Menu Features Chart in this manual.
3. Run Auto Tuning to find analog and digital channels.
4. Enter the Channel Edit menu and edit the channel lineup to
include the Free-To-Guest Channels only.
5. Assign ICONs to the channels using the Channel Label Menu.
Note: You can add Channel ICONS typically network logos
like ABC, NBC, PBS etc. in this step. Or, in Step 7, add
Channel ICONS or labels for channels without Icons.
6. Transfer the TV setup: Enter the TV installer menu. Press ‘2’,
‘5’, ‘5’, ‘MENU’ to start the transfer of the TV’s setup to the
internal controller. Once the transfer is complete, the sys-
tem will exit the Installer menu. Check the Status LED inside
the TV. It should be blinking slowly (1 blink per second).
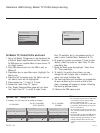
7. Edit/Add Channel ICONs and Channel Labels as needed.
Enter Installer menu. With menu displayed, press 2-5-4 +
MENU. See next page for detailed instructions:
- Editing/Adding Channel ICON and Labels on Master TV
- Changing a Channel’s ICON on Master TV
- Changing/Adding Channel Labels on Master TV
- Changing Source Labels on Master TV
8. Verify Master TV setup and feature configuration:
• Did you add Channel ICONS?
• Did you add Channel Labels?
• Did you add Source Labels?
• Did you adjust all TV menu options as required?
After verifying master setup, enter the TV Installer menu and
set Installer menu item 28 CH OVERIDE to 000. Press ENTER
to remove and exit the Installer menu.