


20
Motion Detection
Press MENU to enter the menu set up, then ? to CAMERA setup.
Press ENTER twice to enter the Motion Detection Setup.
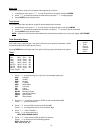
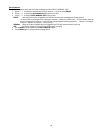
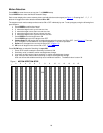
Each screen displays the current camera picture overlaid with the motion targets (as Figure 1). Pressing the ? / ? , ? / ?
buttons will toggle the motion detection between ON or OFF.
The targets on each motion setup can be turned to ON or OFF individually by row. To set up targets, using the following front
panel buttons:
1. Press ENTER to confirm the channel
2. Press ENTER to enter motion mode
3. ? moves the target cursor up one row at a time.
4. ? moves the target cursor down one row at a time.
5. ? moves the target cursor left one column at a time.
6. ? moves the target cursor right one column at a time.
7. Press ENTER to turn the target cursor ON
Press ENTER again to turn the target cursor OFF
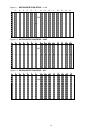
8. Camera Select (1-15) toggles the corresponding target on the cursor line ON or OFF. (see Figure 1.1) There are
only 15 targets in a row, therefore; only Camera Selected (1-15) can be operated.
9. Zoom: turns all targets in the current row ON or OFF. (Figure 1-2)
10. PIP: turns all targets on the screen ON or OFF. (Figure 1-3)
Press SLOW button to setup the Sensitivity list up to 255
1. Press REC button to setup the Sensitivity list down to 000
2. Sensitivity value is related to motion and brightness change.
3. Low value (as 001) means higher sensitivity on motion and brightness change.
4. High value (as 255) means lower sensitivity on motion and brightness change.
User can choose the suitable sensitivity value in different locations. The default value is set on 32.
Figure 1 MOTION DETECTION SETUP
1
2 3 4 5 6 7 8 9 10
11
12
13
14
15
032
--
--
--
--
--
--
--
--
--
--
--
--
--
--
--