


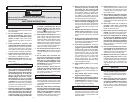
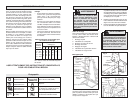

10 11
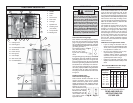
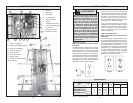
Fig. 6
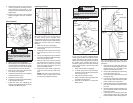
Bolt
Outer
fl ange
Inner fl ange
Blade
The tool is equipped with a rip ruler and
two cross-cut rulers (one on each side of
the tool). The rip ruler is adjusted at the
factory, but the two cross-cut rulers must be
adjusted. The blade must be installed before
setting the cross-cut rulers (see “Installing
Blades”).
1. Make sure the tool is unplugged.
2. Loosen the carriage lock and lower the
saw carriage.
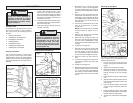
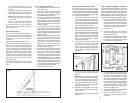
3. To align the cross-cut ruler, use a square
that measures at least 14" on one
side.
4. Line up one edge of the square with the
tips on the saw blade and the other edge
of the square with the ruler.
5. Slide the ruler so its measure matches
the measure on the square. A magnet
holds the ruler in place, but you may
wrap clear tape around the ruler and
frame for additional hold.
6. Repeat the steps above to adjust the
cross-cut ruler on the other side of the
tool.
NOTE: After the tool is completely as-
sembled, make a sample cut to verify
that the ruler is adjusted correctly.
1. Make sure the tool is unplugged.
2. While holding in the spindle lock button,
use the wrench provided with the tool to
turn the bolt on the saw motor spindle
counterclockwise. Remove the bolt.
3. Remove the outer fl ange, but leave the
inner fl ange on the spindle.
4. Install the blade with the arrow pointing
counterclockwise (Fig. 6).
5. Replace the outer fl ange.
6. Tighten the bolt clockwise while holding
in the spindle lock button.
7. Adjust the rulers (see "Adjusting the
Rulers") and install the blade guard (see
"Installing the Blade Guard").
9. Make sure the plate on the saw motor
is fl ush against the leveling screw to
ensure the saw is square (Fig. 5). This
screw is factory set and does not require
adjustments.
10. Tighten the two NUTS ON STUDS
FIRST and tighten the NUT ON BOLT
LAST.
Installing Blades
WARNING
To reduce the risk of injury, do not
operate the saw without the guards
in place (see "Installing the Blade
Guard").
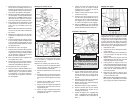
Adjusting the Rulers
Saw
blade
Square
Cross-cut
ruler
Fig. 7
Cross-cut
ruler
WARNING
To reduce the risk of injury, do not
operate the saw without the guards
in place.
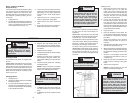
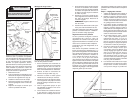
Installing the Blade Guard
Always install the blade guard before operat-
ing the saw. The guard is shipped with the
chatter guard pushed up inside the blade
guard and three torque knobs installed.
Reach up into the blade guard and pull down
the chatter guard. Remove the knobs to
install the guard. Leave the rubber washers
on the torque knobs to prevent the knobs
from slipping.
1. Make sure the tool is unplugged.
2. To attach the guard, line up the torque
knob holes on the blade guard and the
saw carriage (Fig. 8).
3. Install the three torque knobs.
4. Return carriage to the top of guide tubes
and tighten carriage lock.
5. Reverse the procedure to remove the
blade guard.
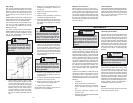
The cord keeper keeps the cord away
from the saw blade and away from your
workpiece.
1. Pinch the ends of the cord keeper to-
gether while slowly sliding them into the
guide tubes (Fig. 9). This will be a very
tight fi t. Seat the ends securely.
2. Remove the rubber stopper from the ring
in the cord keeper (Fig. 10).
3. Uncoil the cord and place the plug end
through the ring.
4. Loosen the carriage lock and lower the
saw carriage to the bottom of the guide
tubes. Tighten the carriage lock.
5. Pull the cord keeper so it is parallel to the
fl oor. Pull on the cord to remove slack in
the cord.
6. Open the rubber stopper and pull it over
the cord with the small end of the taper
toward the bottom.
7. From above the cord keeper, press the
rubber stopper into the ring on the cord
keeper with the small end facing down.
Fig. 8
Chatter
guard
Blade guard
Torque
knobs
Torque knob
Torque
knob hole
Torque
knob holes
Fig. 9
Cord
keeper end
Guide tube
Rubber
stopper
Fig. 10
Saw
carriage
Taut cord
Cord
keeper
Installing the Cord Keeper