


16 17
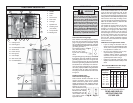
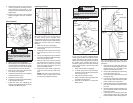
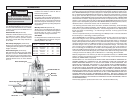
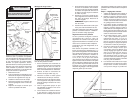
Fig. 15
Rip ruler
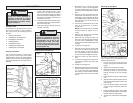
Rip Cutting
A rip cut is a horizontal cut that can be done
from the LEFT TO THE RIGHT or from the
RIGHT TO THE LEFT, but the work piece
must always be moved through the saw
in the direction of the arrow on the saw
motor.
MILWAUKEE recommends using the Hold
Down Bar Kit for frequent cutting of workpiec-
es thinner than 1/4" (see "Accessories").
The minimum length recommended for rip
cuts is 2-1/2' (work supported by four roll-
ers). The same size applies if you use the
Midway Fence Kit.
For easier cutting and best performance,
MILWAUKEE recommends using the Exten-
sion Kit when rip-cutting workpieces longer
than 6' (see "Accessories"). Do not rip-cut
workpieces that exceed 8'.
1. Select ripping from the left or right,
based on preference. Rotate the saw
motor to the ripping position (Fig. 15).
To rotate the motor, pull out the indexing
pins and rotate the saw motor. Lock the
indexing pins into the preset holes in
the saw carriage. The pins are spring-
loaded and should snap into place.
Be sure to shield bystanders from the
tool.
7. When the motor has reached full speed,
slowly move the workpiece through the
saw in the direction of the feed arrow
on the saw motor. Avoid placing your
hands, clothing or body parts under the
saw carriage. Do not look directly down
the line of cut because dust and debris
are generated during operation. Do not
use push sticks.
8. After the cut is completed, turn the tool
off and wait for the blade to come to a
complete stop.
9. Pull the scrap material and the fi nished
workpiece away from the tool.
10. Return the saw carriage to the upper-
most position on the guide tubes.
11. Tighten the carriage lock.
NOTE: When done ripping, return the car-
riage to the cross-cut position.
Indexing
pins
WARNING
To reduce the risk of injury, ripping
must always be done by moving
the workpiece through the saw in
the direction of the arrow on the
saw motor.
2. Select the saw height based on your
workpiece, following the measure on
the rip ruler.
3. Tighten the carriage lock securely.
4. Plug in the tool.
5. Start the motor and allow it to reach full
speed before beginning the cut.
6. Place the workpiece on the rollers. Do
not to drop the material; this may knock
the rollers out of alignment or damage
the rollers.
WARNING
To reduce the risk of injury and
damage to the tool, do not use push
sticks. Push sticks or the workpiece
can kick back, cause the blade to
pinch, or become caught in the
blade and be thrown from the tool.
WARNING
To reduce the risk of injury, always
shield bystanders from the tool.
Never look down the line of cut be-
cause dust and debris are generated
during operation.
Maintaining Tools
Keep your tool in good repair by adopting a
regular maintenance program. Before use,
examine the general condition of your tool.
Inspect guards, switches, tool cord set and
extension cord for damage. Check for loose
screws, misalignment, binding of moving
parts, improper mounting, broken parts and
any other condition that may affect its safe
operation. If abnormal noise or vibration oc-
curs, turn the tool off immediately and have
the problem corrected before further use.
Do not use a damaged tool. Tag damaged
tools “DO NOT USE” until repaired (see
“Repairs”).
Under normal conditions, relubrication is not
necessary until the motor brushes need to
be replaced. After six months to one year,
depending on use, return your tool to the
nearest MILWAUKEE service facility for the
following:
• Lubrication
• Brush inspection and replacement
• Mechanical inspection and cleaning
(gears, spindles, bearings, housing,
etc.)
• Electrical inspection (switch, cord,
armature, etc.)
• Testing to assure proper mechanical and
electrical operation
WARNING
To reduce the risk of injury, always un-
plug your tool before performing any
maintenance. Never disassemble the
tool or try to do any rewiring on the
tool's electrical system. Contact a
MILWAUKEE service facility for ALL
repairs.
WARNING
To reduce the risk of injury, electric
shock and damage to the tool, never
immerse your tool in liquid or allow a
liquid to fl ow inside the tool.
MAINTENANCE
Cleaning
Clean dust and debris from vents. Keep
the tool handles clean, dry and free of oil
or grease. Use only mild soap and a damp
cloth to clean your tool since certain cleaning
agents and solvents are harmful to plastics
and other insulated parts. Some of these
include: gasoline, turpentine, lacquer thinner,
paint thinner, chlorinated cleaning solvents,
ammonia and household detergents con-
taining ammonia. Never use fl ammable or
combustible solvents around tools.
Repairs
If your tool is damaged, return the entire tool
to the nearest service center.
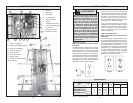
Making Cuts Less than 1"
When making cuts that are less than 1",
the chatter guard (located inside the blade
guard) must be on the workpiece and not on
the cut-off piece. If the chatter guard is on the
cut-off piece, it will jam on the workpiece and
prevent the carriage from continuing through
the cut. If the saw jams, turn the tool OFF
and wait for the blade to stop. Then back the
saw out of the cut.
Lock-Off Feature
Unplug the tool before installing the padlock.
There is a hole in the switch through which a
padlock (not supplied with tool) will fi t to lock
the tool when it is not in use. Use a padlock
with a 1-1/2" shackle, 5/16" diameter (such
as the Master Lock 1KALJ).
Lubricating Guide Tubes
The saw carriage should raise itself from the
bottom to the top of the guide tubes. How-
ever, if the tubes become caked with dust
or debris, the saw carriage may get stuck or
it may not slide smoothly. Periodically clean
the guide tubes with a damp cloth, following
the directions under "Cleaning". Then, use a
dry lubricant such as PTFE or spray silicone.
Other lubricants will cause dust and debris
to collect on the tubes, contaminating the
bearings.