7
3 Set the RF Converter to OFF. See page 43
for instructions on this setting, which can be
done at a later time.
IMPORTANT
Your TV Owner’s Guide may have
additional suggestions for audio video
hookups.
To connect your VCR to a mono (non-
stereo) TV, connect only the white
AUDIO OUT L of the VCR and the white
AUDIO INPUT of the TV. Since the TV
is not stereo, you cannot take advantage
of your VCR’s Hi-Fi stereo sound.
If you have an older TV without audio
video inputs, simply connect only the
antenna or cable as shown on page 5 or
6.
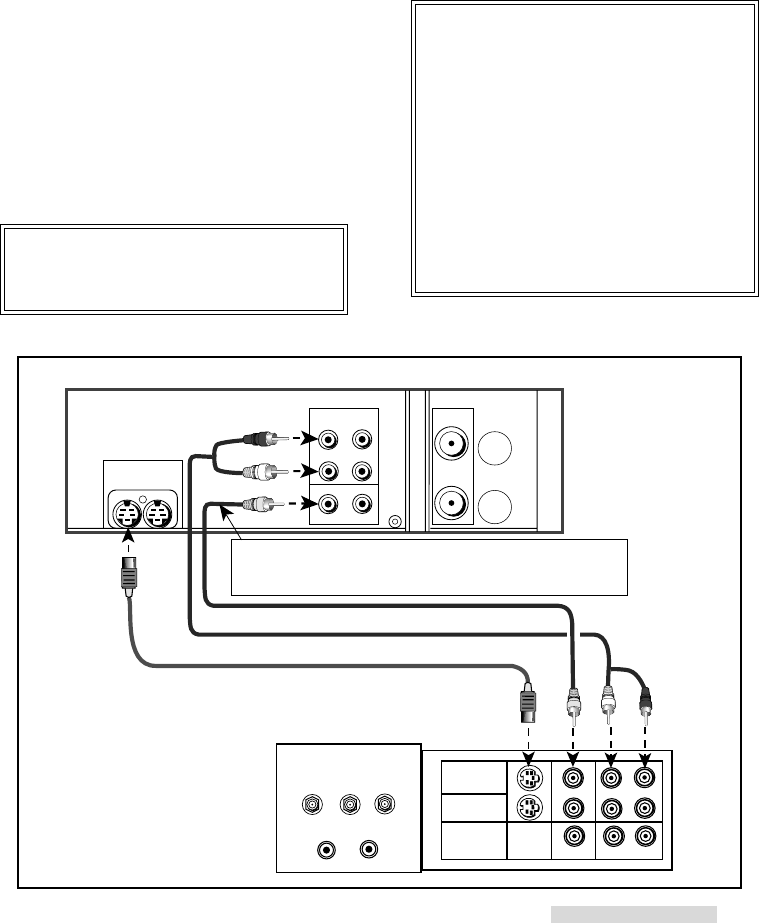
Connections to TV with Audio Video Inputs
INPUT-1
INPUT-2
OUTPUT
MONITOR/TUNER
S-VIDEO
VIDEO
L (MONO) R
AUDIO
OUT
AUDIO
L
R
VIDEO
OUT
S-VIDEO
OUT
R
L
R
R
L
White
Red
Yellow
White
Red
Yellow
TV Rear Panel
VCR Rear Panel
supplied S-video cable
supplied audio cable
optional video cable
When you connect an S-video cable, please do not
connect a yellow video cable because it may cause
interference of the picture depending on your TV.
Because you purchased a Hi-Fi VCR, you will
want to take advantage of its superior sound
capability and connect it to a stereo TV system
with audio and video inputs. This connection
also helps maintain the best picture quality.
1 Connect the red and white audio cable to
AUDIO OUT R (right) and AUDIO OUT L
(left) on the VCR. Connect the other end to
the TV’s AUDIO INPUT RIGHT and AUDIO
INPUT LEFT. Match the colors of the
connectors to the cables.
2 Connect the S-video cable to S-VIDEO OUT
on VCR. Connect the other end to S-VIDEO
INPUT on the TV.
IMPORTANT
If your TV does not have S-Video
connections, use standard yellow video
cable in step 2.
Hooking Up Your VCR


