


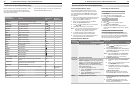

60 6. NetCommand IR Control (736 and 835 Series TVs)
6. NetCommand IR Control (736 and 835 Series TVs) 61
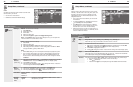
Before You Begin
To complete these steps you will need:
The remote controls for both the TV and the •
A/V receiver.
The IR emitter cable supplied with the TV.•
An HDMI-to-HDMI cable to connect the A/V •
receiver to the TV and cables necessary to
connect devices to the A/V receiver.
Connect your audio/video devices to the A/V
1.
receiver. Note the name of the A/V receiver input
used for each device. This information will be
needed later to set up NetCommand’s automatic
input switching.
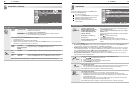
Connect the A/V receiver to the TV with an HDMI-
2.
to-HDMI cable.
Connect the IR emitter cable to the TV and position
3.
the IR emitter where it can send signals to the A/V
receiver. See “IR Emitter Placement,” page 52.
Power on the A/V receiver.
4.
Set the
5.
TV’s remote control slide switch to the
TV
position and power on the TV if needed.
When the
6.
Auto Input Sensing screen displays,
select device name AVR.
Setup to Control A/V Receiver Power and Volume
If you want NetCommand control over the A/V receiv-
er’s power and volume functions, perform the steps
under “A/V Receiver Control: Power and Volume,”
page 57.
Setup to Control TV Audio Output
If your A/V receiver is connected to the TV’s
AVR AUDIO
OUTPUT
or
DIGITAL AUDIO OUTPUT
jacks, set
up Net-
Command to control switching to the TV audio input.
Perform the steps under “Setup 1: Automatic A/V
Receiver Switching to the TV Audio Input,” page 58.
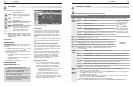
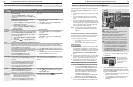
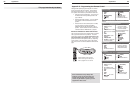
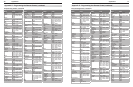
A/V Receiver Control: Automatic Video and
Audio Switching via HDMI
If your A/V receiver has an HDMI output, you can use
this procedure to set up control of the A/V receiver’s
audio and video switching. The HDMI connection
allows you to route video signals from multiple devices
over a single cable to the TV. See the diagram below.
The connected devices can be analog, digital, or a
mixture or the two.
Note: If your HDMI A/V receiver has CEC capabilities,
you may be able to fully or partially control your
equipment without performing NetCommand IR
setup.
HDMI
3D
GLASSES
EMITTER
AVR
AUDIO
OUTPUT
DIGITAL
AUDIO
OUTPUT
L
R
L
R
(480i / 480p / 720p / 1080i)
L
R
DVI/PC INPUT
VIDEO
Y
Pb
Pr
AUDIO
Pb
Y/ VIDEO
Pr
VIDEO: 480i/480p/720p/1080i/1080p
AUDIO: PCM STEREO
PC: VGA, W-VGA, SVGA, W-SVGA,
XGA, W-XGA, SXGA, 720p/ 1080p
1
2
3
HDMI
IR-
NetCommand
Output / External
Controller Input
R
INPUT 3
INPUT 2
INPUT 1
S-VIDEO
INPUT 3
AUDIO
R
L
AUDIO
ANT 2 / AUX
ANT 1 / MAIN
HDMI
1
2
3
)%.*065
)JHIEFmOJUJPO
%7%QMBZFS
%7%QMBZFS
$BCMFCPY
7$3
57CBDLQBOFM
"7SFDFJWFSXJUI
)%.*PVUQVU
You can connect
multiple video
devices to an A/V
receiver that has
an HDMI output.
Setting Up NetCommand Control of
an A/V Receiver, continued
1
3
3
4
2
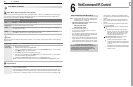
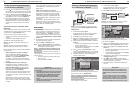
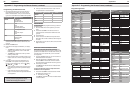
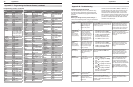
Guide to the Inputs > AV Receiver menu for an A/V
receiver with HDMI output
1
Th e Learn column lists “learnable” keys from the
A/V receiver’s remote control.
2
Input1 through Input5 are arbitrary names used
by the TV to uniquely identify “learnable” A/V
receiver inputs.
3
A check mark next to a key name indicates it has
been “learned” by NetCommand.
4
Th e Assign Input column provides a list of
possible device types. Use this list to assign the
name of the device type connected to the associ-
ated A/V receiver input. The assigned device
name will appear in the Input Selection menu.
Setup to Control Automatic Video
and Audio Switching via HDMI
Follow these steps if you wish NetCommand to control
switching of A/V receiver video as well as audio inputs.
When this setup is complete, you can use the TV’s
Input Selection menu to select a video device con-
nected to the A/V receiver. You can also perform addi-
tional NetCommand setup to control devices connected
to the A/V receiver.
Display the
1.
Inputs > AV Receiver menu.
Note: The labels Input1 through Input5 in the Learn
column are arbitrary names used by the TV to
distinguish between A/V receiver inputs.
With the highlight in the
2.
Learn column, highlight
one of the Input labels (Input1 through Input5).
Press
3.
ENTER
and the highlighted Input label will start
flashing to indicate readiness for “learning.”
While the
4.
Input text is flashing, press and hold the
key on the A/V receiver’s remote control for the
input you wish to associate with the selected Input
label.
When a check appears next to the
5.
Input label,
release the remote control key.
• Ifthetextstopsflashingbeforethecheckmark
appears, repeat this step.
• ToerasetheIRcodejust“learned,”press
CANCEL
while the name is highlighted.
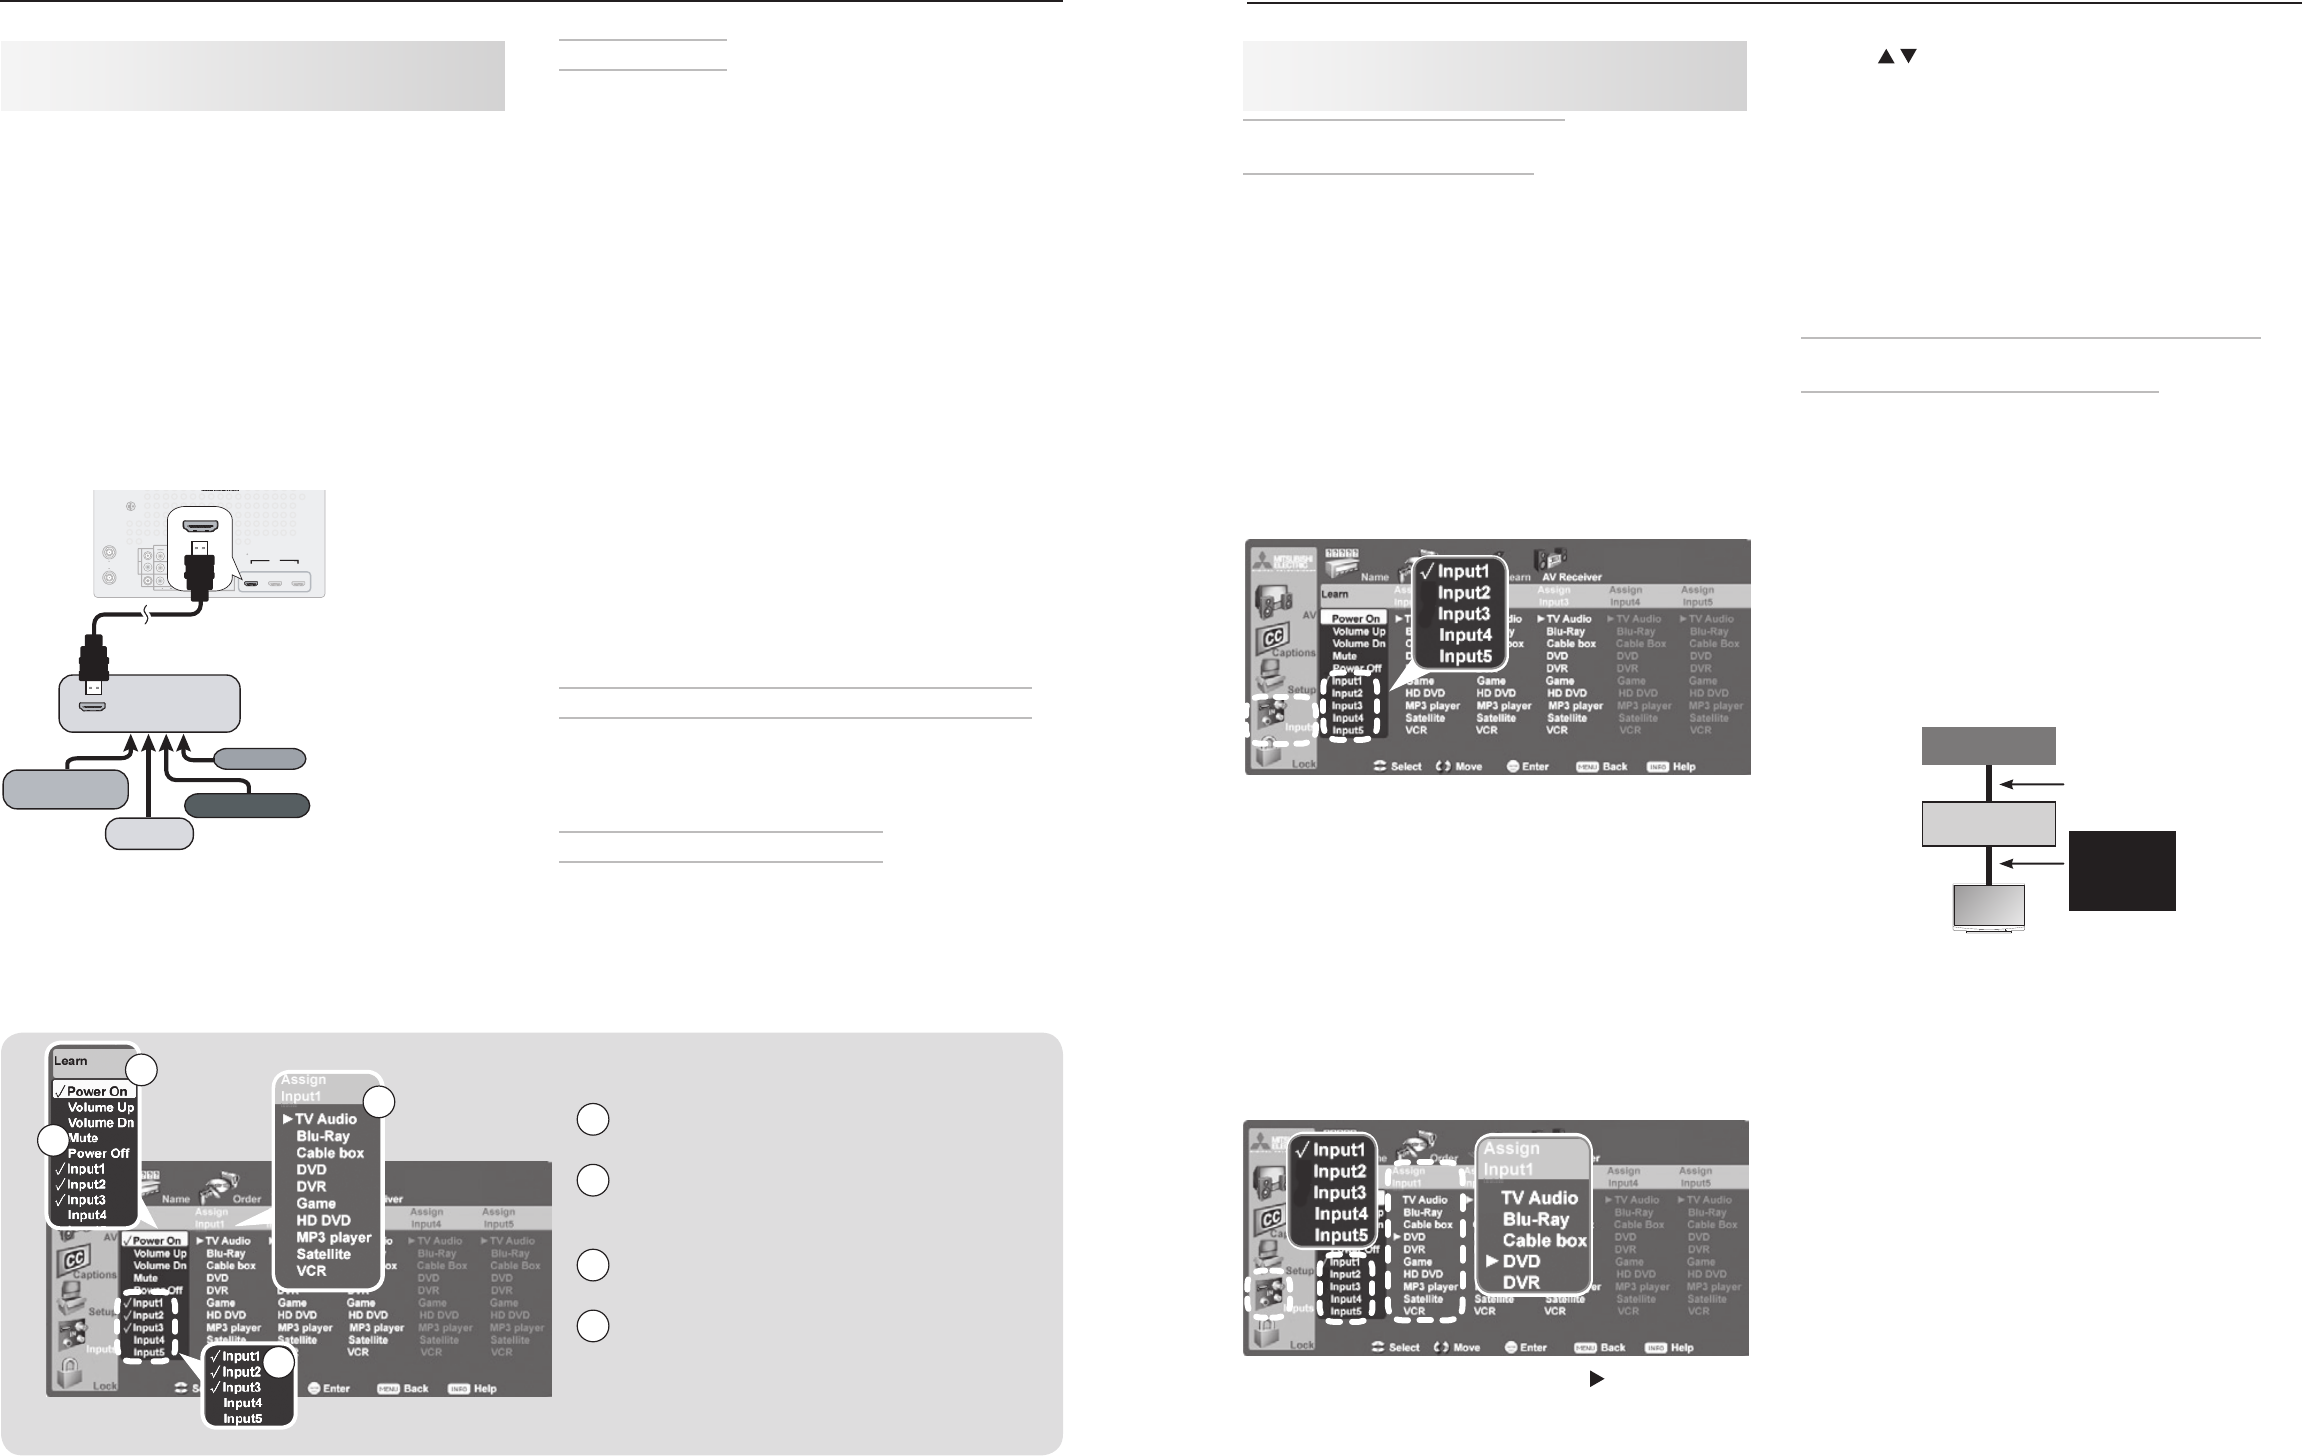
On the
6.
TV’s remote control, press once. The
highlight will move automatically to the associ-
ated Assign Input column (Assign Input1 through
Assign Input5).
Setting Up NetCommand Control of
an A/V Receiver, continued
Use
7.
to highlight the device type connected to
the A/V receiver input just “learned.” The Assign
Input column contains a list of possible device
types.
In the example above, a DVD player is connected to
the A/V receiver input the TV knows as Input1.
The device type you select here will appear as an
icon in the TV’s Input Selection menu. You can
assign each device type in the list only once.
Press
8.
EXIT
if finished or repeat these steps for addi-
tional video sources connected to the A/V receiver.
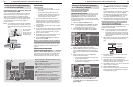
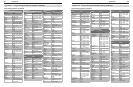
NetCommand IR Control of a Device Connected
to an A/V Receiver with HDMI Output
Use this setup if you wish to have NetCommand control
a device sending audio and video through the A/V
receiver to the TV via HDMI.
Note: If your A/V receiver and the connected device
have CEC capability, you may be able to par-
tially operate the device using the TV’s remote
control without any special setup. In that case,
use this procedure to add commands not avail-
able with CEC.
Set up NetCommand control of A/V receiver audio/
1.
video switching via HDMI as described on this
page.
TV
Source Device
A/V Receiver
Any type of
audio/video
connection
HDMI
cable from
TV to A/V
receiver
Press
2.
EXIT
to close any open menus and return to
normal TV viewing.
Press
3.
INPUT
to open the Input Selection menu.
Highlight the icon for an A/V receiver input
4.
assigned in “Setup to Control Automatic Video and
Audio Switching via HDMI” on this page .
Press
5.
ENTER
to switch the TV to the A/V receiver and
the A/V receiver to the device.
Open the
6.
Inputs > Learn menu.
Perform NetCommand “learning” for the device by
7.
following the steps in “Initial NetCommand Setup
for Most Devices,” page 53.