


10 1. Television Overview
11
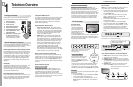
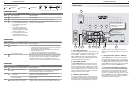
6. S-VIDEO (INPUT 3)
Connect an S-Video device to this input. Use the
AUDIO R
and
L
jacks for
INPUT 3
(item 9) if you wish to
send audio to the TV.
7. HDMI™ Inputs
(High-Definition
Multimedia Interface)
The HDMI inputs support uncompressed standard and
high-definition digital video formats and PCM digital
stereo audio.
Use the HDMI inputs to connect to CEA-861 HDMI com-
pliant devices such as a high-definition receiver or DVD
player. These inputs support 480i, 480p, 720p, 1080i,
and 1080p video formats.
Mitsubishi recommends you use category 2 HDMI cables,
also called high-speed HDMI cables, to connect HDMI
1.3 source devices. High-speed category 2 cables bring
you the full benefits of Deep Color and x.v.Color.
These HDMI inputs can also accept digital DVI video
signals. To connect a device’s DVI output to the TV’s
HDMI input, use an HDMI-to-DVI adapter or cable plus
analog audio cables. Connect the analog audio cables
to the
DVI/PC INPUT AUDIO
jacks (item 10) on the TV to
receive left and right stereo audio from your DVI device.
The TV’s HDMI inputs are compatible with many DVI-D
and HDMI computer video signals. For additional infor-
mation on PC compatibility, see “Using the TV with a
Personal Computer,” page 16, and Appendix A, “Specifi-
cations,” page 62.
These inputs are HDCP (High-Bandwidth Digital Copy
Protection) compliant.
These inputs are
certified for proper interop-
erability with other products certified by Simplay
™
.
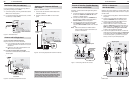
8. IR NetCommand Output/External
Controller Input
736 and 835 series models. IR emitters connected to
this jack are used by the TV’s NetCommand system to
send control signals to external IR remote-controlled
devices such as cable boxes, VCRs, DVD players, satel-
lite receivers and audio receivers.
When NetCommand is not being used, this jack can be
switched to receive wired IR control signals from exter-
nal system controllers. To switch this jack for use as an
input, connect the external controller’s IR output to this
jack, then with the TV remote:
Press 1.
MENU
to display the TV menu.
Enter the number sequence 2, 4, 7, 0 to display 2.
the Installer menu.
TV Back Panel, continued
Highlight the 3. WIRED IR selection and press
ENTER
to change the setting from OFF to ON.
If the IR device is disconnected at any time when the
TV is turned on, the setting returns to the NetCommand
mode (OFF).
Note: When the WIRED IR option is set to ON (control
by an external device), the Low Power setting
for Energy Mode is unavailable.
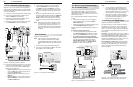
9. AUDIO L and R (INPUT 1, INPUT 3)
These are analog stereo inputs shared by more than
one video input.
INPUT 1
• stereo audio jacks are for use with
INPUT 1
composite video (single yellow cable) or component
video (Y Pb Pr cables).
INPUT 3
• stereo audio jacks are for use with
INPUT 3
composite video or S-Video.
10. DVI/PC INPUT AUDIO
Use the
DVI/PC INPUT AUDIO
jack when connecting
a DVI device to one of the TV’s HDMI inputs using a
DVI-to-HDMI cable. These jacks allow you to send left
and right analog audio from your computer or other DVI
device to the TV.
11. 3D GLASSES EMITTER
Use this jack to connect the special IR emitter supplied
with 3D glasses. The emitter will send a signal that
synchronizes your 3D glasses with the screen display.
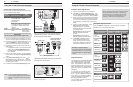
TV Set-Up
Getting Started
Review the important safety, installation, and oper-1.
ating information at the beginning of this book.
Choose a location for your TV.2.
• Allowatleastfourinchesofspaceonallsides
of the TV to help prevent overheating. Over-
heating may cause premature failure of the TV
as well as shortened lamp life.
• Avoidlocationswherelightmayreflectoffthe
screen.
• Seethestandrequirementsunder“Important
Information About Your TV.”
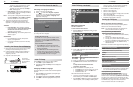
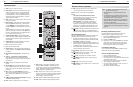
Install the batteries in the remote control. See the 3.
next page for instructions. See page 26. For more
on use of the remote control.
Plug your TV into a power outlet. The green LED on 4.
the front of the TV will start blinking rapidly. After
the green LED stops blinking, press the
POWER
key to
power on the TV.
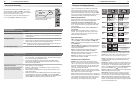
When the 5. Welcome screen appears the first time
you power on the TV, select a language for TV
menus. You can later change the language through
the Setup menu.
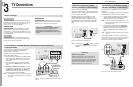
Connect your audio/video (A/V) devices to the TV 6.
and perform initial setup.
See chapter 3, “TV Connections,” for connec-•
tion diagrams.
See the following pages for initial TV setup and •
use of the Auto Input Sensing feature.
To connect the TV to a personal computer, see •
“Using the TV with a Personal Computer,” page
16.
736 and 835 series models: See chapter 6, •
“NetCommand IR Control,” to perform Net-
Command IR “learning” to set up control of
your home theater.
Mitsubishi recommends you perform a channel 7.
scan for channels received on
ANT 1
and
ANT 2
.
See “Initial TV Setup” page 13,
You can now start watching TV or you can perform 8.
additional setup and customization through the TV
menus.
Guidelines for Setting Up and Using Your New Widescreen TV
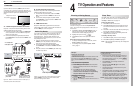
TV Operation
Review chapter 4, “TV Operation and Features,” for 1.
TV features including:
• Input Selection (viewing source). Select a
connected program source to watch, such as a
VCR, DVD player, or antenna. Press
INPUT
on the
remote control to select from icons for the TV
inputs. See “Choosing a Viewing Source,” page
25.
• Program Listings. Press
GUIDE
to see
ChannelView™ listings for programs on
ANT 1
and
ANT 2
. See “ChannelView Channel List-
ings,” page 28
• Picture Formats. Press
FORMAT
to cycle through
picture sizes and shapes to find the one best
suited to the current program. See “TV Signals
and Display Formats,” page 31.
To view still and moving digital camera images on 2.
the TV, see page 32, “Viewing Camera Files.”
736 and 835 series models: To control A/V devices 3.
with NetCommand, see page 55, “Operating
NetCommand-Controlled Devices.”
Additional TV Setup
Review chapter 5, “TV Menus,” to customize TV 1.
operation. Press the
MENU
key to enter the menu
system. Some examples of settings you may wish
to change include:
• Fav. Use an on-screen menu to create custom
lists of your favorite channels from
ANT 1
and
ANT 2
. See Setup > Edit, page 43.
• Order. Rearrange the device icons in the Input
Selection menu to put frequently used icons
near the front. See Inputs > Order, page 47.
• Name. Change the device types that appear
in the Input Selection menu. See Inputs >
Name options, page 47.
• Parental Locks. Restrict TV viewing by
program rating, by channel, or by time of day.
You can also disable the control-panel buttons
if you have small children.
To restrict TV use by program rating, see -
the Lock > Parent menu, page 49.
2
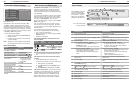
HDMI Cable Categories
HDMI cables are available as Category 1 and Cat-
egory 2 types.
Category 2 Cables• (also called high-speed
HDMI cables). Newer, HDMI 1.3-compliant DVD
players, video games, and set-top boxes require
Category 2 cables, suitable for clock frequen-
cies up to 340 MHz or data rates of up to 10.2
gigabits per second. Use category 2 cables for
high-speed 1080p HD signals carrying extended
color encodings (i.e., 30 or more bits, also called
Deep Color). Category 2 cables are also suitable
for standard HDTV signals.
Category 1 Cables• (also called standard HDMI
cables). Category 1 cables may be unmarked.
They are suitable for standard HDTV 720p,
1080i, and 1080p signals with 8-bit color depth.
Use category 1 cables for clock frequencies up
to 74.25 MHz or data rates of up to 2.23 gigabits
per second.