


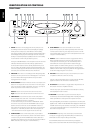

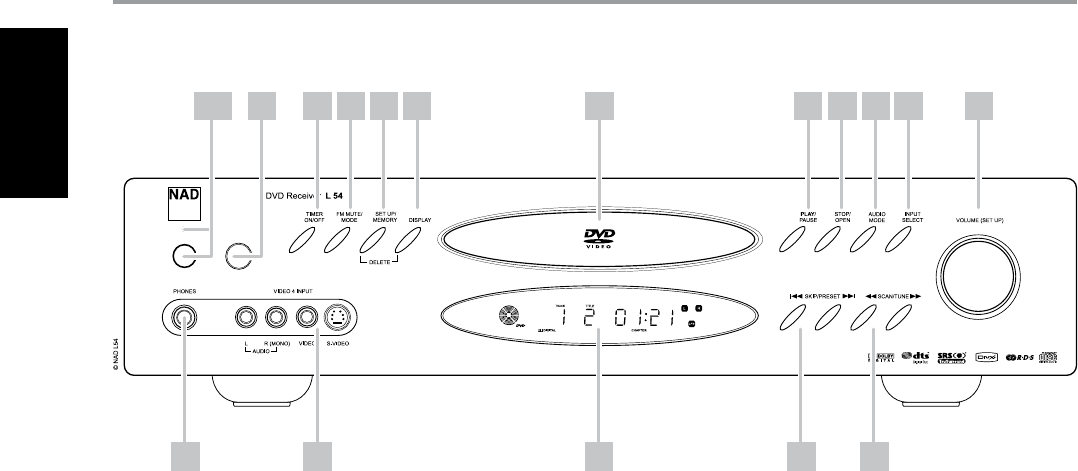
1 POWER : When the L 54 is rst plugged into the AC power, the L 54’s
clock will light in the main Vacuum Fluorescent Display (VFD) display
showing the time of day. Press to switch ON the L 54 from standby,
changing the standby indicator from bright blue to dark and illuminating
the VFD display. Pressing the power switch again turns the unit back to
standby. It is usual (and perfectly acceptable) to leave the L 54 in standby
mode in between normal viewing and listening sessions.
Pressing the “STOP/OPEN” button on the front-panel or the HTR 4 remote’s
“ON” button will switch the receiver ON, making it operational. Press
the remote’s “OFF” button to return to standby. Note that when you do
choose to switch o to standby using the front panel Power button, the
L 54’s memory back-up system will store channel level, tuner preset, and
other settings for several weeks while the unit is switched o.
2 INDICATOR : When the L 54 is in standby, the LED will light bright blue
and at the same time, the VFD in the L 54 will display the L 54’s internal
clock. This indicator will extinguish itself when the power cable is
unplugged from the AC supply.
3 REMOTE SENSOR : Point the HTR 4 at the remote sensor and press the
buttons. Do not expose the remote sensor of the L 54 to a strong light
source such as direct sunlight or illumination. If you do so, you may not
be able to operate the receiver with the remote control.
Distance: About 23 ft (7 m) from the front of the remote sensor
Angle: About 30° in each direction of the front of the remote sensor
4 TIMER ON/OFF : Press and hold to set the internal clock, ON/OFF
timer and display of the clock’s time. A red “clock face” will appear in the
uorescent display when the timer is activated.
To set the internal clock, press and hold the “TIMER ON/OFF” button
for more than 4 seconds. Use the “SETUP/MEMORY” button to toggle
between the hours and minutes. Use the “SKIP/PRESET” buttons to
change the hours and minutes. There are two timers, one for when the
L 54 powers on – “ON TIME”; the other for when the unit powers o time and the disc tray will open.
– “OFF TIME”. Both timers are also programmed in the same way.
5 FM MUTE/MODE : In the normal ‘Mute’ position, only the stations
with a strong signal can be listened to, and the noise between stations
is muted. Pressing the “FM MUTE/MODE” button allows distant (and
potentially noisy) stations to be received (See also “Choosing FM MUTE/
MODE under the section “Using the L 54’s AM/FM Radio”).
6 SETUP/MEMORY : Use to store tuned stations to the L 54’s 60
preset-memory locations (See “Listening to Radio”). When DVD mode
is selected, use this button to go the Setup Menu as shown on the On
Screen Display (OSD). (See also the section “Setting Radio Presets” under
“Using the L 54’s AM/FM Radio”).
7 DISPLAY : Use this multifunction button to toggle between RDS PS,
RDS RT and station frequency in FM Tuner mode (See the section
“Viewing RDS Text under “Using the L 54’s AM/FM Radio”). When in
either CABLE/SAT or VCR mode, this “DISPLAY” button will toggle
between Optical or Coaxial and analog inputs. You can assign either
Optical or Analog input to VCR and either Coaxial or Analog input to
CABLE/SAT. When in DVD mode, pressing “DISPLAY” will toggle between
the two DVD display navigation menus as well.
8 DISC TRAY : With the DISC TRAY open, insert a DVD, VCD, CD or other
compatible media disc face down onto the tray.
If the disc is placed upside down and it is a single sided disc, ‘NO DISC’
appears on both the L 54’s VFD and the TV/Monitor screen.
9 PLAY/PAUSE : Press this button to toggle between Play and Pause of a
DVD, VCD, CD and other compatible media disc.
If the disc tray is open, press this button to automatically close the tray
and start playback if a disc is loaded.
10 STOP/OPEN : Press this button to open and close the disc tray and
simultaneously select the internal DVD player. When in standby, this button
will also power ON the L 54 and open the disc tray at the same time.
During DVD playback, press this button to stop and at the same time pause
playback of disc - “PRESS PLAY TO CONTINUE” will be displayed in the OSD and
“RESUME” at the VFD. If you do not want to resume play, press "STOP/OPEN"
a second time and playback will come to a complete STOP. Press a third
11 AUDIO MODE : Depending on the selected input, mode and audio
format, press to toggle through SRS, TREBLE, BASS, LEFT balance level,
RIGHT balance level and Dynamic Range Control (DRC).
Use the“VOLUME (SETUP)” knob or HTR 4’s Volume keys to adjust the
settings. (See also section about “Audio Mode” under “Setting up the L 54”).
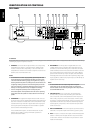
IDENTIFICATION OF CONTROLS
FRONT PANEL
31&2 4 5 6 7 8 9 10 11 12 13
18 17 16 15 14
ENGLISH FRANÇAIS DEUTSCH NEDERLANDS ESPAÑOL ITALIANO РУССКИЙ SVENSKA
8