


E – 10
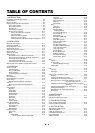
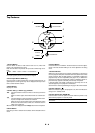
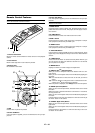
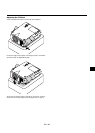
4. LED
Flashes when any button is pressed.
5. Power ON Button
If the main power is applied, you can use this button to turn your pro-
jector on.
P
J
FOCUS
ZOOM
VOL.
SHIFT
HELP
P
O
I
N
T
E
R
KEYSTONE
M
A
G
N
I
F
Y
F
R
E
E
Z
E
P
IC
-
M
U
T
E
P
C
C
A
R
D
SLIDE
F
O
L
D
E
R
S
L
I
D
E
LIST
OFF
VIDEO
AUTO ADJ.
S-VIDEO
RGB1
RGB2
LASER
ON
POWER
S
E
L
E
C
T
3
2
1
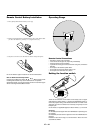
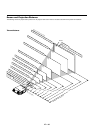
Remote Control Features
NOTE: If you are using a Macintosh computer, you can click either the right-
click or left-click button to activate the mouse.
1. Infrared Transmitter
Direct the remote control toward the remote sensor on the projector
cabinet.
2. Laser Pointer
Beams a laser light when “Laser” button is pressed.
3. Remote Jack
Not available on this model.
M
E
N
U
E
N
T
E
R
C
A
N
C
E
L
PJ
OFF
VIDEO
AUTO ADJ.
S-VIDEO RGB1 RGB2
LASER
ON
SELECT
POWER
6
8
7
11
13
15
4
5
9
1
0
1
2
1
4
1
6
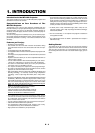
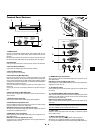
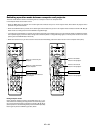
6. Power OFF Button
If the main power is applied, you can use this button to turn your pro-
jector off.
NOTE: To turn off the projector, press and hold the POWER OFF button for a
minimum of two seconds.
7. VIDEO Button
Press this button to select an NTSC, PAL, SECAM or NTSC4.43 com-
patible video source from a VCR, DVD player, laser disc player or docu-
ment camera.
8. S-VIDEO Button
Press this button to select an S-Video source from a VCR.
9. RGB 1 Button
Press this button to select a video source from a computer or compo-
nent equipment connected to your RGB 1 port.
10. RGB 2 Button
Press this button to select a video source from computer or compo-
nent equipment connected to your RGB 2 port.
11. AUTO ADJ Button
Use this button to adjust an RGB source for an optimal picture. Some
signals may not be displayed correctly or take time to switch between
sources.
12. LASER Button
Press and hold this button to activate the laser pointer. When lit, you
can use the laser to draw your audience’s attention to a red dot that
you can place on any object.
13. MENU Button
Displays the menu for various settings and adjustments.
14. SELECT (▲▼
ᮤ ᮣ
) (Mouse) Button
When you are in the Computer mode, these buttons work as a com-
puter mouse.
When you are in the Projector mode, which is indicated by lighting the
PJ button:
▲▼
: Use these buttons to select the menu of the item you wish to
adjust.
ᮤ ᮣ
: Use these buttons to change the level of a selected menu item.
A press of the
ᮣ
button executes the selection.
When the pointer is displayed, these
▲▼
ᮤ ᮣ
buttons move the pointer.
15. ENTER (Left Click) Button
When you are in the Computer mode, this button works as the mouse
left button.
When this button is pressed and held for a minimum of 1.5 seconds,
the drag mode is set.
When you are in the Projector mode, which is indicated by lighting the
PJ button:
Use this button to enter your menu selection. It works the same way as
the “Enter” button on the cabinet.
16. CANCEL (Right Click) Button
When you are in the Computer mode, this button works as the mouse
right button.
When you are in the Projector mode, which is indicated by lighting the
PJ button:
Press this button to exit “Menus”. It works the same way as the “Can-
cel” button on the cabinet.