10
PREPARATION
No supplied cables are used with these connections:
• Please purchase the necessary cables at your local store.
Before you connect:
Be sure your antenna or other device is connected properly
before plugging in the AC power cord.
Antenna Connection
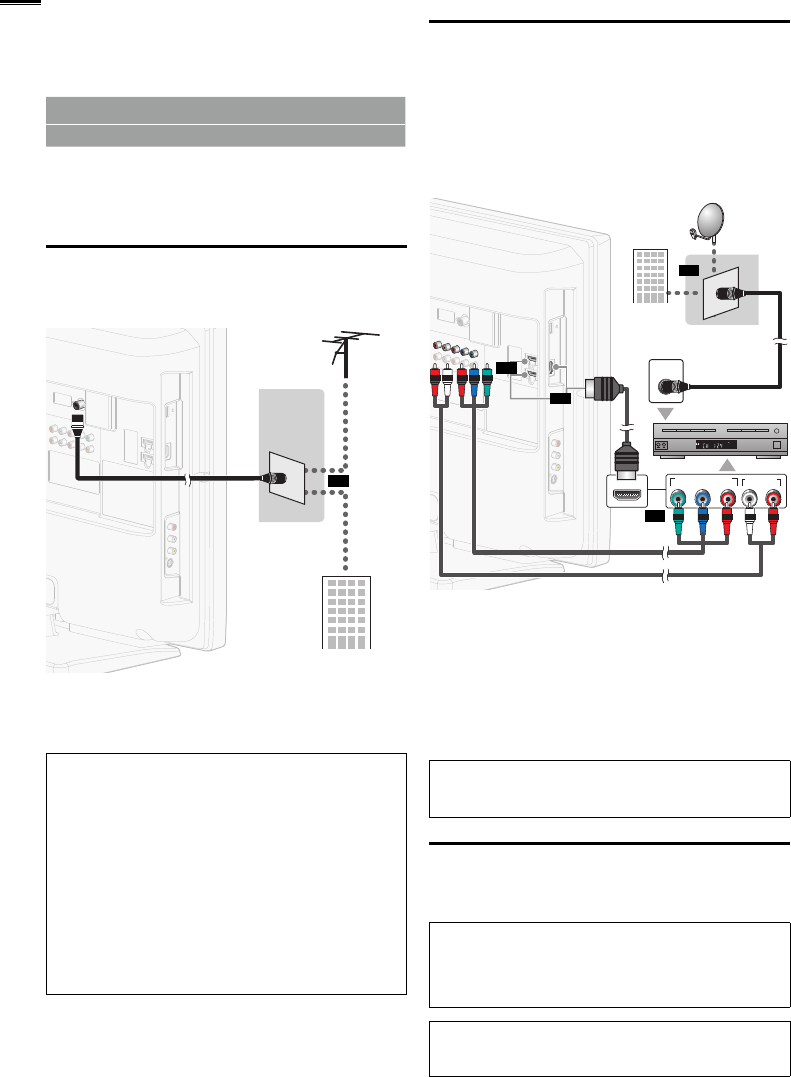
Connect the RF coaxial cable on your home outlet to the
antenna input jack of this unit.
VHF / UHF
VHF / UHF
analog
analog
or
or
DTV antenna
DTV antenna
cable TV signal
cable TV signal
or
RF coaxial cable
RF coaxial cable
Once connections are completed, turn on the unit and begin
initial setup. Channel scanning is necessary for the unit to
memorize all available channels in your area. [Initial Setup]
➠
p. 11
Note
• If you have any question about the DTV’s antenna, visit
www.antennaweb.org for further information.
• Depending on your antenna system, you may need different types
of combiners (mixers) or separators (splitters) for HD TV signal
the minimum RF bandpass on these devices is 2,000MHz or 2GHz.
• For your safety and to avoid damage to this unit, please unplug the
RF coaxial cable from the antenna input jack before moving the
unit.
• If you did use an antenna to receive analog TV, it should also
work for DTV reception. Outdoor or attic antennas will be more
effective than a set top or inside antenna.
• To switch your reception source easily between antenna and cable,
install an antenna selector.
• If you are not receiving a signal from your cable service, contact the
Cable provider.
Connection to Cable Receiver or
Satellite Box
Use an HDMI or Component Video cables to connect the
HDMI or the Component Video Input jacks of the unit to the
HDMI or the Component Video output jacks of the cable
receiver / satellite box.
If you connect to the unit’s Component Video Input jacks,
connect Analog Audio cables to the Analog Audio L/R Input
jacks right beside the Component Video connector jacks.
STEREO
PCM
ANT IN
COMPONENT VIDEO OUT
Pr/CrPb/CbY
AUDIO OUT
RL
HDMI OUT
(red)
(red)
(blue)
(blue)
(green)
(green)
cable receiver /
cable receiver /
satellite box
satellite box
cable TV signal
cable TV signal
including PPV
including PPV
component video cables
component video cables
(red / blue / green) and audio cables
(red / blue / green) and audio cables
RF coaxial cable
RF coaxial cable
or
or
or
or
HDMI cable
HDMI cable
satellite dish
satellite dish
You can also connect this unit to the cable receiver or satellite
box other than the HDMI or the Component Video output jacks
or Composite Video output jack (
➠
p. 24, 25) because they
might have different output jacks.
Required cables and connecting methods of the cable receiver /
satellite box, or the availability channel for the clear QAM may
differ depending on the cable / satellite provider or local TV
broadcaster.
For more information, please contact your cable / satellite provider
or local TV broadcaster.
Note
• Use an HDMI cable with the HDMI logo (a certifi ed HDMI cable).
High Speed HDMI cable is recommended for the better compatibility.
Plug In the AC Power Cord
Make sure that the AC power cord must be plugged to an AC
outlet after all the necessary connections are made.
Caution:
• Do not connect the AC power cord to a power supply outside
the indicated voltage of this unit (AC 120V).
Connecting the AC power cord to a power supply outside of this
range may result in fi re or electrical shocks.
Note
• Each time you plug in the AC power cord, no operations will be
performed for a few seconds. This is not a malfunction.


