Getting startedConnections and settingsPlaybackSettingsReference
3
VQT3V64
Table of contents
Getting started
Safety precautions. . . . . . . . . . . . . . . . . . . . . . . 2
Accessories . . . . . . . . . . . . . . . . . . . . . . . . . . . . 4
Unit and media care. . . . . . . . . . . . . . . . . . . . . . 4
Playable media . . . . . . . . . . . . . . . . . . . . . . . . . 5
Control reference guide. . . . . . . . . . . . . . . . . . . 8
Connections and settings
STEP 1 : Connecting to a TV. . . . . . . . . . . . . . . 9
STEP 2 : Connecting to
an amplifier/receiver . . . . . . . . . . . . . 10
STEP 3 : Connecting to the network . . . . . . . . 11
STEP 4 : Connecting the AC mains lead. . . . . 11
STEP 5 : Settings . . . . . . . . . . . . . . . . . . . . . . 12
STEP 6 : Reprogramming
the remote control. . . . . . . . . . . . . . . 14
Playback
Inserting or removing media . . . . . . . . . . . . . . 15
HOME menu . . . . . . . . . . . . . . . . . . . . . . . . . . 15
Multi User Mode. . . . . . . . . . . . . . . . . . . . . . . . 16
Playback . . . . . . . . . . . . . . . . . . . . . . . . . . . . . 17
VIERA Connect (Enjoying Internet
Service) . . . . . . . . . . . . . . . . . . . . . . . . . . . . . . 20
Home Network feature. . . . . . . . . . . . . . . . . . . 21
VIERA Link “HDAVI Control™” . . . . . . . . . . . . 23
Settings
Option menu . . . . . . . . . . . . . . . . . . . . . . . . . . 24
Setup menu . . . . . . . . . . . . . . . . . . . . . . . . . . . 27
Reference
Troubleshooting guide . . . . . . . . . . . . . . . . . . . 33
Messages . . . . . . . . . . . . . . . . . . . . . . . . . . . . 37
Supplemental information . . . . . . . . . . . . . . . . 39
Specifications. . . . . . . . . . . . . . . . . . . . . . . . . . 40
Precautions of wireless LAN connection . . . . . 41
(For Saudi Arabia)
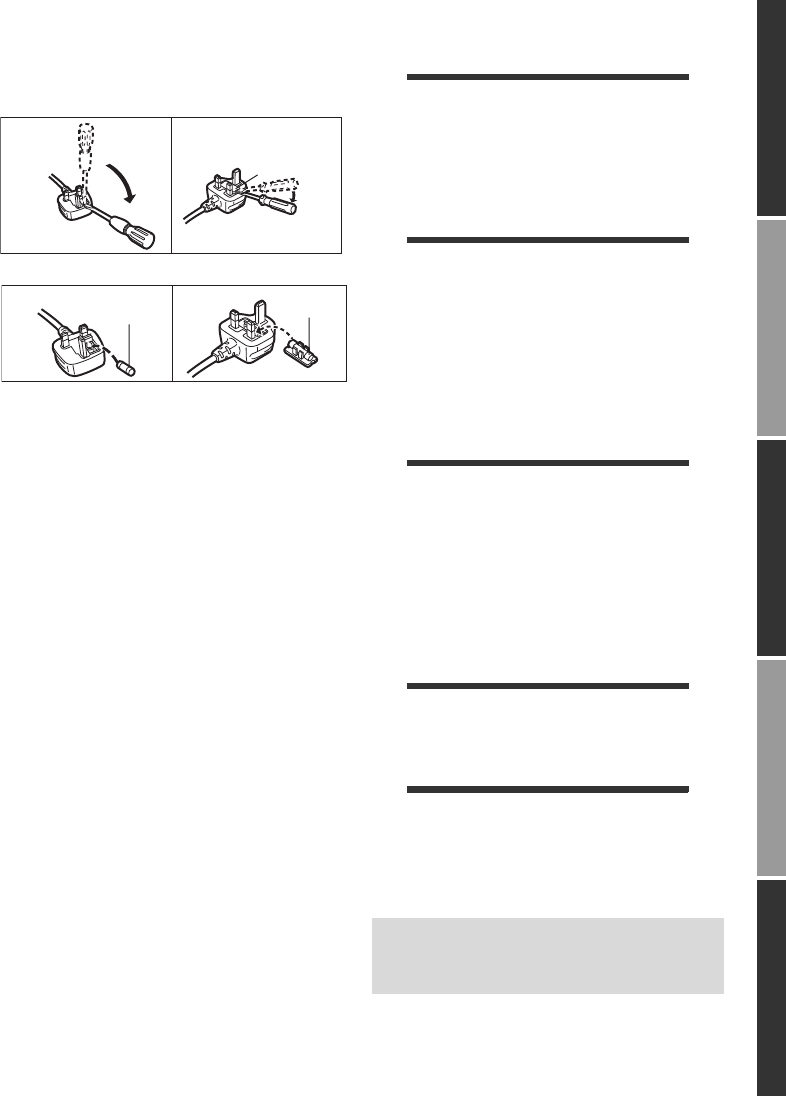
How to replace the fuse
The location of the fuse differ according to the type of AC
mains plug (figures A and B). Confirm the AC mains plug
fitted and follow the instructions below.
Illustrations may differ from actual AC mains plug.
1. Open the fuse cover with a screwdriver.
2. Replace the fuse and close or attach the fuse cover.
Fuse cover
Figure A Figure B
Figure A Figure B
Fuse
(5 ampere)
Fuse
(5 ampere)
≥ Restriction on use of unauthorized
copied content (> 38)
≥ Firmware updates (> 13)
DMP-BDT220GNGCGAGW-VQT3V64.book 3 ページ 2012年2月6日 月曜日 午前9時52分


