


12
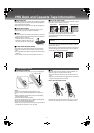
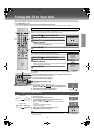
Setting Up for VHS
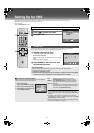
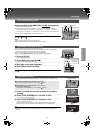
Make basic settings for VHS. These settings are retained in memory until they are changed, even if the unit is turned off.
≥Select the unit viewing channel (or the AV input) on the TV.
≥Turn on the unit.
≥Switch [VHS/TV/DVD] to “VHS”.
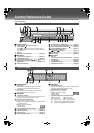
[1] Press [MENU].
[2] Press [34] to select the menu.
[3] Press [ENTER].
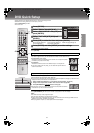
The clock operates for at least 3 years on its backup system in the event of a power failure.
After 3 years, clock back up can only be guaranteed for maximum of 1 hour.
................................................................................................................................................................................................................
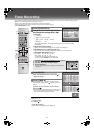
[1] Set each item with [34 1].
Press [2] to return to the previous item.
At the set time (H:M) point:
≥When it is kept pressed, the indication changes in 30 minute
steps.
≥There is no need to press [1].
................................................................................................................................................................................................................
[2] Press [MENU] to start the clock and
exit the setting screen.
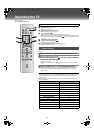
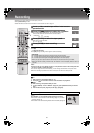
VHS/DVD/TV
VHS/DVD
QUICK REPLAY DUBBING
REC
CH
VOLUME
TV
TV
VHS DVD
123
789
0
4
5
6
SLOW/SEARCH
NAVI
TOP MENU
MENU
RETURN
PROG/CHECK
PROG PLAY
DISPLAY
JET REW
TIMER
ENTER
PLAY
LIST
INDEX/SKIP
OUTPUT
TRACKING/V-LOCK
AV
DIRECT
NAVIGATOR
VHS/DVD
-/-
-
ENTER
MENU
VHS/
TV/
DVD
VHS/DVD
OUTPUT
Common procedures
CLOCK SET
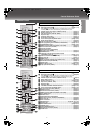
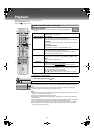
Time Reset Function
If the clock is less than 2 minutes early or late, it can easily be reset to the proper time.
Example: Resetting the clock to 12:00.00
1)
Display the “CLOCK SET” screen
.
2) When the current clock display on the unit is between 11:58.00 and 12:01.59, press [MENU]
as soon as you hear the 12:00.00 time tone. This resets the time to 12:00.00.
CLOCK SET
TUNER PRESET
SYSTEM
OPTION
SELECT
END
: , ENTER
:MENU
VHS MENU
Y M D H:M
2003 1 1 0:00
CLOCK SET
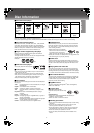
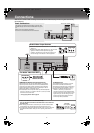
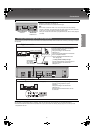
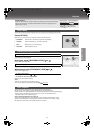
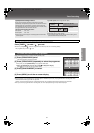
ªTo switch to the desired video
You can set the unit so that the VHS/DVD output is automatically
switched to the device which starts playback.
1) In the OPTION menu,
select “OUT [VHS/DVD]” with [34].
2) Press [2 1] to change the setting.
3) Press [MENU] twice to make the on-
screen display disappear.
VHS: The output is only for VHS, even if you press
[VHS/DVD OUTPUT],
the DVD video is not shown.
MANUAL: Press [VHS/DVD OUTPUT] to switch to the desired
video source. They are not switched automatically.
AUTO (Initial setting):
VHS and DVD are automatically switched depending on
the manipulation or the unit operation. You may also
switch them with [VHS/DVD OUTPUT].
Note:
≥You can switch to the desired video with the above operation only
when the video from this unit is viewed through the VHS/DVD OUT
terminal.
≥Depending on the operation, the output may not be switched
automatically even if “AUTO” is selected. In this case, press [VHS/
DVD OUTPUT] to switch it manually.
≥When setting timer recording, the output is automatically switched
to DVD even if “MANUAL” is selected.
OPTION 1/2
TAPE SELECT [AUTO]
NTSC INPUT SELECT [AUTO]
NTSC PB SELECT [onPALTV]
JET NAVIGATOR [OFF]
DELETE NAVIDATA [NO]
OSD REC [OFF]
OSD [AUTO]
OUT[VHS/DVD] [AUTO]
END :MENU
SELECT:
VP31GL.book 12 ページ 2 0 0 3年7月3 0日 水曜日 午後8時2 2分