


13
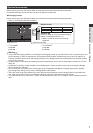
Auto Setup
Quick Start Guide
Auto Setup
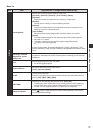
Search and store TV channels automatically.
● These steps are not necessary if the setup has been completed by your local dealer.
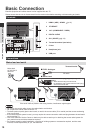
● Please complete connections (p. 10) and settings (if necessary) of the connected equipment before starting Auto
Setup. For details of settings for the connected equipment, read the appropriate manual.
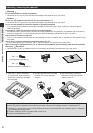
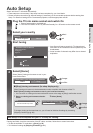
1
Plug the TV into mains socket and switch On
● Takes a few seconds to be displayed.
● If the red LED shows on the TV, press the Standby On / Off switch on the remote control.
2
Country
United Kingdom Ireland
Select your country
OK
select
set
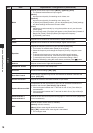
3
Start tuning
Automatic Channel Search
Searching channels...
Analogue : 1
Digital : 0
EXIT
RETURN
Scan 2%
● Auto Setup will start to search for TV channels and
store them in the numbered order as specied by the
broadcasters.
● Actual number of channels may differ due to channel
duplication.
4
Please select your viewing environment.
Home Shop
OK
change
conrm
Select [Home]
Select [Home] viewing environment to use in your
home environment.
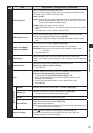
[Shop] viewing environment (for shop display only)
[Shop] viewing environment is the demonstration mode to explain main features of this TV.
Select [Home] viewing environment to use in your home environment.
● You can return to viewing environment selection screen at the stage of [Shop] conrmation screen.
1 Return to viewing environment selection
screen
2 Select [Home]
Shop
You have selected shop mode
BACK/
RETURN
Please select your viewing environment.
Home Shop
OK
change
conrm
To change viewing environment later on, you will need to initialise all settings by accessing
[Shipping Condition]. (p. 21)
Auto Setup is now complete and your TV is ready for viewing.
If tuning has failed, check the connection of the RF cable, and then, follow the on screen instructions.
● To add the available TV mode later [Scan] (p. 20)
● To initialise all settings [Shipping Condition] (p. 21)