


7 (E)
CONTENTS
ON
OFF
POWER
DV
DVCPRO
DVCPRO 50
METER
L
R
FULL/FINE
MONITOR SELECT
HEADPHONES
MONITOR MIX
INPUT SELECT
PREVIEW/PREVIEW
AUTO EDIT
PREROLL
VIDEO
REC LEVEL
CH1
PB LEVEL
AUDIO
CH2 CH3 CH4
TC
PRESET
MENU SET DIAG
SUPER REC INH
INT TCG
MODE
CONTROL
ON
OFF
UNITY
VAR
COUNTER
RESET
A IN
TRIM
SET
OUTIN
A OUT
CH1 CH4CH2
INSERT
CH3
ASSEM
VIDEO CUE TC
STAND BY
EDIT
REW STOP
PLAY REC
PLAYER
RECORDER
FF
JOG SHTL SLOW
TAPE
EE
ON
REGEN
PRESET
EXIT
OFF
REMOTE
LOCAL
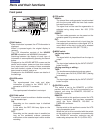
6<; 7
8: 9
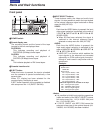
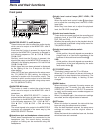
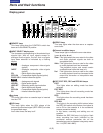
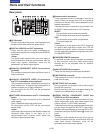
Front panel
6PLAY button
Press this button to start playback.
When this button is pressed together with the REC
button, recording starts.
On the AJ-SD955, when this button is pressed
together with the EDIT button during playback, manual
editing starts. However, manual editing will not be
initiated if the servo is not locked. When only the
PLAY button is pressed during manual editing, editing
is exited, and the playback mode is established.
When the TRIM+ (or TRIM–) button H is pressed
while this button is held down, playback speed will be
increased (or decreased) by the frame mode unit
selected for the setup menu No. 108 (CAP. LOCK)
setting each time one of the TRIM buttons is pressed.
The servo lamp turns off while the speed is being
increased or decreased.
7REC button
When this button is pressed together with the PLAY
button, recording starts.
When it is pressed during playback, a search, fast
forwarding or rewinding, the E-E mode pictures and
audio signals can be monitored while it is held down.
When it is pressed in the stop mode, the E-E mode
pictures and audio signals can be monitored. When
the STOP button is pressed, the original pictures and
sound are restored.
8STOP button
When this button is pressed, the tape stops travelling,
and if the MODE switch Z is set to TAPE, still pictures
can be monitored. Even in the stop mode, the drum
continues to rotate, and the tape remains tightly
wound around the drum.
When the VTR is left in the stop mode beyond a
specific period of time (which can be selected using
setup menu No. 400 to 403), it is automatically set to
the standby OFF mode or STEP FWD mode in order
to protect the tape. The VTR is set to the stop mode
immediately after the cassette has been inserted.
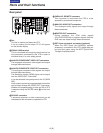
Parts and their functions
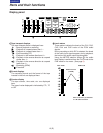
9FF button
When this button is pressed, the tape is fast
forwarded.
The fast forwarding speed can be selected using
setup menu No.102 (FF. REW MAX).
:REW button
When this button is pressed, the tape is rewound.
The rewinding speed can be selected using setup
menu No.102 (FF. REW MAX).
;EDIT button
This button is pressed together with the PLAY button
during playback to initiate manual editing.
When it is pressed during playback, a search, fast
forwarding or rewinding, the input signals in the mode
selected by the ASSEM button or INSERT button can
be monitored in the E-E mode while the button is held
down.
When the button is pressed in the stop mode, the
input signals in the mode selected by the ASSEM
button or INSERT button can be monitored in the E-E
mode.
When the STOP button is pressed, the original
pictures and sound are restored.
<STAND BY button
In the standby ON mode, this button’s lamp lights to
indicate that the same tape tension is applied as in the
regular stop mode and that the head drum is rotating.
In the standby OFF mode, the half loading mode is
established by this button.
When the button is pressed in the stop mode, the
standby OFF mode is established. At this time, its
lamp goes off.
When the VTR is left in the stop mode beyond a
specific period of time, it is automatically set to the
standby OFF mode in order to protect the tape.
When this button or the STOP button is pressed in the
standby OFF mode, the VTR is set to the standby ON
mode.
When a button other than the STOP button is pressed,
the VTR is set to the mode that corresponds to the
button pressed. The time taken by the VTR to transfer
to the standby OFF mode can be selected using setup
menu No. 400 (STILL TIMER).
SD955
SD955