


30
6. Select either "1DISK" or "ALL" by pressing the A or B
button, then press the SET button.
1DISK: Enables formatting only a specified Hard Disk.
ALL: Enables formatting all Hard Disks.
If the "1DISK" is selected in the menu, move the cursor
to the Hard Disk number to be formatted by pressing
the A, B, D or C button, then press the SET button.
The instructions appear in the lower-left corner of the
menu, as shown below.
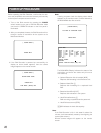
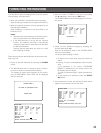
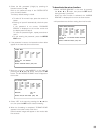
7. Select "YES" in the menu by pressing the A or B but-
ton, then press the SET button to start formatting.
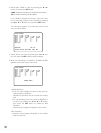
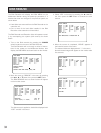
8. When the formatting is completed, "FORMAT DONE!"
appears in the lower center of the menu.
<1DISK Selection>
• Then the menu display will return to step 6 for for-
matting another Hard Disk.
Repeat the procedure 6 to 8 to format the another
disk.
• To quit formatting, move the cursor to RESTART in
the menu by pressing the A, B, D or C button,
then press the SET button to restart the Disk
Recorder.
Normal camera images will appear on the monitor.
<ALL Selection>
• Normal camera images will appear on the monitor
after five seconds.
1DISK FORMAT
MAIN 1:¢¢GB 2:¢¢GB
EXT5 1:
¢¢GB 2:¢¢GB 3:¢¢GB 4:¢¢GB
EXT4 1:ADD 2:ADD 3:ADD 4:ADD
EXT3 1:- 2:- 3:- 4:-
EXT2 1:- 2:- 3:- 4:-
EXT1 1:- 2:- 3:- 4:-
EXT0 1:- 2:- 3:- 4:-
EXT DVD:-
EXECUTE? YES NO
SELECT YES/NO AND PRESS [SET] KEY
1DISK FORMAT
MAIN 1:¢¢GB 2:¢¢GB
EXT5 1:¢¢GB 2:¢¢GB 3:¢¢GB 4:¢¢GB
EXT4 1:ADD 2:ADD 3:ADD 4:ADD
EXT3 1:- 2:- 3:- 4:-
EXT2 1:- 2:- 3:- 4:-
EXT1 1:- 2:- 3:- 4:-
EXT0 1:- 2:- 3:- 4:-
EXT DVD:-
FORMAT DONE!