


C293M-B (1/09) 3
Installation
The SWM can be mounted directly onto a wall, onto a single gang electrical box, or onto a pole using an
adapter. Refer to the SWM-PA Series pole adapter manual (C294M) for pole mounting installation
instructions.
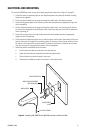
WALL MOUNTING
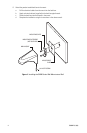
To install the SWM Series wall mount directly onto a wall (refer to Figure 1 on page 4):
1. Determine the location where the mount is to be installed.
2. Use the adjustment plate as a template to drill holes into the mounting surface. If the adjustment
plate is not required for shimming, it can be discarded after the mounting holes are drilled.
3. Pull the electrical cables from the cable hole in the mounting surface through the cable holes in the
adjustment plate (if required), and then through the mounting cleat. Position the cleat so the
elongated mounting fastener hole is below the cable entry hole and the embossed arrow is pointing
up.
4. Fasten the adjustment plate (if used) and mounting cleat securely to the mounting surface with two
fasteners of appropriate length and size (not supplied). If necessary, before tightening the two
fasteners, insert shims between the adjustment plate and the mounting surface to create a
perpendicular surface on which to attach the wall mount. The lower hole in the mounting cleat is
elongated, which allows for vertical alignment adjustment.
5. Pull the electrical cables through the mount, hook the mount onto the top of the mounting cleat, and
position the mount flush against the mounting surface. If necessary, loosen the set screw to ensure
the mount is flush against the mounting surface. Tighten the set screw in the bottom of the mount
only until the mount is snug against the surface. Do not overtighten.