


10 Pelco Manual C454M-C (1/98)
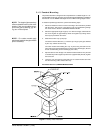
3.1.2 Hard Ceiling Mounting
For installing the back box in a hard ceiling, an optional backup plate is provided for
applications where additional reinforcement to the ceiling structure is needed.
To mount the back box directly into a hard ceiling, perform the following steps.
1. Determine the location of the back box. Ideally the back box cutout should be
adjacent to any ceiling structure.
2. Cut the opening in the ceiling (16-13/16" in diameter).
3. Insert the back box into the opening. Mark spots to drill holes through the side
of the back box at the locations where fasteners need to be located. Remove
the back box and drill the holes.
4. Using the appropriate fasteners (not supplied) attach the back box to any
adjacent structure through the drilled holes in the box.
Proceed to Section 3.2, WIRING INSTRUCTIONS.
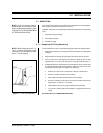
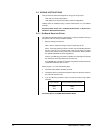
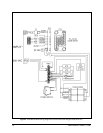
3.1.2.1 Optional Backup Plate Installation
A backup plate assembly is supplied with all back boxes to be installed in hard
ceilings, and is for use in applications where additional reinforcement to the ceiling
structure is needed. To install the backup plate, do steps 1 through 2 in Section
3.1.2 and then proceed as follows. Refer to Figure 2.
1. Insert the back box into the opening in the ceiling and mark the ceiling with the
locations of four of the screw holes in the flange. The holes must be 90° apart.
2. Remove the back box and drill 13/64" screw holes in the ceiling at the marked
points.
3. Insert the two (2) pieces of the backup plate through the large hole and posi-
tion them around the opening. Connect the two halves using the studs pro-
vided.
4. Align the nuts in the plate with the four (4) screw holes in the ceiling.
5. Insert the back box into the ceiling, and align the screw holes in the ceiling
with the holes in the flange of the back box.
6. Attach the back box to the backup plate with four (4) 6-32 screws provided.
7. Use appropriate fasteners (not supplied) to attach the back box to any adja-
cent structure through the holes drilled in the side of the back box.
Proceed to Section 3.2, WIRING INSTRUCTIONS.