


C617M-A 8/04 11
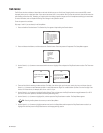
11. Use the Search (<</>>) buttons to highlight each field in the menu.
Recording Times
The recorder will record continuously between the specified times. Use the number buttons to enter the hour of the starting time and end-
ing time. Enter two digits. Enter the hours in 24-hour format. For example, enter 08 for 8 a.m. and 15 for 3 p.m. For 24-hour recording, enter
a start time of 00 and an ending time of 24. For no recording, enter a start time of 24 and an end time of 00.
Event Recording Times
Event recording means the recorder will only record if there are alarms during the specified time period. Use the number buttons to enter
the hour of the starting time and ending time. Enter two digits. Enter the hours in 24-hour format. For example, enter 08 for 8 a.m. and 15
for 3 p.m. For 24-hour recording, enter a start time of 00 and an ending time of 24. For no recording, enter a start time of 24 and an end time
of 00.
NOTE:
Recording and event recording times should be set for different time periods. For example, you may want to record contin-
uously in the daytime when there is a lot of activity, but record only alarms at night.
Event Recording Duration
This is the time the recorder will continue recording after the alarm goes away. The time can be set from 0 to 200 seconds.
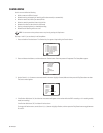
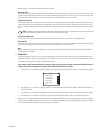
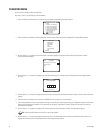
Recording Bar
At the bottom of the screen is a bar that shows when recording will occur. Red is for continuous recording, blue is for event recording, and
white is for no recording. If you overlap the continuous and event recording times, the bar will be red.
Quit
When you finish entering the times, use the Search (<</>>) buttons to highlight Quit, and then press the Play/Pause button to select. The
Camera Number menu appears.
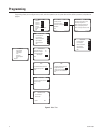
12.
RESOLUTION
In this step the camera’s resolution is set. You can set each camera’s resolution individually, allowing you to use different resolutions for
the different cameras. Or you can set the resolution for all cameras at one time; in this case, the resolution will be the same for all cameras.
To set each camera’s resolution individually, follow the steps below.
If you want to use the same resolution for all cameras, skip this step and proceed to step 13 to finish the individual setup of
cameras. Then set the resolution for all cameras in the All Resolution menu (next section).
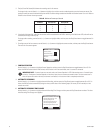
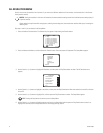
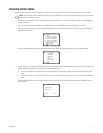
a. Use the Search (<</>>) buttons to highlight Resolution, and then press the Play/Pause button to select. The Resolution menu appears.
b. Use the Search (<</>>) buttons to highlight a resolution, and then press the Play/Pause button. When one resolution is turned On, all
others are set to Off.
c. Use the Search (<</>>) buttons to highlight Quit, and then press the Play/Pause button to select. The Camera Number menu appears.
d. Use the Search (<</>>) buttons to highlight Quit, and then press the Play/Pause button to select. The Camera menu appears.
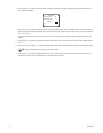
13. Repeat steps 7-12 to configure other cameras. When you finish configuring all cameras, press the Stop button as many times as necessary
to return to the Setup Menu. Highlight another menu item in the Setup Menu and then press the Play/Pause button to select it, or highlight
Exit and then press the Play/Pause button to end the programming session.
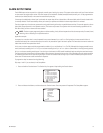
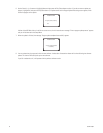
RESOLUTION
Lowest resolution:
Off
Low resolution:
Off
On
High resolution:
Off
Highest resolution:
Off
Quit
Standard resolution: