


88
RQT9428
■ Auto-Tuning
You can restart auto channel setting if set up (➡ 18) fails for some
reason.
1 Press [
e
,
r
] to select “Auto-Tuning” and press [OK].
When the confi rmation screen appears
2 Press [
w
,
q
] to select “Yes” and press [OK].
You can also use the following method to restart Auto-Tuning. When
the unit is on and stopped
Press and hold [
2
CH] and [CH
1
] on the main unit until
Region Selection screen appears. (➡ 18)
All the settings except for the ratings level, ratings PIN and clock
settings return to the factory preset. The timer recording
programmes are also cancelled.
■ Download from TV
You can use “Download from TV” when you connect the unit to a
VIERA Link (HDAVI Control 3 or later) compatible TV with an HDMI
cable.
1 Press [
e
,
r
] to select “Download from TV” and press [OK].
When the confi rmation screen appears
2 Press [
w
,
q
] to select “Yes” and press [OK].
Tuning will start automatically.
■ DVB Manual Tuning
You can set channels manually when the DVB Auto-Tuning could
not complete successfully.
1 Press [
e
,
r
] to select “DVB Manual Tuning” and press [OK].
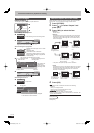
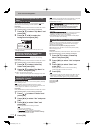
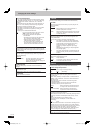
DVB Manual Tuning
Physical Channel
MHz
No. Channel NameNo. Channel Name
DVB: 0
Type New
01 0
01 0
[CH6]
177.50
Signal Quality
Signal Strength
RETURN
Select offset
Start tuning
Select frequency
2 Press [
e
,
r
] to select the channel you want to set.
3 Press [
w
,
q
] to adjust the frequency.
The frequency rises and falls in steps of 0.125 MHz.
Adjust the frequency by checking the signal strength and signal
quality displays.
[Refer to “DVB Signal Condition” (➡ below) for signal quality and
signal strength.]
4 Press [OK] to start scan.
The set channel is displayed in the table.
5 Press [EXIT] and press [
12
CH] to check that applicable
channels have been selected.
■ Add New DVB Channels
You can search for newly added terrestrial digital channels to
receive.
1 Press [
e
,
r
] to select “Add New DVB Channels” and press [OK].
The unit starts searching for newly available terrestrial digital
channels. This takes about 3 minutes.
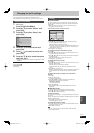
Add New DVB Channels
This will take about 3 minutes.
RETURN
Scan
966
DVB: 0
CH Channel Name
Searching
Type Quality
A message is displayed when the search is fi nished.
“No new channels found” is displayed when no new services can
be found.
2 Press [OK] to save the newly found channels.
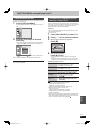
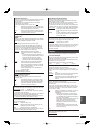
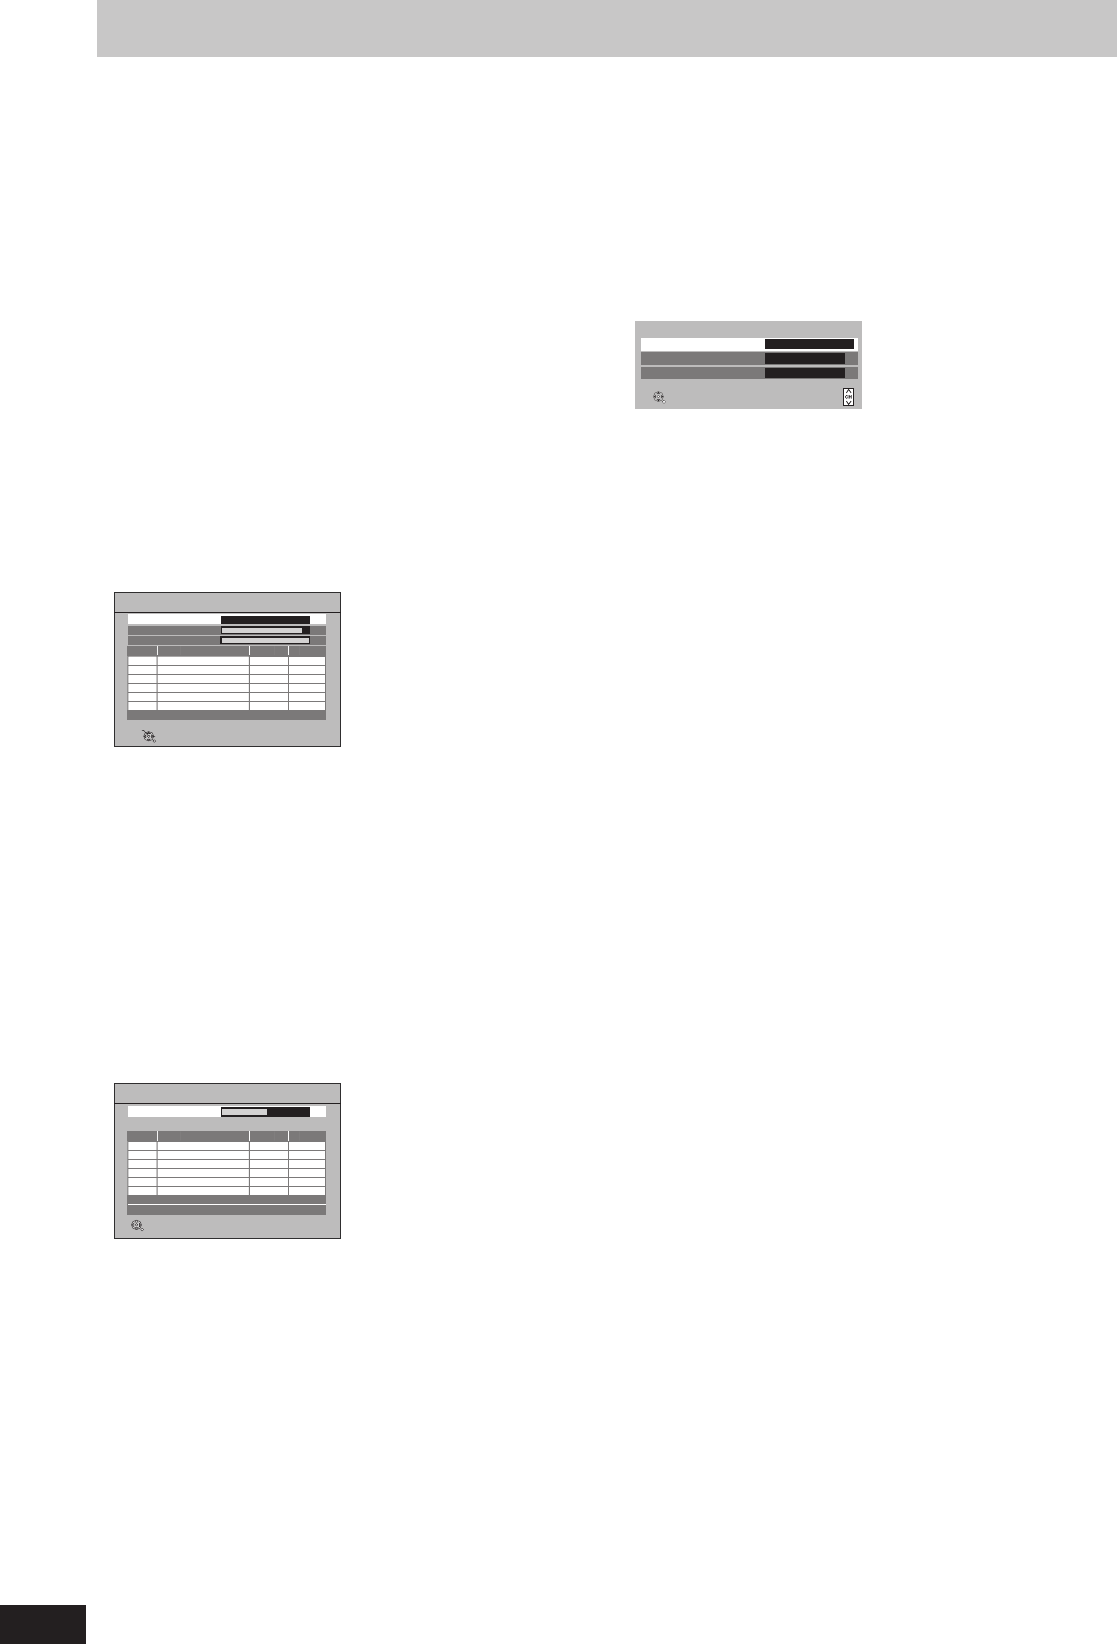
■ DVB Signal Condition
You can check the quality and strength of digital broadcast signals.
Realign the aerial if you are receiving a poor signal.
When “DVB Signal Condition” is displayed in grey and cannot be
selected:
1 Press [EXIT] to exit the screen.
2 Press [INPUT SELECT] to select “TV”.
3 Display the Setup menu again (➡ 87).
Press [
e
,
r
] to select “DVB Signal Condition” and press [OK].
The quality and strength of the signal are shown.
Press [
12
CH] to select the channel.
Signal Quality
Signal Strength
Channel Name
No service
DVB Signal Condition
RETURN
Chan.Up
Chan.Down
0 10
0 10
Signal Quality
Below 2 (display red):
The signal quality is so poor that there may be interference in the
pictures and sound.
2–5 (display orange):
The signal quality is basically adequate, but brief interference in the
pictures and sound is possible in isolated case.
Over 5 (display green):
Optimum picture and sound quality.
Signal Strength
The display for signal strength is grey. “0” means signal strength 0%,
“10” means signal strength 100%.
If the signal is too strong, the display will change from grey to red.
Reduce the signal amplifi cation at your aerial.
When the signal is weak:
– adjust the position and direction of the aerial.
– adjust the aerial reception with “DVB Manual Tuning” in the
Setup menu (➡ left).
– check that the current digital broadcast channel is correctly
broadcasting.
■ New Channel Message
When a new DVB channel is added, this unit will be informed
automatically. Then the confi rmation message appears. If you press
[OK], Auto-Tuning starts.
1 Press [
e
,
r
] to select “New Channel Message”.
2 Press [
w
,
q
] to select “Automatic” or “Off”.
[Automatic]
[Off] The channel messages are not shown.
(All factory default settings are indicated with underlined text.)
Changing the unit’s settings
DMR-BW850GL_en.indb 88DMR-BW850GL_en.indb 88 2009/04/08 午前 10:01:262009/04/08 午前 10:01:26