


Hookups (cont’d) 11
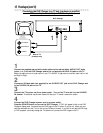
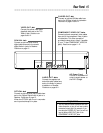
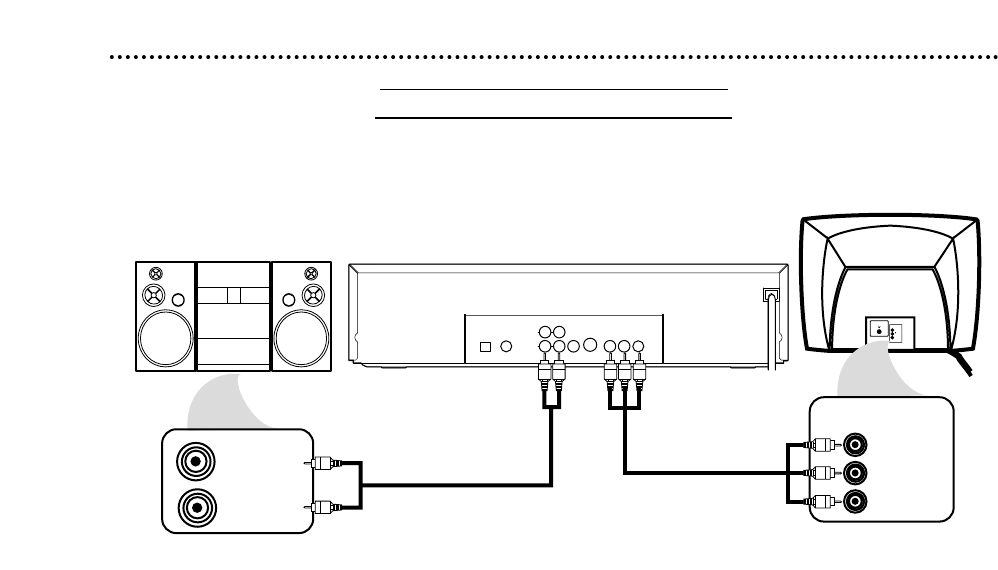
Connecting to a TV and a Stereo
TV has Component Video In Jacks
DIGITAL AUDIO OUT
OPTICAL
COAXIAL
VIDEO
OUT
RL
AUDIO OUT
1
2
S–VIDEO
OUT
Y
Pb/Cb
Pr/Cr
COMPONENT VIDEO OUT
VIDEO
L/MONO
AUDIO
R
in
1
AUDIO (RIGHT) IN
AUDIO (LEFT) IN
Y
Cb/B-Y
Cr/R-Y
COMPONENT
VIDEO IN
PCM-DOLBY DIGITAL-DTS
1
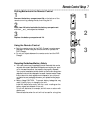
Connect the supplied red and white audio cables to the red and white AUDIO OUT jacks (either
1 or 2) on the DVD Changer and to the red and white AUDIO IN jacks on the Stereo. Match the
cable colors to the jack colors. If your Stereo’s AUDIO IN jacks are not colored, match Left to Left and
Right to Right.
2
Connect optional component video cables to the COMPONENT VIDEO OUT jacks on the DVD
Changer and to the COMPONENT VIDEO IN jacks on the TV. Refer to your TV manual. The TV’s
jacks may be labeled differently than the picture above.
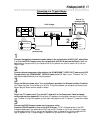
3
Plug in the Stereo’s power cord. Turn on the Stereo and select the Stereo’s Auxiliary IN station.
Your Stereo may refer to this as Source or AUX IN. During Disc playback, you will adjust the volume at your
Stereo. See your Stereo owner’s manual for details.
4
Plug in the TV’s power cord. Turn on the TV and set it to the Component Video In channel,
which might be near channel 00. During Audio CD playback, you may check the status of Audio CDs on
your TV screen. During DVD playback, you will watch the program on the TV. See your TV manual for details.
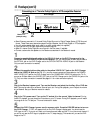
5
Connect the DVD Changer’s power cord to a power outlet.
Press the POWER button to turn on the DVD Changer. “P-ON” will appear briefly on the DVD
Changer’s display panel. You should see the DVD logo on the TV screen. If you do not, check your connec-
tions and make sure the TV is on the correct Component Video In channel. If you still do not see the DVD
logo or playback on the TV, keep changing TV channels until you see the DVD image on the TV.
2
1
Back of TV
(example only)
Stereo
(example only)
DVD Changer