


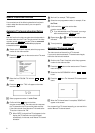

Monitor function
You can switch backwards and forwards between TV picture
and video recorder picture with the MONITOR button. But this
only works when you use a scart cable to connect the video
recorder to your TV set and if your TV set responds to this
switch-over.
Sorting and clearing TV channels manually
You can assign any programme number to a TV channel that
you have stored and you can also delete unwanted TV
channels.
a Switch on the TV set. If required, select the programme
number for the video recorder.
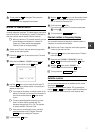
b Press the MENU button on the remote control. The main
menu will appear.
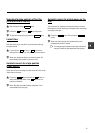
c Select the line ’CHANNEL ALLOCATION’ with P r or
P q button and confirm with the OK button.
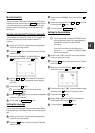
P01 CH26
------------------------
-/+ CL OK
d With the P r or Pq button, select the TV channel to
which you want to give a programme number (starting
with ’P01’).
e Confirm with the OK button.
DIf you want to delete a TV channel, press the
CLEAR (CL), y button.
f Repeat steps dto euntil you have given a programme
number to all TV channels.
g To end, press the TV/STANDBYm button.
Setting the language
You can select the language for the on-screen display (OSD).
The small display on the video recorder will only show english
text.
a Switch on the TV set. If required, select the programme
number for the video recorder.
b Press the MENU button on the remote control. The main
menu will appear.
c Select the line ’LANGUAGE’ and confirm with the OK
button.
d Select your language with the P r or P q button and
confirm with the OK button.
e To end, press the TV/STANDBY m button.
Setting the time and date
DIf a TV channel which transmits TXT/PDC is stored
under programme number ’P01’, time and date will
automatically be taken from the TXT/PDC
information.
If the time in the video recorder display is not
correct or if ’--:--’ appears in the display, please
set the clock manually.
a Switch on the TV set. If required, select the programme
number for the video recorder.
b Press the MENU button on the remote control. The main
menu will appear.
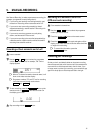
c Select the line ’CLOCK’ with the P r or P q button
and confirm with the OK button.
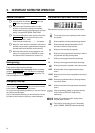
TIME 20:00
YEAR 1999
MONTH 01
DATE 01
------------------------
-/+ 0-9 OK
d Check the time in line ’TIME’. If required, please change
the time with the 0-9 buttons on the remote control.
e Confirm with the OK button.
f Check ’YEAR’, ’MONTH’ and ’DATE’ in the same way.
Confirm each entry with the OK button.
g To end, press the TV/STANDBYm button.
9