


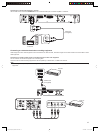

16
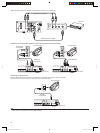
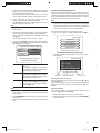
3. The search for channels that can be received begins from the smallest
frequency or channel No. of the channel displayed at “Entry/Search”
and increases upwards to larger values.
When the desired channel is found, changing of the number value
comes to a stop. Press 2 to advance to the “Programme #” item.
4. At the “Programme #” item, specify which channel on the TV the
reception channel specifi ed in step 3 is to be viewed.
Using 4 or 6 in “Programme # “, select the programme number you
want to use for the TV channel, e.g. “01”.
NOTE:
- Programmes cannot be reserved correctly if you do not make the
correct settings.
5. Enter the name of the channel to display on the TV screen. Select the
“Channel Name” item using 8 or 2, and press the k button.
Decide on the position to enter the text using 4 or 6, and enter text
using 8 or 2.
When you have entered the name, press the k button.
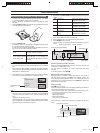
6. When you press NEXT f with the “Channel Name” item selected,
the following screen is displayed. Select the item to be changed using
8 or 2, and change the settings.
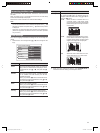
Manual Channel Search (Page 2)
Press PREVIOUS for Page 1 of Options.
Off
Off
OK
Decoder
NICAM
Fine Tuning
Press SYSTEM to Save and Exit.
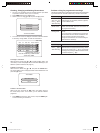
Decoder Sets whether or not to use a decoder to receive
this channel.
When you press the k button, the selection
item is displayed. Select the desired item using
8 or 2, and press the k button.
NICAM Sets whether or not to select NICAM.
When you press the k button, the selection
item is displayed. Select the desired item using
8 or 2, and press the k button.
Fine Tuning
After pressing the k button, fi ne-tune the
reception state using 4 or 6 while viewing the
TV screen. When you have fi nished adjusting,
press the k button.
NOTE:
- When you press PREV d, the screen returns to “Manual Channel
Search (Page 1)”. In this screen, you can change the details you are
currently setting.
7. Press SYSTEM MENU to save the settings, and return to the Setup
Options screen.
8. Repeat steps 1 to 7 of this procedure for all of the channels you want
to set.
Arranging and Deleting Channels
After you have performed the automatic channel search, you may not
agree with the sequence in which the individual TV channels have been
allocated to the programme positions (programme numbers). You can use
this function to rearrange the TV channels already stored or to delete TV
channels you do not want or those with poor reception.
NOTE:
- The teletext clock resets automatically.
If you store a TV channel which transmits TXT/PDC on programme
number “P01”, the date and time will automatically be transmitted
and constantly updated. As a result, the changes from summer time
to winter time and back again will be made automatically.
Perform the following operation in the Setup Option screen.
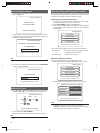
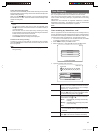
1. Select “Sort TV Channels “ using 8 or 2 and press the k but-
ton.
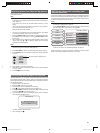
Setup Options
Press OK to Select or "Left Arrow" to Exit.
Auto Install
Manual Search
Sort TV Channels
Date and Time
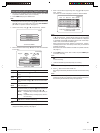
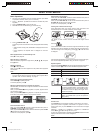
2. The following screen will be displayed. In this screen, arrange or
delete channels.
P:04
P:05
P:08
P:07
P:06
S.P: 001 BBB
Sort Channel List
Press OK to Select Channel to Move
Press CLEAR to Delete a Channel
Press SYSTEM to Save and Exit.
Rearranging the order of channels
First of all, select the channel you want to re-arrange using 8 or 2, and
press the k button.
Next, move to the position where you want to move the channel to using
8 or 2, and press the k button. This re-arranges the order of the
channel.
Deleting TV channels
You can delete channels you do not want to receive. Select the desired
channel using 8 or 2, and press CLEAR.
3. Repeat step 2 for all of the channels you want to change.
4. When you have fi nished changing the settings, press SYSTEM MENU
to save the settings.
Program# Reception channel Channel name
DVR_S120_INS_MANUAL.indd 16DVR_S120_INS_MANUAL.indd 16 5/19/2005 11:54:23 AM5/19/2005 11:54:23 AM