


32
Audio Output Settings
1. Turn the TV on and select input from the DVD recorder. (For details
on operation methods, refer to your TV’s manual.)
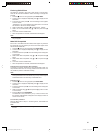
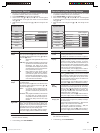
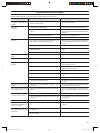
2. Press SYSTEM MENU to display the System Menu.
3. Select “Sound” using 8 or 2, and press 6 once. The setting items
at "Sound Options" on the right of the screen can now be selected
using 8 or 2.
4. Select the item to be changed using 8 or 2, and change the set-
tings.
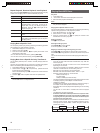
System Menu
Sound Options
Video
Sound
Feature
Language
Recording
Setup
All
Digital Output
Analog Output
Night Mode
Stereo
Setting Item Explanation
Digital
Output
Set output from the digital audio output terminal.
When you press the k button, the selection items
are displayed. Select digital output using 8 or 2, and
press the k button.
Off Select this when digital audio output is not
used.
PCM Only Dolby Digital and MPEG-2 multi-channel
signals are converted to PCM (Pulse Code
Modulation). This setting is for receiv-
ers/amplifi ers without digital multi-channel
sound decoders. DTS is not converted into
PCM. (Sound does not output.)
All Dolby Digital and DTS signals are fed
unaltered to the digital output. MPEG-2
multi-channel signals are converted to
PCM (Pulse Code Modulation). This set-
ting is for receivers/amplifi ers with digital
multi-channel sound decoders.
Analog
Output
Set output from the analogue audio output terminal
(L/R AUDIO OUT).
When you press the k button, the selection items
are displayed. Select analogue output using 8 or 2,
and press the k button.
Stereo For devices without DolbySurround or
TruSurround. Use this setting if the DVD
recorder is connected only to a stereo TV
set.
Surround Dolby Digital and MPEG-2 multi-channel
are mixed down to a DOLBY surround-
compatible two-channel output signal. For
devices with Dolby Surround Pro Logic
decoder.
Night Mode Night mode optimises the sound for playback at low
volume. You are therefore less likely to disturb your
neighbours. This only works for Dolby Digital audio on
DVD video discs. This option can be selected if required.
Night Mode works only when analog output.
To use this feature, press the k button to select it.
Each press of k selects or deselects this setting.
NOTE:
- When you press 4 , other items in the System Menu can be selected.
Set other items as necessary.
5. To end setting, press SYSTEM MENU.
Operation and State Display Settings
1. Turn the TV on and select input from the DVD recorder. (For details
on operation methods, refer to your TV’s manual.)
2. Press SYSTEM MENU to display the System Menu.
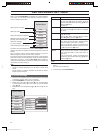
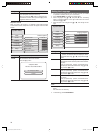
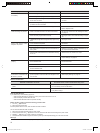
3. Select “Feature” using 8 or 2, and press 6 once. The setting items
at "Feature Options" on the right of the screen can now be selected
using 8 or 2.
4. Select the item to be changed using 8 or 2, and change the set-
tings.
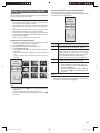
System Menu
Feature Options
Video
Sound
Feature
Language
Recording
Setup
Access Control Press OK
Status Display
Resume
Auto Standby
Clock Display: Off
PBC Enable
Setting Item Explanation
Access
Control
Parental Level Control
Accessing of DVD discs can be controlled.
For details, see “Parental Level Control” on page 34.
Status
Display
Along with the on-screen menu, the OSD (On Screen
Display) also displays information on the current operat-
ing status (counter, playback, recording, TV channel,
etc.) on the TV screen. By default, this would be off, to
see the information about the operating status, check
the “Status Display” box. This appears in every selected
mode for a few seconds and disappears.
To use this feature, press the k button to select it.
Each press of k selects or deselects this setting.
Resume If playback of a pre-recorded DVD video disc is inter-
rupted (rOPEN/CLOSE), when the disc is reloaded
(disc is started), playback starts at the precise location
where it stopped. This applies not only to the current
disc but to the last 20 discs played. This feature can
be switched off if not required.
To use this feature, press the k button to select it.
Each press of k selects or deselects this setting.
Auto
Standby
To set whether or not to set the standby mode when
no operations have been performed for 10 minutes.
When no DVD recorder operation has occured for
10 minutes after e(STOP) button is pressed , this
unit will go to standby mode. This function works CD
media(Audio, MP3 or JPEG) only.
To use this feature, press the k button to select it.
Each press of k selects or deselects this setting.
Clock
Display: Off
To save power, you can switch off the clock display on
the DVD recorder. Programmed (TIMER) recordings
will still take place.
If the recorder is switched off (button o), the clock
display is also switched off when checked.
If the recorder is switched off (button o), the
clock display is visible when unchecked.
To use this feature, press the k button to select it.
Each press of k selects or deselects this setting.
NOTE:
- When you press 4, other items in the System Menu can be selected.
Set other items as necessary.
5. To end setting, press SYSTEM MENU.
DVR_S120_INS_MANUAL.indd 32DVR_S120_INS_MANUAL.indd 32 5/19/2005 11:54:27 AM5/19/2005 11:54:27 AM