Installing and Connecting the Projection TV
15
Installing and Connecting the Projection TV
Model name1[KP-46WT500] Model name2[KP-51WS500] Model name3[KP-57WS500] Model name4[KP-65WS500]
[4-088-847-12]
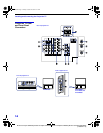
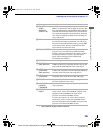
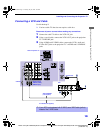
Connection Description
1 DVI-HDTV
VIDEO
AUDIO R/L
(VIDEO 7 IN)
Can accommodate a copy-protected digital connection
(HDCP
*
) to other devices (such as digital set-top boxes) that
have compatible interfaces. The DVI-HDTV input terminal is
compliant with the EIA-861 standard, and is not intended for
use with personal computers. See the instruction manual that
came with your equipment for details about connecting and
using it with the TV.
* High-bandwidth Digital Content Protection.
2 AUX Allows you to view local and cable channels if your cable
provider does not feature local channels. You can switch
between local and cable channels easily by pressing ANT
on the remote control. Devices connected to the AUX
input cannot be viewed in Twin View.
3 TO CONVERTER This is a VHF/UHF OUT jack that lets you set up your
projection TV to switch between scrambled channels
(through a cable box) and normal cable channels (CATV).
Use this jack instead of a splitter to get better picture
quality when switching between scrambled and
unscrambled cable channels.
4 VHF/UHF Connects to your VHF/UHF antenna or cable.
5 S VIDEO
(Rear and front)
Connects to the S VIDEO OUT jack of your VCR or other S
VIDEO-equipped video component. Provides better picture
quality than the VHF/UHF jacks or the Video IN jack.
6 VIDEO
(L/R)/AUDIO
(Rear and front)
Connects to the audio and video OUT jacks on your VCR
or other video component. A fourth video input (VIDEO 2)
is located on the front panel of the projection TV.
7 Y/PB/PR
(L/R)/AUDIO
Connects to your DVD player’s or Digital Set-top box’s
component video (Y, PB, PR) and audio (L/R) jacks.
8 TV OUT Outputs the signal that the TV is tuned to (regardless of
the picture displayed on the screen).
9 AUDIO OUT
(VAR/FIX)
L (MONO)/R
Connects to the left and right audio inputs of your audio or
video component.
0 CONTROL S
IN/OUT
To control other Sony equipment with the projection TV's
remote control, connect the CONTROL S IN jack of the
equipment to the CONTROL S OUT jack on the
projection TV with the CONTROL S cable.
To control the projection TV with a remote control for
another Sony product, connect the CONTROL S OUT
jack of the equipment to the CONTROL S IN jack on the
projection TV with the CONTROL S cable.
01COV.book Page 15 Tuesday, July 30, 2002 3:46 PM


