


DVR4-5500™ Operating Instructions
15
Part 5: Networking
Why would you put your DVR onto a network? Well, how about being able to monitor your security system from any
Internet capable computer on Earth, or even in low orbit if you travel that far from home? It’s pretty cool, and really
convenient. We’re not going to try and deceive you: this is a somewhat tricky process which does require some
knowledge of computers and networking.
Because of this, we recommend that only people familiar with networking (or those willing to put in the effort to learn)
attempt networking their DVR. Often the best thing to do, if you are completely unfamiliar with networking technology,
is to find someone who does know, and get them to walk you through it. We’ve got some additional networking
tutorials and information available on our website (check out: www.swannsecurity.com
) to help you through the
process.
Tips and Tricks:
Some additional research might help you out. Don’t be put off by the term “research” – all we really
mean is: say you come across a term you’re unfamiliar with (for example, “Ethernet”), just throw this term into your
favourite Internet search engine and – bam! – you’ll have more information about Ethernet than you’ll know what to
do with… and definitely enough to help you through the process.
Foolish Assumptions:
We’re assuming, for the purposes of this walkthrough, that you have an active Internet
connection running through a router (yours might have a fancy name, such as “DSL Modem” or “Residential
Gateway” – basically, the thing that you use to gain access to the Internet). We’re also assuming you have an
Internet capable PC hooked up to the network, running a recent version of Windows (such as XP or Vista). If this is
not the case and you’re unfamiliar with the way your network is set up, we suggest having a chat with the folks who
set up your network – they’ll probably know what can and can’t be done.
Ready? Take a deep breath, and let’s start at the start…
5.1 Connecting the DVR to your Local Network
The way that you’ll connect your DVR to your network depends on what kind of network you’re running at home.
We’re going to cover the three most likely scenarios, and walk you through it step by step. (If you’re going to use
PPPoE, skip this step – but then, if you’re familiar with PPPoE, you probably know that already!)
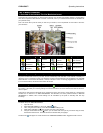
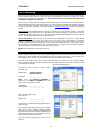
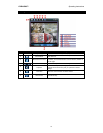
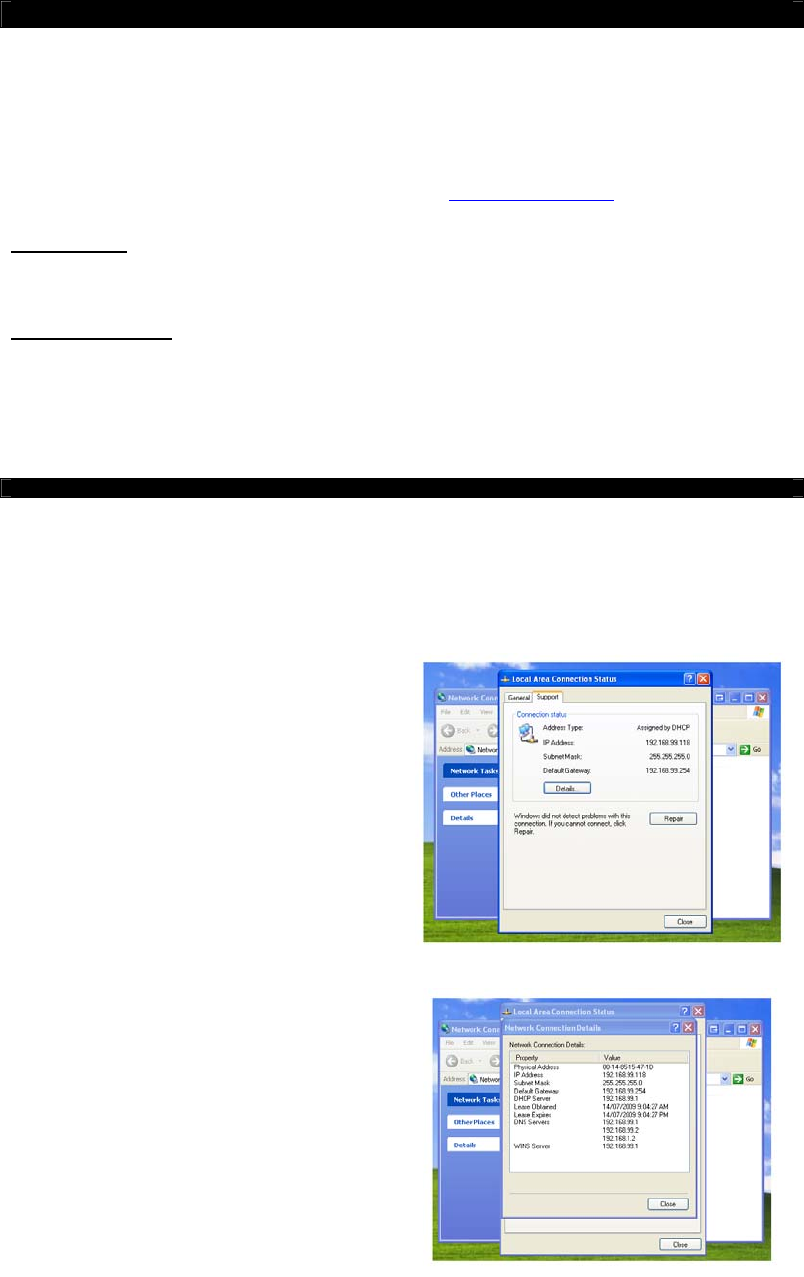
First of all, we’re going to need to find out some information about your network. Open your network properties
window (usually done by right clicking your network icon and choosing Properties). Have a hunt around until you find
your network and IP settings.
They’ll look something like this.
You’ll need to make a note of a couple of things,
specifically your:
Address Type: Assigned by DHCP or
Manually Assigned
IP Address: ____ : ____ : ____ : ____
NOTE: This is your PRIVATE IP ADDRESS, as
distinct from your PUBLIC IP ADDRESS, which we’ll
discover later. You’ll need to know both.
Subnet Mask: ____ : ____ : ____ : ____
Default gateway: ____ : ____ : ____ : ____
EXAMPLE
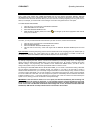
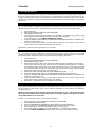
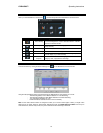
Then, open the Details window.
Here, grab your:
DNS Servers: ____ : ____ : ____ : ____
____ : ____ : ____ : ____
There might be a few DNS servers: just grab the top two
if there are more.
If you’re having trouble with this step, again we suggest
talking to the nearest available computer-tech-person
(most likely the most convenient geek/student/child)
they’ll know how to find this information. Alternatively, the
people who installed your computer system will know all
this information (or at least how to get it).
Once you’ve got this information, we can go on to the
next step.
EXAMPLE