Model T200U-NOy Option Manual Addendum
12 07303C DCN6646
3.2 Electrical and Pneumatic Connections
NOTE
To maintain compliance with EMC standards, it is required that the cable length (at the
rear of the analyzer) be no greater than 3 meters for all I/O connections, which include
Analog In, Analog Out, Status Out, Control In, Ethernet/LAN, USB, RS-232, and RS-485.
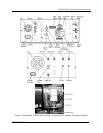
1. Mount the Converter (Figure 1, bottom) on a suitable mast.
2. Route the umbilical cable assembly into the shelter of the Converter.
3. Locate the analyzer and 501Y Bypass Pump Chassis in close proximity,
preferably mounting one over the other in a 19” rack.
4. Connect the T200U-NOy analyzer rear panel electrical connectors per the
T200 operation manual.
5. Connect the pneumatic cable fittings from the analyzer rear panel (Figure 1,
top) to the 501Y rear panel (Figure 1, center) and from the 501Y rear panel
to the Converter (Figure 1, bottom).
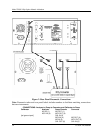
Refer to Figure 2 for an illustration of the pneumatic connections; refer to the
tags on each tube to match up the correct tube with the appropriate rear panel
fitting.
6. Connect the pneumatic cable fitting from the calibrator to the 501Y rear panel
(
Figure 2).
7. Also connect the EXHAUST port of the analyzer rear panel to the external
Pump.
8. Connect the 7-pin power and signal cable from the external Converter’s
umbilical cable assembly to the CONVERTER POWER connector on the
rear of the 501Y.
9. Connect the analyzer and 501Y AC power cords from their AC power
receptacles to the correct line voltage (refer to power specs on the
respective rear panel label).
WARNING!
Lethal voltages are present inside the chassis.
Do not operate with cover off during normal operation
Before operation, check for correct input voltage and frequency.
Do not operate without proper chassis grounding
Do not defeat the ground wire on power plug
Turn off power before disconnecting electrical subassemblies


