


2 of 6
2. OPENING THE TIVO
Unplug the power cord from your electrical outlet and wait five minutes for the
TiVo to discharge. Do not plug the TiVo back in until you are completely
finished. Be very careful of static electricity, which can destroy your TiVo’s
internal parts. You should not perform this upgrade on carpet. You may want to
label the wires that you remove from your TiVo so that you can easily locate
where they belong.
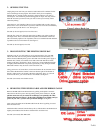
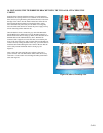
Using the Torx T-10 (smaller of the two) L-key included with your kit, unscrew
the five Torx screws on the back of your TiVo. The five screws are surrounded by
gray from the top of the TiVo’s case. See Figure 2.
Set aside (to be used again): Five TiVo lid screws.
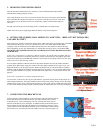
Once the five screws are removed, remove the lid. Place your palms on the top
side edges of the TiVo, toward the back and push toward the back of the TiVo
(this occasionally requires a bit of patience). The cover should slide back and then
up. Remove the cover from the TiVo. See Figure 3.
Set aside (to be used again): TiVo lid.
Figure 2 (above) Back view
Figure 3 (above) Top view
3. DISCONNECTING THE EXISTING DRIVE BAY
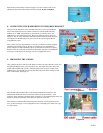
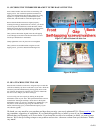
With the cover off, you will be able to see (a) one hard drive, (b) a gray IDE
ribbon cable that runs from the greenish motherboard to the hard drive, (c) a
multi-colored (red/black/yellow) power cable that runs from the power supply to
the hard drive, and (d) two bracket screws that connect the hard drive and its
bracket to the TiVo. See Figure 4. Note: Your TiVo’s green motherboard might
be slightly different than the one pictured; specifically, it may be larger and the
IDE cable connector may be closer to the front of the unit.
Using your Torx T-10 screwdriver, unscrew and remove the two bracket screws
that connect the hard drive bracket to the lower bracket (part of the bottom of
the unit). These screws are located at the front-right of the TiVo. As you look
down into the TiVo, you will see the two screw heads. See Figure 4.
Set aside (not reused): Two bracket screws.
Figure 4. Front/top view
4. REMOVING THE POWER CABLE AND IDE RIBBON CABLE
Remove the IDE cable from the hard drive by pulling on the plastic connector.
Then remove the drive power cable by pulling on the plastic connector. As you
pull the connectors out, be careful not to dislodge (even partially) the white
ribbon cable shown in Figure 5. If this cable is dislodged even slightly and you
power on your TiVo, you can cause permanent damage. See Figure 5.
Next, remove the other end of the IDE cable from the TiVo by pulling it toward
the front of the TiVo.
With both cables removed from the factory drive, slide the drive and bracket back
slightly toward the back of the TiVo and then lift it out of the TiVo.
Set aside (not reused): One IDE cable.
Figure 5 Front/top view